10
FLIGHT CONTROLS
Turn Left/Right
Turn Left
Turn Right
Move Right
Move Left
FRONT
BACK
Ascend/Descend
Move Forward/Backward
Move Left/Right
Страница 1: ...ITEM NO 33049 G P S S T R E A M I N G H D C A M E R A 2 4 G H z 4 5 C H R C Q U A D C O P T E R ...
Страница 2: ...NE BATTERY INSTALLING THE DRONE BATTERY RECALIBRATING THE DRONE ROTOR UNLOCK LOCK AUTO TAKE OFF LAND TRANSMITTER LCD INTERFACE AUTOMATIC SHUTDOWN OVERRIDE FUNCTIONS FLIGHT CONTROLS LIVE FEED APP AND CAMERA OPERATION SPECIAL FUNCTIONS SPECIAL FUNCTIONS CONTINUED POST FLIGHT REPLACING THE ROTORS 3 3 4 4 5 5 6 7 6 8 9 SYNCING THE DRONE TO THE TRANSMITTER 8 9 9 10 11 12 13 14 TROUBLESHOOTING 15 FCC WA...
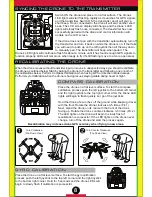
Страница 3: ...d flying area is 25ft x 25ft x 15ft 2 Be sure that the transmitter and drone batteries are fully charged 3 Be sure that the throttle is at its lowest position to avoid premature flight 4 Always turn on the drone first then turn on the transmitter Incorrect operation may result in failure and the possible influencing of other devices in the area 5 Ensure that all plugs and wires are secure and in p...
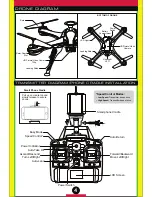
Страница 4: ...OTTOM OF DRONE Rotor Rotor Guard Slot Headlight LED Smartphone Cradle Easy Mode Speed Control Power Indicator Ascend Descend Turn Left Right Auto Land Auto Take Off Power Switch Auto Return Forward Backward Move Left Right LCD Screen Pull up on cradle top and slowly release to secure phone Smart Phone Cradle 1 2 HD Picture Video Camera Power Switch Battery Compartment Landing Skids LED Lights ...
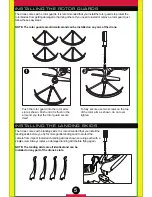
Страница 5: ...with 4 landing skids It is recommended that you install the landing skids before you fly for more gentle landings and to protect the camera from impact Install each landing skid as shown securing each with a single screw Always replace a damaged landing skid before flying again NOTE The landing skids are all identical and can be installed on any part of the drone s slots Push the rotor guard into ...
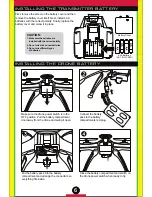
Страница 6: ...partment door away from the drone and swing it open Close the battery compartment and switch on the drone power switch when ready to fly Put the battery pack into the battery compartment and arrange the connectors so everything fits inside CAUTION 1 Make sure the batteries are installed with the correct polarity 2 Do not mix old and new batteries 3 Do not mix different types of batteries INSTALLIN...
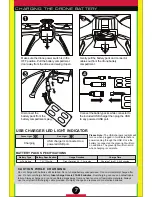
Страница 7: ...GER LED LIGHT INDICATOR Please Note The USB chargers red light will turn on when plugged in to indicate there is power running through the USB Once the battery is connected the green light will turn on and blink The green light will turn solid when charging is complete Make sure the drone power switch is in the OFF position Pull the battery compartment door away from the drone and swing it open Di...
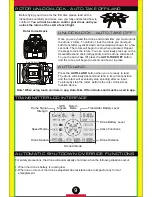
Страница 8: ...drone to the transmitter and following one or both of the calibrations below Perform Compass Calibration when having GPS or direction related issues Perform Gyro Calibration when the drone is having issues staying stable during hover or flight COMPASS CALIBRATION Place the drone on a flat level surface To start the compass calibration process push the left joystick to the bottom left corner and th...
Страница 9: ...scend and hover in place Press the AUTO LAND button when you are ready to land The drone will slowly descend and land in its current position and the rotors will eventually stop spinning after no input To promptly stop the rotors perform the rotor Unlock Lock function above Before flying your drone for the first time please read all the instructions carefully and make sure you fully understand how...
Страница 10: ...10 FLIGHT CONTROLS Turn Left Right Turn Left Turn Right Move Right Move Left FRONT BACK Ascend Descend Move Forward Backward Move Left Right FRONT BACK FRONT BACK ...
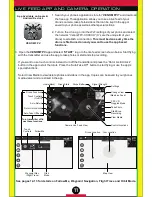
Страница 11: ...tart and stop recording If you want to use touch controls instead turn off the transmitter and press the Rotor Lock Unlock button in the app to start the rotors Press the Auto Take Off button to start flying or use the app s special functions Select View Media to view delete photos and videos in the app Copies can be saved to your phones media viewer and are stored in the app LIVE FEED APP AND CAM...
Страница 12: ... and fly in a circle around a set waypoint in this mode Activate this mode and you will see a menu tab pop up in the app Click the icon and then tap on the map to set a waypoint Hard press the waypoint for a second to edit the hovering altitude and the radius the drone will hover around Delete waypoints by pressing the icon and then tapping on the waypoint Once you have set the waypoint for your d...
Страница 13: ...nom FPV app after the transmitter has been turned off This mode is under the Waypoint Mode Select the icon to draw a path on the touch screen that the drone will follow using GPS telemetry Way points will automatically drop along the path you make Press the Icon to start the flight You can delete single waypoints on the path created by clicking the icon Use the icon to delete all the waypoints on ...
Страница 14: ...t location FRONT BACK A B B A POST FLIGHT After you are done flying the drone make sure the battery pack is disconnected and the transmitter power is turned off If you are not going to use the drone for an extended period of time please remove the AA batteries from the transmitter to prevent them from draining or leaking Use the included screwdriver to unscrew and remove the screw on the rotor Rem...
Страница 15: ... before taking off Transmitter batteries are installed incorrectly Transmitter and or drone is not powered ON Turn both transmitter and drone ON Transmitter batteries are drained Drone s battery pack is drained Drone is locked Rotors are damaged Replace the damaged rotors Rotors are damaged Replace the damaged rotors Drone is not on a flat surface Place the drone on a flat surface before attemptin...
Страница 16: ...terference will not occur in a particular installation If this equipment does cause harmful interference to radio or television reception which can be determined by turning the equipment off and on the user is encouraged to try to correct the interference by one or more of the following measures Reorient or relocate the receiving antenna Increase the separation between the equipment and receiver C...