Assembly
21
MAN1255 (3/19/2018)
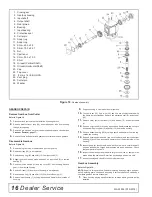
ASSEMBLE CUTTER
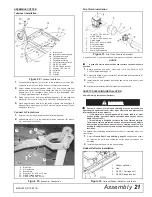
Tailwheel Installation
Figure 29
. Tailwheel Installation
1.
Attach tailwheel bracket (6) to cutter at the tailwheel pivot holes (5B)
using cap screw (13) and flange lock nut (14) previously removed.
2.
Select desired height adjustment holes (10), and secure tailwheel
bracket with cap screws (13) and flange lock nuts (14). Cutting height
adjustment will be necessary when cutter is fully assembled. See
“Cutting Height Adjustment” on page 10.
3.
Raise rear of cutter and insert tailwheel assembly (9) into tailwheel
bracket (6). Secure with o-ring (29), washer (30), and spiral pin (28).
4.
Place diagonal brace bars (4) on the inside of frame rails and attach to
diagonal brace mounting holes (5A). Secure using cap screws (13) and
flange lock nuts (14).
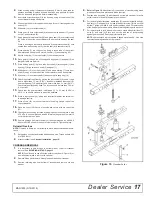
Connect A-Frame Arms
1.
Rotate A-frame arms (9) and break link (8) forward and up.
2.
Attach brace arms (11) to the break link (8) using cap screw (36), sleeve
(13), and flange lock nut (34).
Figure 30
.
Brace Arm Connection
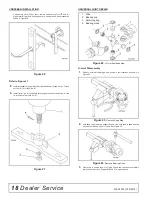
Slip Clutch Installation
Figure 31
.
Slip Clutch Driveline Assembly
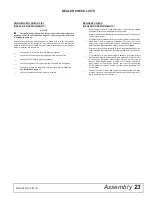
A new slip clutch, or one that has been in storage over the winter, may seize.
NOTICE
■
A grade 8.8 metric bolt must be used to attach clutch driveline to
gearbox.
1.
Before operating slip clutch, make sure it will slip. Refer to SLIP
CLUTCH adjustment, page 13.
2.
Position the shield (3) against gearbox. Install shield and torque bolts (5)
to 16.3 N-m (12 lbs-ft.).
3.
Install driveline onto gearbox input shaft and secure with bolts (1) and
nuts (2).
4.
Lubricate rear driveline half and install front driveline half.
SAFETY SHIELDING INSTALLATION
Chain Shielding Installation (Optional)
Full chain, rubber, or steel band shielding must be installed when
operating in populated areas or other areas where thrown objects could
injure people or damage property.
•
If this machine is not equipped with full chain, rubber, or steel
band shielding, operation must be stopped when anyone comes
within 300 feet (92 m).
•
This shielding is designed to reduce the risk of thrown objects.
The mower deck and protective devices cannot prevent all objects
from escaping the blade enclosure in every mowing condition. It is
possible for objects to ricochet and escape, traveling as much as 300
feet (92 m).
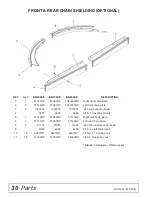
The optional chain shielding assemblies are ready for installation when you
receive them.
1.
Refer to
Front & Rear Chain Shielding,
page 29
and attach as shown
by inserting the bolts from inside the cutter frame out through the
shielding.
2.
Install hardware as shown in the parts drawing.
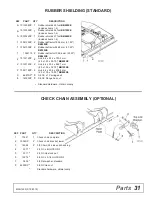
Rubber Deflector Installation
Figure 32
. Optional Rubber Deflector Installation
4.
Brace arms
5A.
Brace arm mounting hole
5B.
Tailwheel pivot hole
6.
Tailwheel bracket
9.
Tailwheel assembly
10.
Height adjustment holes
13.
5/8 NC x 2 HHCS
14.
5/8 NC Flange lock nut
27.
Washer .18 x 1.62 x 3
28.
Spiral pin
29.
O-Ring
30.
Washer
DP6
34
9
36
11
8
13
8.
Break link
9.
A-Frame arms
11.
Brace arms
13.
Sleeve, 15.6 x 25.4 x 31.8 mm
34.
5/8 NC Flange lock nut
36.
5/8 NC x 2-3/4 HHCS GR5
1.
12 mm x 1.5P x 65 mm
HHCS GR8.8
2.
12 mm x 1.5P Hex lock nut
3.
Clutch shield
5.
M8 x 1.25P x 20 mm HHCS
6.
5/16 Lock washer
7.
5/16 Flat washer
8.
Anti-rotation chain
9.
Vent plug/Dipperstick
DANGER
DANGER
1. Rubber deflector
2. Link
3. 3/8 NC 1 Carriage bolt
4. 3/8 NC Flange lock nut
Содержание BRUSHBULL BB600XE
Страница 1: ...OPERATOR S MANUAL BRUSHBULL ROTARY CUTTER 3 19 2018 BB600XE BB720XE BB840XE MAN1255 TM...
Страница 7: ...Declaration of Conformity 7 MAN1253 3 15 2018...
Страница 24: ...24 Assembly MAN1255 3 19 2018 NOTES...
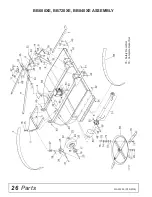
Страница 26: ...26 Parts MAN1255 3 19 2018 BB600XE BB720XE BB840XE ASSEMBLY 78 Safety Decal Set 79 Complete Decal Set...
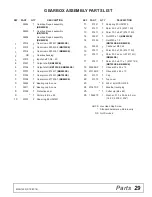
Страница 28: ...28 Parts MAN1255 3 19 2018 GEARBOX ASSEMBLY...
Страница 38: ...MANUEL D UTILISATION BRUSHBULL MAN1255 3 19 2018 BB600XE BB720XE BB840XE TM FAUCHEUSE ROTATIVE...
Страница 44: ...7 D claration de Conformit MAN1255 3 19 2018 Declaration of Conformity...
Страница 63: ...TRINCIATRICE ROTANTE BRUSHBULL 19 03 2018 MAN1255 TM BB600XE BB720XE BB840XE...
Страница 69: ...Dichiarazione di conformit 7 MAN1253 15 03 2018...
Страница 81: ...Assemblaggio 19 MAN1255 19 03 2018 NOTE...
Страница 87: ...BRUSHBULL SICHELM HER 19 03 2018 BB600XE BB720XE BB840XE MAN1255 TM...
Страница 93: ...Konformit tserkl rung 7 MAN1253 15 03 2018...
Страница 105: ...Montage 19 MAN1255 19 03 2018 HINWEISE...
Страница 111: ...BRUSHBULL DESBROZADORA GIRATORIA 19 3 2018 BB600XE BB720XE BB840XE MAN1255 TM...
Страница 117: ...Declaraci n de conformidad 7 MAN1253 15 3 2018...
Страница 129: ...Montaje 19 MAN1255 19 3 2018 NOTAS...


