background image

20

3064202_201602

Messages status page

13  Messages status page

13.1 Procedure for faults


− Read fault message


− Possible causes for the fault and remedies can be found in the "Faults" chapter


− Determine and remedy the cause of the fault

A fault can be cleared on the fault message status page by pressing key 4. 


BM-2 installed in the heating appliance.


− Check that the system is functioning correctly

13.2 Procedure for warnings


− Read warning message


− Possible causes for the warning and remedies can be found in the "Faults" chapter


− Determine and remedy the cause of the warning message


− With warnings there is no need to acknowledge the fault 


− Check that the system is functioning correctly

13.3 Acknowledging faults for users

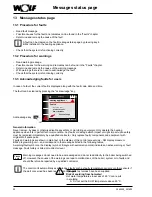
In case of a fault, the current fault is displayed along with the fault code, date and time.

The fault can be cleared by pressing the "acknowledge" key.

14:12

20/01/2015

Message

Heating appliance 1

Fault 4

19.02.2013   12:03

At burner start no

flame establishe

Acknowledge key

Acknowledge

General information

Never remove, bypass or otherwise disable any safety or monitoring equipment. Only operate the heating 

appliance when it is in perfect technical condition. Any faults or damage which impact or might impact upon safety 

must be remedied immediately by a qualified contractor. Only replace faulty components and equipment with 

original Wolf spare parts.

Faults and warnings are shown in plain text on the display of the control accessories – AM display module or 


BM-2 programming unit – and correspond to the messages listed in the following tables.

A warning/fault symbol on the display (symbol: triangle with exclamation mark) indicates an active warning or fault 

message. Fault history is listed at contractor level.

Warning messages do not need to be acknowledged and do not lead directly to the boiler being switched 

off. However, the causes of the warnings can lead to malfunctions of the boiler / system or to faults and 

should therefore be repaired by a qualified contractor.

The control unit automatically acknowledges faults such as faulty temperature sensors or other sensors if 

the part concerned has been replaced and plausible test values have been supplied.

Please 

note

 Danger!

Risk of scalding from hot water!

Hot water temperatures in excess of 65 °C can result 

in scalding.


f

Do not set the DHW temperature above 65 °C.

Содержание BM-2

Страница 1: ...600 Internet www wolf heiztechnik de Document no 3064202_201602 Subject to technical modifications Operating instructions for users BM 2 programming unit 14 12 20 01 13 1 5 bar 25 2 C 1 x Heating appliance Heating appliance Heating mode Pressure Burner ON 4 5 C 1 x Simplified mode Heating mode Outside ON 2 22 bar Pressure 43 5 C Boiler 14 12 25 08 2015 4 3 2 1 0 1 2 3 4 Operating option simplified...

Страница 2: ...liance status page 13 7 1 Using the 1 x key for 1x DHW heating 13 7 2 Using the key for emissions test mode 14 8 DHW status page 15 8 1 Changing the set DHW temperature 15 8 2 Changing the DHW operating mode 15 9 Heating circuit status page 16 9 1 Changing the set heating circuit temperature 16 9 2 Changing the heating circuit operating mode 16 10 Mixer status page 17 10 1 Changing the set mixer c...

Страница 3: ...ctual temperature display 22 16 Default settings overview 23 16 1 Heating appliance 23 16 1 1 DHW operating mode 23 16 2 Heating circuit mixer circuits 1 7 24 16 2 1 Setting economy factor in economy mode 24 16 2 2 Setting winter summer changeover 25 16 2 3 Setting ECO ABS 25 16 2 4 Setting day temperature room temperature 25 16 2 5 Setting room influence 25 16 3 Language 26 16 4 Time 26 16 5 Date...

Страница 4: ...mbols in the time programs submenu 33 18 Party key 34 19 Temporary setback mode 35 20 Winter mode setting example 36 21 Summer mode setting example 37 22 Energy saving tips 38 23 Glossary 40 24 Documentation information 42 24 1 Other applicable documents 42 24 2 Safekeeping of these documents 42 24 3 Applicability of these instructions 42 24 4 Maintenance cleaning 42 Table of contents ...

Страница 5: ...ion of an AM display module in the heating appliance f f Incorrect use Any use other than the intended use is not permissible Any other use or changes to the product at any time including during fitting and installation invalidate all warranty claims The user has sole liability for such use This appliance is not designed to be operated by persons including children with restricted physical sensory...

Страница 6: ...be damaged by an electrical discharge Touch earthed objects e g heating or water pipes before carrying out any work in order to discharge the static charge 2 2 Standards directives The appliance and control accessories comply with the following regulations EC Directives f f 2006 95 EC Low Voltage Directive f f 2004 108 EC EMC Directive EN Standards f f EN 55014 1 Emission f f EN 55014 2 Immunity f...

Страница 7: ...nd a keyword Pictogram Keyword Explanation Danger Risk to life or risk of serious injury Danger Risk to life or risk of serious injury through electrocution Warning Slight risk of injury Caution Possible material damage Table 2 1 Meaning of warnings 2 5 1Layout of warnings You will recognise warnings in these instructions by pictograms and a line above and below the warning section These warnings ...

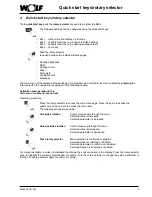
Страница 8: ...US connection No eBUS connection Operating option simplified mode SM 4 5 C 1 x Simplified mode Heating mode Outside ON 2 22 bar Pressure 43 5 C Boiler 14 12 25 08 2015 4 3 2 1 0 1 2 3 4 After switching on the heating appliance the software loads and a progress bar and the Wolf logo appear You are then taken to the start page home page During commissioning the commissioning assistant is displayed s...

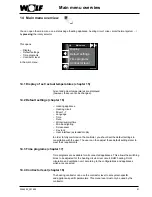
Страница 9: ...nd operation in the main menu submenu menu item Operating procedure Press the rotary selector to access the main menu page Press the again to access the submenu and once more to access the menu item The following actions are possible Clockwise rotation Cursor moves down through the menu Selected value is increased Selected parameter is increased Anti clockwise rotation Cursor moves up through the ...

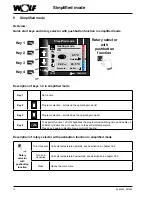
Страница 10: ...tion scrolls up the operating mode list Key 3 Program selection scrolls down the operating mode list Key 4 1 x The special function 1x DHW bypasses the programmed switching times and heats up all DHW cylinders once for one hour to the set DHW temperature Press key 4 again to disable once only DHW heating Description of rotary selector with pushbutton function in simplified mode Rotary selector wit...

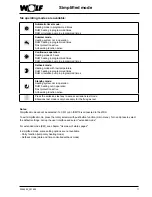
Страница 11: ... in programmed times Standby mode Heating system not in operation DHW heating not in operation Frost protection active Anti seizing function active Press the emissions test key to access emissions test mode Emissions test mode is only necessary for the flue gas test Notes Simplified mode cannot be selected if a CWL or an ISM7 8 is connected to the WRS To exit simplified mode press the rotary selec...

Страница 12: ...e set heating circuit temperature Selected temperature Change operating mode Selected operating mode Call up home page Room temperature BM 2 as remote control Outside temperature with outside temp sensor in WRS Flow temperature 12 Mixer Setting options Info regarding system data Change set mixer circuit temperature Selected temperature Change operating mode Selected operating mode Call up home pag...

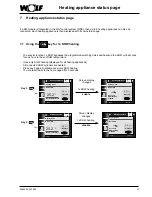
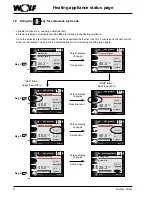
Страница 13: ...ting appliances All connected DHW cylinders are heated Press key 2 again to disable once only DHW heating You are taken back to the home page after 5 seconds Key 2 14 12 20 01 13 1 5 bar 1 x Once only DHW heating enabled Heating appliance Heating mode 1 x Burner ON Pressure 14 12 20 01 13 1 5 bar 25 2 C 1 x Boiler temperature Heating appliance Heating mode Burner ON Pressure 1x DHW heating enable ...

Страница 14: ... test Flue gas test active 08 min Rem time 14 12 20 01 13 20 C 40 0 C T_return Boiler temperature Flue gas test Flue gas test active 15 min Rem time Key 3 14 12 20 01 13 1 5 bar 25 2 C 1 x Boiler temperature Heating appliance Heating mode Heating mode ON Pressure Flue gas test Screen display changes Screen display changes Screen display changes Screen display changes 14 12 20 01 13 20 40 0 C T_ret...

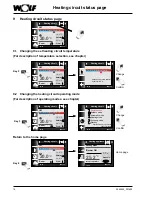
Страница 15: ...elector Confirm with OK Key 3 14 12 20 01 13 DHW Continue with rotary selector Confirm with OK 1x reheat Automatic mode Constant op Standby 1 x 14 12 20 01 13 50 0 C 50 0 C Set DHW DHW ON 25 30 35 40 45 50 55 60 65 Key 4 14 12 20 01 13 1 5 bar 25 2 C 1 x Pressure Boiler temperature Heating appliance Heating mode Burner ON Change Confirm 14 12 20 01 13 50 0 C 50 0 C Set DHW DHW ON 25 30 35 40 45 50...

Страница 16: ...ge Confirm Home page 14 12 20 01 13 20 0 C Room Heating circuit OFF 4 3 2 1 0 1 2 3 4 40 0 C Flow 16 0 C Outside 14 12 20 01 13 20 0 C Room Heating circuit OFF 4 3 2 1 0 1 2 3 4 40 0 C Flow 16 0 C Outside 14 12 20 01 13 20 0 C Room Heating circuit OFF 4 3 2 1 0 1 2 3 4 40 0 C Flow 16 0 C Outside 14 12 20 01 13 20 0 C Room Heating circuit OFF 4 3 2 1 0 1 2 3 4 40 0 C Flow 16 0 C Outside 14 12 20 01...

Страница 17: ...C Flow 16 0 C Outside 1 14 12 20 01 13 Mixer 1 Change using rotary selector Confirm with OK 4 3 2 1 0 1 2 3 4 1 14 12 20 01 13 Mixer Continue with rotary selector Confirm with OK Party function Setback mode Automatic mode Heating mode Economy mode Standby 1 Key 3 Key 4 14 12 20 01 13 1 5 bar 25 2 C 1 x Pressure Boiler temperature Heating appliance Heating mode Burner ON Change Confirm Key 2 Change...

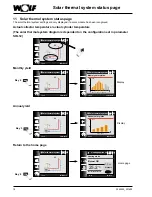
Страница 18: ...eld Annual yield Return to the home page 14 12 20 01 13 1 5 bar 25 2 C 1 x Pressure Boiler temperature Heating appliance Heating mode Burner ON Display Display Home page Key 3 Key 4 Key 2 14 12 20 01 2015 Solar thermal system 14 12 20 01 2015 Solar thermal system 14 12 20 01 2015 Solar thermal system 60 52 60 52 60 52 14 12 20 01 2015 Solar thermal system 60 52 14 12 20 01 2015 Solar thermal syste...

Страница 19: ...1 x Pressure Boiler temperature Heating appliance Heating mode Burner ON Home page 14 12 20 01 13 49 m h Air flow rate OFF 22 2 C Ext air Ventilation unit Key 3 Change Confirm Call up Select 14 12 20 01 13 Ventilation unit Turn to change values Press to confirm Start 18 01 2014 11 03 End 19 01 2014 12 15 OFF ON Tempor moist prot enabled 14 12 20 01 13 Continue with rotary selector Confirm with OK ...

Страница 20: ...fety or monitoring equipment Only operate the heating appliance when it is in perfect technical condition Any faults or damage which impact or might impact upon safety must be remedied immediately by a qualified contractor Only replace faulty components and equipment with original Wolf spare parts Faults and warnings are shown in plain text on the display of the control accessories AM display modu...

Страница 21: ...face extended mode In order to fully commission the controller you should set the default settings in consultation with the user The user can then adjust these default settings later to meet their requirements 14 3 Time programs chapter 17 Time programs are available for all connected appliances This allows the switching times to be adjusted for the heating circuit mixer circuit DHW heating DHW ci...

Страница 22: ...played if ventilation unit is installed Average outside temperature displayed if outside sensor is installed Non average outside temperature displayed if outside sensor is installed Displays heating appliance 1 4 ACT Boiler temperature in C System pressure in bar Current flue gas temperature in C Outside temperature in C Return temperature in C DHW temperature in C DHW flow rate in C DHW DFL flow ...

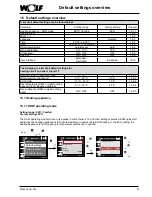
Страница 23: ...summer changeover 0 C 40 C 20 C 16 2 2 ECO ABS 10 C 40 C 10 C 16 2 3 Day temperature BM 2 in wall mounting base and room influence enabled 5 C 30 C 20 C 16 2 4 Room influence BM 2 in wall mounting base ON OFF OFF 16 2 5 16 1 Heating appliance 16 1 1 DHW operating mode Setting range ECO Comfort Factory setting ECO The DHW operating mode function only applies to combi boilers The Comfort setting act...

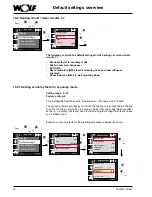
Страница 24: ...etting 4 For a detailed description see the Heating curve Economy mode chapter The economy factor describes by how much the heating curve sets back the heating circuit or the mixer circuit when in economy mode This factor has the same effect as the 4 4 setting but is only used in the time program during the setback phase or in setback mode Example of economy factor setting setting procedure is alw...

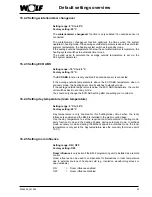
Страница 25: ...y mode If the average outside temperature is below the ECO ABS temperature the control unit switches back to economy mode You should only change the ECO ABS setting after consulting your contractor 16 2 4 Setting day temperature room temperature Setting range 5 C to 30 C Factory setting 20 C Day temperature is only enabled for this heating mixer circuit when the room influence is enabled and the B...

Страница 26: ...ovak Hungarian Russian Greek Turkish Bulgarian Croatian Latvian Lithuanian Norwegian Romanian Swedish Serbian Slovenian Danish Estonian Factory setting English 16 4 Time 14 12 20 01 13 Main menu Display Default settings Time programs Contractor level Entry 14 12 20 01 13 Time 14 25 Date 18 12 2012 Min backlighting 10 Screensaver ON Default settings 14 12 20 01 13 Time Value 14 25 Default settings ...

Страница 27: ...rt to minimum backlighting level if no further settings are made on the BM 2 for one minute 16 8 Screensaver You can enable a screensaver The display reverts to minimum backlighting after one minute and the following values are shown f f Time f f Outside temperature outside sensor connected f f Room temperature BM 2 installed in wall mounting base 16 9 Key lock The key lock prevents a unintentiona...

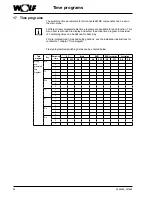
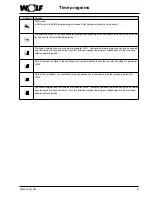
Страница 28: ...select the active time program A maximum of 3 switching times can be defined for each day For pre programmed times and setting options see the installation instructions for contactors chapter Time program Freely programmed switching times can be entered below Time program Day Switching time HC Mixer DHW DHW circulation Ventilation ON OFF ON OFF ON OFF ON OFF ON OFF Freely pro grammed time program ...

Страница 29: ...temperature When the heating appliance is in full load operation the flue gas inspector can carry out the necessary flue gas tests Emissions test mode terminates automatically either after 15 minutes or if the maximum flow temperature has been exceeded You can only enable emissions test mode using the BM 2 programming unit if it is installed in the heating appliance Emissions test mode can be swit...

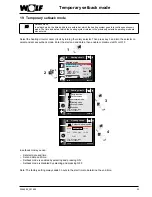
Страница 30: ...te are entered at which the heating system goes into continuous heating mode The time and date at which the heating system returns to the previously selected operating mode are also entered see chapters Heating circuit status page and Mixer status page section Changing the mixer circuit operating mode Setback mode In setback mode the time and date are entered at which the heating system goes into ...

Страница 31: ...y entering the start and end times Once this time has elapsed the program switches back to the previously selected operating mode During reduced ventilation the ventilation unit runs permanently in accordance with the settings in parameter CWL2 During Std ventilation the ventilation unit runs permanently in accordance with the settings in parameter CWL3 The system targets the set air volume of par...

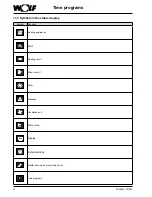
Страница 32: ...ams 17 3 Symbols in the status display Symbol Function Heating appliances DHW Heating circuit 1 Mixer circuit 1 Solar Message Ventilation unit Main menu Display Default settings Modification mode or contractor level Time programs ...

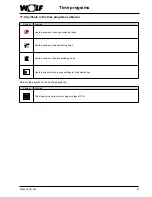
Страница 33: ...is submenu to change switching times Use this submenu to add switching times Use this submenu to delete switching times Use this quick start key to copy settings for the selected day Burner stage symbol in the heating appliance Symbol Function This displays the current burner stage in steps of 20 ...

Страница 34: ...the Party function you can Set start date and time Set end date and time The Party function is enabled by selecting and pressing ON The Party function is disabled by selecting and pressing OFF Note The factory setting always adds 3 hours to the start time to determine the end time Key 3 14 12 20 01 13 20 0 C Room Heating circuit Heating mode Automatic ON 4 3 2 1 0 1 2 3 4 40 0 C Flow 16 0 C Outsid...

Страница 35: ...ble via ON or OFF In setback mode you can Set start date and time Set end date and time Setback mode is enabled by selecting and pressing ON Setback mode is disabled by selecting and pressing OFF Note The factory setting always adds 3 hours to the start time to determine the end time Key 3 14 12 20 01 13 20 0 C Room Heating circuit Heating mode Automatic ON 4 3 2 1 0 1 2 3 4 40 0 C Flow 16 0 C Out...

Страница 36: ...nfirm with OK 1x reheat Automatic mode Constant op Standby 1x 14 12 20 01 13 50 0 C 50 0 C Set DHW DHW ON 25 30 35 40 45 50 55 60 65 14 12 20 01 13 20 0 C Room Heating circuit Heating mode Automatic ON 4 3 2 1 0 1 2 3 4 40 0 C Flow 16 0 C Outside 14 12 20 01 13 Heating circuit Party function Setback mode Automatic mode Heating mode Economy mode Standby Turn to change value Press to confirm Select ...

Страница 37: ...ode Automatic ON 4 3 2 1 0 1 2 3 4 40 0 C Flow 16 0 C Outside 14 12 20 01 13 20 0 C Room Heating circuit Heating mode Automatic ON 4 3 2 1 0 1 2 3 4 40 0 C Flow 16 0 C Outside 14 12 20 01 13 Heating circuit Party function Setback mode Automatic mode Heating mode Economy mode Standby Turn to change value Press to confirm 14 12 20 01 13 DHW Continue with rotary selector Confirm with OK 1x reheat Aut...

Страница 38: ...eating system maintenance by your local heating contractor can therefore quickly pay off Easily accessible radiators Air must be able to circulate freely near the radiators otherwise the heating system will lose effectiveness Modern radiators emit some of their heat as radiant heat Long curtains or poorly positioned furniture can swallow up to 20 of energy Keep the heat inside the room at night to...

Страница 39: ...mperature lower you lose the saving effect because a lot of energy is then needed to reheat the rooms It is only worth setting the setback temperature lower if you are going to be away for a long time e g on holiday DHW circulation pump The DHW circulation pump circulates the DHW through the pipework This ensures that hot water is always available for you at the draw off points ...

Страница 40: ...low a specified value for example if there are high outside temperatures during the night Economy temperature The economy temperature is the value that the set room temperature is reduced to during periods of low usage Emissions test mode Emissions test mode is only necessary for the flue gas test The heating appliance provides maximum heating output in emissions test mode full load operation Emis...

Страница 41: ...cuit The mixer circuit is a heating circuit in which a mixer is fitted to control the temperature of the heating water The mixer is fitted in the heating flow to regulate the flow temperature by mixing in cooler return water Pasteurisation function Legionella are a type of bacteria which can cause serious illness Legionella bacteria can form and multiply if tap water is exposed to long dwell times...

Страница 42: ...other accessories may also apply 24 2 Safekeeping of these documents The system user or operator should ensure the safekeeping of all instruction manuals f f Pass on these installation instructions as well as all other applicable manuals to the system user or operator 24 3 Applicability of these instructions These installation instructions apply to the BM 2 programming unit 24 4 Maintenance cleani...

Страница 43: ...3064202_201602 43 Documentation information ...

Страница 44: ...Wolf GmbH P O Box 1380 D 84048 Mainburg Tel 49 8751 74 0 Fax 49 8751 741600 Website www wolf heiztechnik de BM 2 installation instructions for users 3064202_201602 Subject to technical modifications ...

Отзывы: