background image

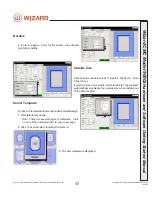
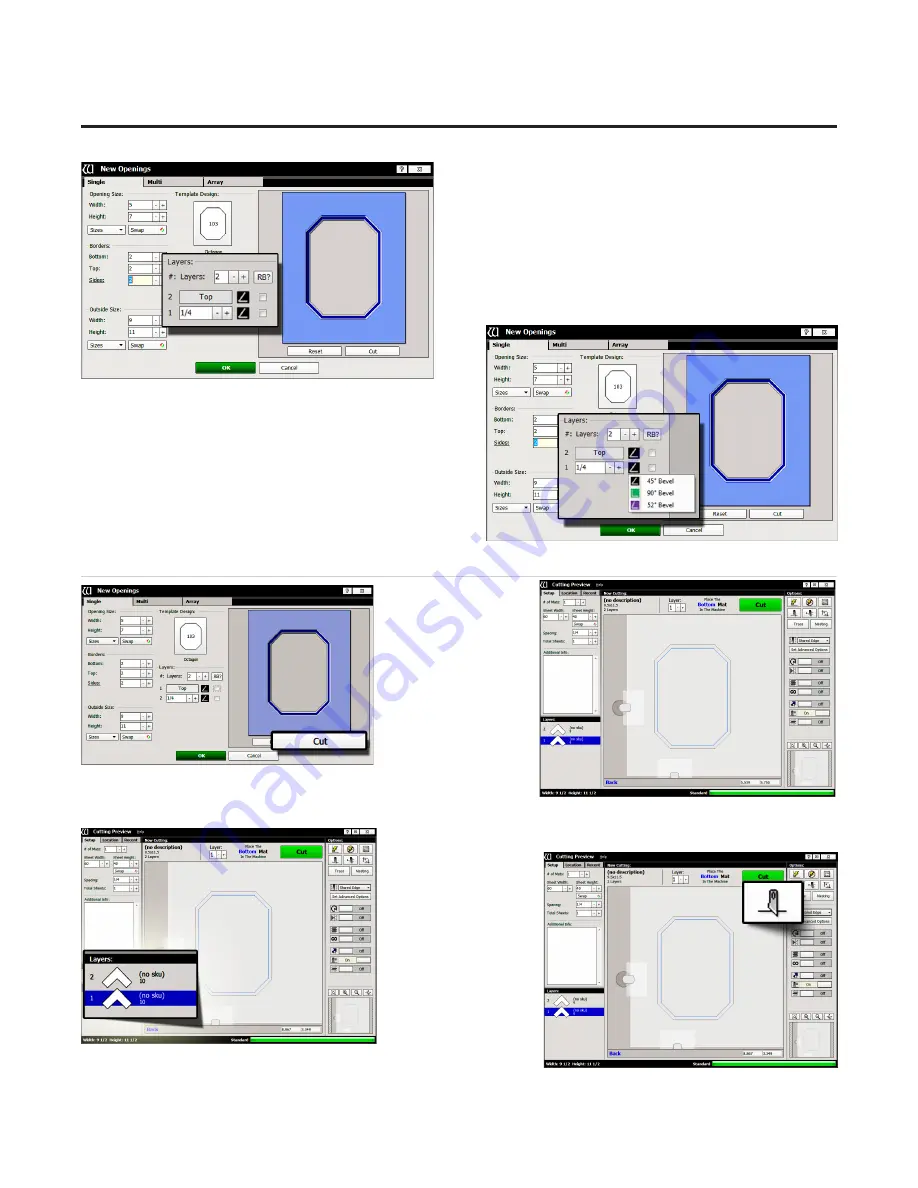
Layers

10.  Select the number of layers desired for this project.  

Leave it at the default of 2 layers.    

Cartridge Selection

11.  Click on the cartridge icon and select the desired 

cartridge for this layer.  For this project, leave it at the 

default cartridge, which is the 45° cartridge.

NOTE:  Cartridges  not  currently  available  will  be 

greyed out. 

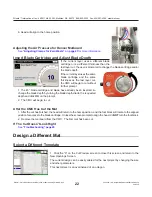
Go to Cut Preview to Cut the First Mat

1. Click 

Cut

 on 

the New Openings 

Screen to take design 

to the Cut Preview. 

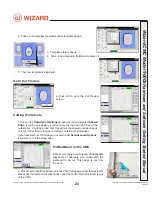
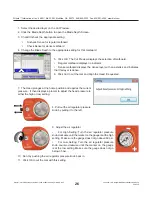
Blade Depth Settings

1.  Select the desired 

layer on the Cut 

Preview Screen.

2.  Click on the Blade 

Depth button.

 18

Wizard™ International, Inc., 4600 116th St. SW, Mukilteo, WA  98275   888/855-3335   Fax: 425/551-4350  wizardint.com

20-34304-1A  GettingStartedManual9000zFrameShop

04/05/19

Wizard™ CMC Model 9000z Hardware and Software Getting Started Guide

Содержание CMC 9000z

Страница 1: ...Wizard CMC Model 9000z Getting Started Manual FrameShop FrameShop 20 34304 1A...

Страница 2: ...assembled without written permission from Wizard International Inc and its licensors if any Trademarks FrameShop is a trademark of Wizard International Inc DOCUMENTATION IS PROVIDED AS IS AND ALL EXPR...

Страница 3: ...ng the Shipping Blocks 8 Check Squareness 9 Head Installation 10 Install the Head onto the Gantry 10 Hooking up the Gantry and Air Lines 11 Connecting the Board Cable 11 Attaching the Air Lines 11 Hoo...

Страница 4: ...essure 25 Variable Pressure Optimization VPO Feature 25 Adjusting the Head Air Pressure for Regular or Dense Matboard 25 Cutting an Extra Dense Layer with the 90 Cartridge 27 Changing the Blade 28 Usi...

Страница 5: ...or the computer monitor if not using the stand Where to Find More Information Knowledge Base Login to the Knowledge Base with your Customer ID which can be found on your License Screen Options View Li...

Страница 6: ...Wide Pen ECU and Air Regulator ECU Air Regulator 6 Wizard International Inc 4600 116th St SW Mukilteo WA 98275 888 855 3335 Fax 425 551 4350 wizardint com 20 34304 1A GettingStartedManual9000zFrameSh...

Страница 7: ...clamp K Lower rail containing drive belt L Mat to be cut M Slipsheets 1 2 sheets of 4 ply N Upper rail containing drive belt O Horizontal tension adjustment lower rail P Horizontal tension adjustment...

Страница 8: ...y lift the CMC straight up out of the box 3 Gently set the CMC upright resting on the foam corners 4 Position the CMC on the stand making sure that none of the air lines are crimped and that the groun...

Страница 9: ...and place them in the shipping box for storage Check Squareness Check the Drive Belt Lines Move the gantry all the way to the left Move the gantry slowly toward the right until a red mark is visible...

Страница 10: ...grabber arm on the right side of the gantry 6 Holding the head in position so that the head lines up neatly to the head grabber arm replace the two 5 32 screws making sure they go into the head grabbe...

Страница 11: ...of the board cable to the back of the gantry in the same manner 3 Move the gantry to the far right of the CMC and back to the left to make sure the board cable does not get caught on anything If the b...

Страница 12: ...regulator with the glass bowl down to the left large wall bracket or side of stand making sure not to crimp any air lines The hardware to connect the air regulator to the stand is included in the sta...

Страница 13: ...e 6 Plug in the computer power cord into the matching port on the computer then plug the power cord from the computer into a surge protector Connect the ECU WARNING Highvoltage Nouserserviceable parts...

Страница 14: ...ess DB9 cable and loop it around a couple of times then use the zip tie to attach it to the plastic mount on the back of the board 9 The board cable was plugged into the back of the ECU when we hooked...

Страница 15: ...gauge displays the clamp pressure as it is cutting To adjust the clamp pressure pause the current cut then pull out and then turn the black knob underneath the control panel Turn the knob clockwise t...

Страница 16: ...ingle Multi and Array Opening Size 3 Enter 5x7 approx 13x18 cm for width and height of the opening NOTE The Outside size field will display on the top if Edit Opening Size First is unchecked in the Ad...

Страница 17: ...the borders field Select Template 6 Clickonthetemplatethumbnailundertemplatedesign 7 Template library opens Note There are several pages of templates Click on one of the numbered tabs to see a new pa...

Страница 18: ...not currently available will be greyed out Go to Cut Preview to Cut the First Mat 1 Click Cut on the New Openings Screentotakedesign to the Cut Preview Blade Depth Settings 1 Select the desired layer...

Страница 19: ...labeled 45 on the end and is black 1 Push blade cartridge release down to eject the current blade cartridge 2 The blade cartridge displays a diagram of the blade orientation shown in contrast Place ne...

Страница 20: ...Waste on page 24 Push Cut 1 Push the green Cut button on the control panel on the left side of the board to cut the design Optionally you can click the Cut button on the Cut Preview Screen 2 If the m...

Страница 21: ...antry and the head assembly to the left edge of the CMC until it stops 3 It will stop against the Magnetic Stop 4 Thenslidetheheaddownuntilthefootblockrestsagainsttheheadalignmentstop 5 Click on the A...

Страница 22: ...After the CMC Has Cut the Mat 1 After the cut has finished the head will return to the home position and the foot block will rotate to the aligned position for access to the blade cartridge Unless the...

Страница 23: ...than cutting each design s outside cut individually If you have Remnant Trimming on located under Set Advanced Options it will also cut off the scrap edge Put Matboard on the CMC 8 Make sure there are...

Страница 24: ...at thus not wasting any material This is especially useful when tiling 2 The Cut Preview Screen will indicate if any of the clamps are in the way of the foot block 3 Push the clamp toward the board to...

Страница 25: ...ard air pressure to the clamps Adjusting the Clamp Pressure Clamp Pressure Adjustment To adjust the clamp pressure see Clamp Pressure Adjustment page 15 Variable Pressure Optimization VPO Feature Adju...

Страница 26: ...prompt to adjust the head pressure to either the high or low setting 8 Pull out the air regulator pressure knob by pulling it to the left 9 Adjust the air regulator For High Setting Turn the air regu...

Страница 27: ...dicates that this layer is extra dense 6 Click Cut the cut the mat and Align the Head if requested 7 A prompt to adjust the head pressure to the high setting displays 8 Pull out the air regulator pres...

Страница 28: ...way Using the Pen Cartridge Changing the Pen in the Pen Cartridge The pen cartridge is unlabeled and is black with a metal pen holder column attached to the base The pen icon within the software is a...

Страница 29: ...s the cut and gives option to abort A prompt to click OK to release the motors will display The motors will immediately release Grasp the head and click OK then manually lower the head back to the hom...

Страница 30: ...n the Knowledge Base at http info wizardint com KB to determine if the opening adjustment needs to be adjusted Q What process does the computer use to download corners Click check for corners on the l...

Страница 31: ...ensure that the air line is free of moisture and oil Moisture is very detrimental to hardware and can cause a variety of problems Check your air compressor documentation for instructions 2 Wipe down...

Страница 32: ...ally invalid No part of this publication may be reproduced or transmitted in any form or for any purpose without the express permission of Wizard International The information contained herein may be...

Отзывы: