background image

35

Configuration of the Breakout Box

VideumII BroadCaster Base Kit (only)

Configuring the Breakout Box

If you have a VideumII Broadcaster Base Kit, you have to configure your
Breakout Box. Winnov does not ship a video source/camera with the
purchase of a VideumII Broadcaster.  Therefore, to continue with this
installation tutorial, you must have a S-Video or composite video
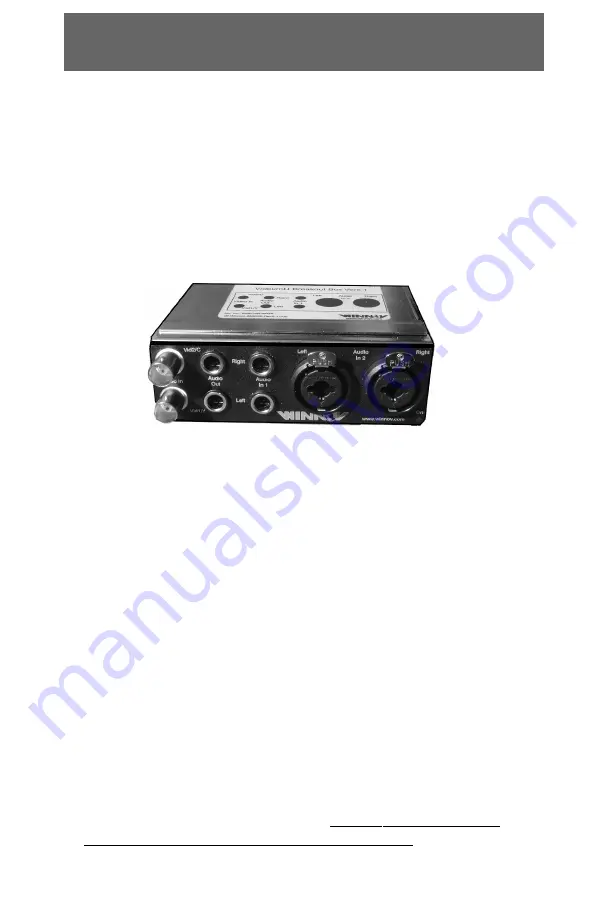
source and configure the provided VideumII Breakout Box.  Figure 2.4
shows a sample Breakout Box.

Look at the label on top of the breakout box to identify the
connectors.

With your video source handy, do the following to configure your
VideumII Breakout Box for use with your video source.

1. Connect the audio and video source.

Plug your camera into any of the BNC connectors on your
VideumII Breakout Box.

Make sure that your audio source is plugged into one of the audio
input connectors on your Breakout Box.

The VideumII Breakout Box is now connected.  The VideumII
Breakout Box must be connected before the system is powered on
for it to be recognized by the system.

2. Run the “Video Source Configuration” Utilities.

The “Video Source Configuration” utilities will allow you to
configure your Breakout Box. Select  Start | Programs | Winnov
Videum NT | Utilities | Video Source Configuration.   Figure 2.5
appears.

Figure 2.4:  Breakout Box

Содержание Videum 1000 Plus

Страница 1: ...deum4100 4400 VideumConferenceProXP VideumIIBroadcasterBaseKit VideumIIBroadcasterLiteKit HardwareandSoftware InstallationGuide 10 2002 EU010 TechnicalSupport support winnov de Website http www winnov de Sales Contact sales winnov de Tel 49 8243 9684 0 ...

Страница 2: ... Broadcaster Xstream MultiCaster Xstream RadioCaster Videum StreamEngine are trademarks of Winnov Windows 2000 and Windows NT are trademarks of Microsoft Corporation Pentium is a trademark of Intel Corporation Other trademarks mentioned in this document are owned by their respective companies No part of this document may be photocopied stored in a retrieval system transcribed or reproduced by any ...

Страница 3: ...eum 4100 4400 Videum Conference Pro XP Kit collaboration kit for video conferencing that includes Winnov Color Camera Videum Software and the Videum 1000 Plus capture card VideumII Broadcaster Base Kit professional capture card with breakout box VideumII Broadcaster Lite Kit professional capture card with breakout cable Welcome The ideal solution for collaboration and streaming media applications ...

Страница 4: ...ted RFI Field Strength 30MHz 1000 MHz EN 61000 4 2 1995 A1 1998 4kV ElectrostaticDischarge ESD EN 61000 4 3 1996 A1 1998 3V m ElectromagneticFields EN 61000 4 4 1995 1kV ElectricalFastTransients EN 61000 4 5 1995 power lines 2kV unsymmetrical 1kVsym HighEnergyPulses Surge EN 61000 4 6 1996 3V ConductedRF Disturbance EN 61000 4 11 1994 95 for 5 ms 30 for 250 ms VoltageDips ShortInterruptionsandVolt...

Страница 5: ...picalconfiguration Installation instructions from the user smanual need tobe observed I theundersigned herebydeclarethattheequipmentspecifiedabove conformstotheaboveDirectiveandStandard Name Dipl Ing WolfgangKemmler Title ManagingDirector Date February 18th 2002 Videum 10xx October 4th 2002 Videum 4100 4400 OfficialNoticesandWarranties ...

Страница 6: ...port In order to better serve our customers in the most efficient manner Winnov has a dedicated support team available via email during business hours To contact Winnov technical support Email send email to support winnov de Fax 49 8243 9684 27 Website visit websites at http www winnov de or http support winnov com Contacting winnov sales To purchase additional products or for product information ...

Страница 7: ... input connectors are available on the bracket as well as one audio out connector Features of your Videum 1000 Plus capture card High performance video capture Captures one audio and video channel at up to 640x480 30 fps uncompressed NTSC and 768x576 25 fps uncompressed PAL Accepts data in a variety of ways NTSC PAL and square pixel resolution image aspect ratio 4 3 Captures widescreen formats 640...

Страница 8: ...deum 1010 Plus has been engineered for low profile PCI slot New flat panel and slimline all in one computers only support low profile PCI slot The Videum 1010 Plus supports only one MXC video input on the bracket One adaptor cable MXC to S Video Composite as shown in Figure is provided with the capture card It will enable you to connect a composite or S Video video signal System Requirements Penti...

Страница 9: ...hich supports composite and s video inputs locking BNC connectors and balanced stereo audio via XLR connectors The breakout box features two XLR audio connectors four phono audio connectors and two BNC video connectors The breakout box is easily rackmountable and give an easy rackmount access to the connectors Refer to the next page to see a description of the breakout box TheVideumII Broadcaster ...

Страница 10: ...ctivity Figure 1 2 Videum 1000 Plus Bracket Figure 1 3 Videum 1010 Plus Bracket S Video In MXC Camera In Composite Video In Aux Audio In Line Mic Audio In Audio Out MXC Video input for Winnov Camera Aux Audio In Line Mic Audio In Audio Out ...

Страница 11: ...Plus Connectivity VideumII Broadcaster Capture Card S Video In MXC Camera In Composite Video In Audio Out DVI Connector for A V Media Cable Figure 1 4 Videum 1000 VO Plus Bracket Figure 1 5 VideumII Broadcaster Bracket ...

Страница 12: ...VI connector Connectivity VideumII Broadcaster Breakout Box VideumII Broadcaster Breakout Cable BNC Connectors BalancedStereo XLR Connectors Four Phono Audio Connectors Figure 1 6 VideumII Broadcaster breakout box Figure1 7 VideumIIBroadcasterbreakoutcable ...

Страница 13: ...ite video camera Composite Video In RCA jack VCRs camcorders and composite video cameras Aux Audio In 3 5mm stereo Audio output from VCR audio output from another sound card Line Mic In 3 5mm stereo Microphone or audio from an S Video camera Stereo Audio Out 3 5mm stereo Sound card Line In input takes audio from video camera to sound card audio input Can also be used for external speakers or headp...

Страница 14: ...eum 4100 board Captures one audio and video data stream at full video size and full resolution 768x576 at 25 fps Fast switching function to alternate between the four video sources Real time capture and preview of the video streams Programmable capture resolution frame rate and compression settings Supports multi processor systems Supports multiple boards per system Integrated watchdog function fo...

Страница 15: ...it PCI bus interface running at 33 MHz to provide complete software compatibility with most video applications The Windows plug and play manager recognizes the board as four independent audio and video devices Therefore each audio and video channel is handled by an independent driver Each driver handles both video and audio data streams Features of your Videum 4400 capture card Captures four indep...

Страница 16: ...tion can be individually disabled via jumpers This feature allows cascading of video inputs and insertion of the card into an existing video link without requirement of an additional video amplifier or router Digital I O triggers and Watchdog function 8digitalalarminputs outputs Watchdog reset functionality significantly enhances system resilience Precision video time stamping fully synchronized w...

Страница 17: ...tchdog Reset Cable Connector 11 Eight Digital inputs outputs 12 TTL I O voltage selector 13 One on board stereo audio line and headphone output 14 Jumper J9 15 Jumper J13 White dot pin 1 Videum4400 Figure1 8 Top view of theVideum 4100 one channel 1 2 3 4 9 10 11 5 1 2 3 4 5 Figure1 9 Top view of theVideum 4400 four channel 13 Videum4100 8 12 6 7 14 15 9 10 11 13 12 6 7 14 15 ...

Страница 18: ...escription of the Videum 4100 and Videum 4400 bracket Watchdog Reset Cable The Watchdog Reset Cable as shown in Figure 1 11 comes with your Videum board It has a 4 pin connector with 2mm pitch on one end and a standard 2 pin 100 mil socket on the other end Figure 1 11 Watchdog Reset Cable White 4 pin connector Black 2 pin connector ...

Страница 19: ...o the audio connector available on the bracket 5 in Figures 1 8 and 1 9 4 stereo 1 4 mini jacks will be connected to your audio sources This four channel audio cable comes with your Videum 4100 or 4400 board Connectivity Make sure you have successfully plugged the cable on the 8 pin mini DIN connector of the bracket ...

Страница 20: ...vel 1 Vrms Videum 4400 features four stereo inputs You will find in this section the technical specifications for the audio inputs on bracket the on board audio inputs and the audio output CharacteristicsoftheAudioInput Figure1 13 Audio inputs on bracket Internal audio inputs J1 on board Figure 1 14 shows the internal audio connector J1 Technicalcharacteristics Connection J1 is connected in parall...

Страница 21: ... channel Technicalcharacteristics Connector 4 pin 100 mil male header Maximum output power 60mW into 32 Ohm headphone Maximum distortion 0 1 into 32 Ohm headphone 2 into 8 Ohm speaker Type Class AB stereo amplifier Output voltage 3 5 V at 0 dB and 0 1 distortion peak to peak The stereo headphone amplifier also serves as a summing amplifier for all four channels ...

Страница 22: ...to provide 4 streams with different resolutions from the same video stream Several Videum 4400 4100 cards are cascaded or run in parallel to other video equipment In these cases the video termination requires a video amplifier repeater However with the Videum 4400 4100 this can be avoided by individually disabling the termination To disable the termination remove the jumper Only one termination mu...

Страница 23: ...23 Connecting a video source to theVideum 4100 4400 Connectortype BNC Inputtype Composite video Connects to normal cameras and camcorders S Video optional Number 4 composite or 2 S Video Video Source ...

Страница 24: ...ff and unplugged connect the 4 pin connector of theWatchdog reset cable to the whiteWatchdog housing connector on your Videum board as shown in Figure 1 17 Watchdog Capabilities 2 Unplug your computer s reset cable where it connects to the motherboard To locate the reset cable please refer to the motherboard s manual 3 Connect the 2 pin connector of theWatchdog reset cable Figure 1 18 to the reset...

Страница 25: ...1 20 TestWinnovWatchdog black 2 pin connector If you experience some troubles connecting your Watchdog reset cable please contact our Support department at support winnov de You are now ready to utilize the Watchdog function of your Videum board For more information on the Watchdog function and how to configure it refer to the software section Watchdog Capabilities If the Watchdog Watchdog functio...

Страница 26: ...oard into the available slot Hold the Videum board at the edges and align the pins on the board with the pins in the connector Firmly press the pins into the connector until the board is seated evenly 6 Secure the board with the screw that was holding the protectiveslotcover Tighten the screw until the board is secure 7 Reinstall the cover of the computer 8 Now you can see theVideum board connecto...

Страница 27: ...the left 2 Connect the camera cable to the MultimediaExtensionConnector MXC 3 Turn the camera on if necessary using the power switch on the back of the camera Switch Default Seetings Description BLC On Sets backlight compensation to prevent underexposed or overexposed images WB Fixed Sets the white balance for color reproduction Should be in Fixed mode when you have a colored scene and stable ligh...

Страница 28: ...deo and power for the camera If you need a composite or S Video connector use the MXC to composite S Video cable which comes with your Videum 1010 Plus board Remember that you won t be able to have at the same time a composite input S Video input and RCA input This will cause your system to malfunction Connecting Video Figure 1 21 MXC to composite or S Video adaptor cable ...

Страница 29: ...he VideumII BroadCaster Breakout Box onto the Breakout Box Mounting Bracket Figure 1 20 shows a sample of a blank Breakout Box 1 Decide on the position of theVideumII Broadcaster Breakout Box Locate the Breakout Box Mounting Bracket anddecide in which of the four possible positions you prefer to mount the VideumII Broadcaster Breakout Box in 2 Attach the front label to the Breakout Box Mounting Br...

Страница 30: ...x Mounting Bracket If any of the four positions of the Breakout Box Mounting Bracket is unused attach the blank Front Panel Label into the recessed area of these positions to give the Breakout Box Mounting Bracket its finished professional appearance You are now ready to connect the Breakout Box to your computer Connecting the Breakout Box to the Capture Card To connect the external Breakout Box t...

Страница 31: ...al USB video for example and works its way to the far end of the computer Any connection scheme between the VideumII Broadcaster Capture Cards and the Breakout Boxes will work However to simplify the correlation between the enumeration of the four VideumII Broadcaster Capture Cards and the four positions of the Breakout Box in the Breakout Box Mounting Bracket we suggest the connection as listed i...

Страница 32: ...gly recommended Windows XP The Videum 10xx Family and VideumII BroadCaster Family of capture cards presently do not support Windows 3 1 Windows 95 Windows 98 or Windows Me Please use the Videum AV and VO cards General driver release notes 1 Please refer to the download section for latest hints and updates 2 Older cards may not be supported by the latest driver release Videum AV and VO PCI install ...

Страница 33: ... drive 3 InWindowsExplorer find the CD titled VIDEUM 2 xx right click the CD and select Setup Videum 2 xx Alternatively you can run Setup exe directly from the root directory of the CD The setup program will automatically install all files in the appropriate locations Follow the screen prompts during the installation process 5 Restartyour computer Software Installation NT 4 0 When upgrading your o...

Страница 34: ... the system prompts you with a NewHardware Found dialog box press Next If you install multiple boards in your system this dialog box will come up multiple times Always cancel them 5 Click yes when the system will tell you that it is about to install unsigned drivers This dialog box will come up multiple times Always press yes 6 Restartthecomputer Figure 2 2 Screen Shot of New Hardware found Figure...

Страница 35: ...your video source handy do the following to configure your VideumII Breakout Box for use with your video source 1 Connect the audio and video source Plug your camera into any of the BNC connectors on your VideumII Breakout Box Make sure that your audio source is plugged into one of the audio input connectors on your Breakout Box The VideumII Breakout Box is now connected The VideumII Breakout Box ...

Страница 36: ...electing the corresponding configuration choice from the Video Source Configuration list 4 CustomizeVideo Source Names Enter the source name you want to assign to each video source configuration into the corresponding text box These names will appear in the Videum Capture menu 5 Select another board and repeat steps 2 and 3 6 Click OK 7 Reboot your system otherwise the settings will not be saved 8...

Страница 37: ...up menu and from the task bar It will allow you to keep your software up to date at all times Just open it and select FTP Site Winnov s latest software updates can be found at http www winnov de support software index htm or http www winnov com support software index htm Figure 2 6 Winnov UpdateTool ...

Страница 38: ...stall more than two Videum 4400 boards in one system You may install up to nine Videum 4100 in one system Multiple capture cards in one system 2 To select the device you want Open Videum Capture by right clicking on the Winnov Eye located in your system tray Videum Capture allows you to select a device in the Video Properties dialog box in the Device list box Or Open Videum Status by right clickin...

Страница 39: ...39 VideumCapture Application User s Guide ...

Страница 40: ...er document using drag and drop Videum allows you to add multimedia to web pages word processing documents presentations and so on Using theVideum CaptureWindow To view and record audio video and still images open the Videum Capture application by right clicking on Videum Eye or selecting Start Programs WinnovVideumNT Capture All commands available are listed on the next page Figure 3 0 Videum Cap...

Страница 41: ...audio or video clip to the beginning End Goes directly to the end of the audio or video clip Videum Capture Menus Button Menu SubMenu Description File Open Opens a capture file SaveAs Saves a captured clip to a file RecentFile Lists the most recent files displayed Exit Exits the Capture program Edit Copy Copies the current frame to the clipboard View Customizes your display to include some or all ...

Страница 42: ...camera will capture a video at 320x240 pixels You can either choose a image size in the menu or customize it Remember that your Videum 1000 allows you to capture at 640x360 for 16 9 widescreen format and 640x272 for 2 35 1 widescreen format For PAL we propose the following image sizes 192x176 25 of the full image resolution 256x192 33 3 384x288 50 768x576 100 Please note that 352x288 CIF and 704x5...

Страница 43: ...o required for playback Only for playback on your own system WNV1 Provides good hardware compression mostly used under 4 1 but this Videum Codec is also required for playback Only for playback on your own system Install WNV1View exe on the other computer to just install the WNV1 codec on this system This utility can be found on the Videum software CD This codec is not supported by the Videum 4100 ...

Страница 44: ...s associated with video capture If you have only one Videum 10xx or 4100 card installed only one device will be available to you If you have the Videum 4400 four devices will be available to you numbered from 0 to 3 Each device represents an audio and video stream that can be independently configured The following description of each device will be available in the device drop down list 0 Videum V...

Страница 45: ...o tab of the Capture Properties Interface Video Capture Properties Setting up theVideo Properties 1 Select the device you want to configure 2 Define the frame rate and whether or not you want to capture audio along with your video 3 Set a capture time limit Thus your movie files do not become too large 4 Specify the default file name for video captures and give it an initial size in megabytes Pres...

Страница 46: ...m board needs to digitize both fields Click this option to enable this feature The fields are then interleaved and multiple frames are averaged This is why it is reserved for still objects Objects in motion would show jagged vertical edges When disabled Videum only digitizes one field This gives the best results for moving objects Still Image Set up a still image The Still Image tab as shown in Fi...

Страница 47: ...clip You have the options of placing the clip into a document pressing the Delete key to delete the clip clicking the Save As button to save the clip or select the Send command from the File Menu to send the clip by e mail Capturing an Audio or a Video Clip 4 Save your file To save or send a file choose Save As or Send from the File menu To Save you can also click the Save As button to display the...

Страница 48: ...her capture 6 To capture a still image clip click theStill Image Capture button on theVideum Capture window A clip icon is displayed on the left side of the Videum Capture image indicating that a clip is available for placement You must add it to a document save it or delete it before you can do another capture Still images are normally saved as BMP files You can also use the Save As button or men...

Страница 49: ...he appropriate clip icon on the Videum Capture window 2 Open any other application that can accept audio video or still images If the drag and drop feature is not supported by your application use the Paste feature in the Edit menu to insert the clip 3 Drag the yellow clip icon from theVideum Capture window and drop it on the document in which you want it placed This video clip was captured with t...

Страница 50: ...lip When you drag and drop an audio clip an audio clip icon shown at the left is displayed When still images are inserted they appear just as they were snapped Example For example you can use audio and video clips to enhance e mail documents Just open any clipboard compliant applica tion and drop the clip Here is an example of what you can do Figure3 7 Videoclipinsertedintoanemail Adding Clips to ...

Страница 51: ... to take snapshots and how long you want this movie to record Then click the Start button to start recording a time lapse movie Once the movie is completed a clip icon is available for inserting into other documents Example Take one frame every minute If you have set the capture rate to 15 fps the final video will play at 15 fps So one hour 60 minutes 60 frames will play in 4 seconds 10 hours will...

Страница 52: ...re menu The Stop Motion dialog box is displayed 2 Click the Frame button each time you want to record a frame 3 Click the Done button when you are finished recording frames Once the movie is completed a clip icon is available for inserting into other documents Example Create your own animations easily Position an object in front of the camera Click the frame button once to take one image Move the ...

Страница 53: ...g to your needs The Webcam Control Interface is shown in Figure 3 10 WebCam To capture images for Web pages follow these steps 1 Select WebCamfromtheCapturemenu The WebCam dialog box is displayed 2 Use theIntervalto set the time between captures Click the up and down arrows to set the minutes and seconds 3 Use the Browse button or type the name of the file to which the capturesaretobesaved 4 Selec...

Страница 54: ...n save each image to a new file and set the characters you want appended to each file name specified in the previous dialog You can also automatically FTP each image to a server you specify To use FTP you must specify the host name the path from your login directory to the directory where you want the image to be stored the FTP user name and password 6 Once all of the image saving options are spec...

Страница 55: ...Audio Output Select the Device This tab allows you to select the device you want to configure 1 Select which device you want to configure from the drop down list as shown in Figure 3 14 If you are using a Videum 10xx or 4100 the device is numbered 0 If you are using a Videum 4400 four devices are available numbered from 0 to 3 2 General information This tab gives you some general information about...

Страница 56: ...tion 1 Select the default input It selected when an application is started for the first time 2 Select the default audio source to associate with that input This feature is convenient for communication applications audio inputs switch automatically when another video input is selected Videum Configure Figure 3 12 Videum Configure Applet for Videum 1000 Plus Family Figure 3 13 Videum Configure Appl...

Страница 57: ...pplied to all the boards on your system 3 Click More to set the video parameters This window as shown in Figure 3 14 allows you to modify the settingssuchas brightness contrast saturationand hue Hue this control is only used for NTSC cameras For PAL it should stay at the default setting of 50 Press the Default button to reset the value to 50 For NTSC cameras set Hue to get the most realistic color...

Страница 58: ...ou the audio inputs interface for VideumII Broadcaster family Figure 3 16 Audio Inputs Interface for Videum 1000 Plus family Videum Configure Figure 3 17 Audio Inputs Interface for the VideumII BroadCaster Family 1 For each audio inputs adjust the input gain 2 Click auto if you prefer to have your system set them up for you ...

Страница 59: ...ve in signals by moving the slider controlling the volume as shown in Figure 3 18 and 3 19 Check the mute box if needed Figure 3 19 Audio Outputs Interface for Videum II Broadcaster Family Videum Configure Figure 3 18 Audio Outputs Interface for Videum 1000 Plus Family ...

Страница 60: ... your Videum board Figure 3 18 shows you the audio inputs interface Videum 4100 4400 These two cards feature four composite or two S Video optional inputs Please assign one of the four inputs to become the default input Configure for PAL if a PAL video source is connected Figure 3 21 Audio inputs for the Videum 4100 4400 Videum Configure Figure 3 20 Video inputs for the Videum 4100 4400 ...

Страница 61: ...ov card using TCP IP protocols Switch to another camera while you are conferencing Figure 4 0 Videum Zoom Applet How to useVideum Zoom 1 Start the Videum Zoom application by right clicking on the Eye in the task bar or selecting File Start Videum Zoom of your Videum Capture 2 Select theVideo Source from the drop down list 3 Pan tilt and zoom the video you selected 4 Adjust the image properties of ...

Страница 62: ...trol another camera remotely In order to control another camera you need a communication program such as NetMeeting to see the remote video window 1 Start the Videum Zoom application by right clicking on the Eye or selecting File Start Videum Zoom of your Videum Capture 2 Under Connect enter the IP address of the system your are conferencing with The IP address 123 123 123 123 was entered 3 Click ...

Страница 63: ...nd white in any corner of the video window This is a great tool to help you differentiate the different cameras you have The insignia is pasted into any local video window at the fixed size specified Figure5 1 VideumInsigniaApplet 1 Close all your video applications 2 Start Videum Insignia 3 Select an existing insignia from the list or Click the Create New button or Select an existing insignia and...

Страница 64: ...ou just added on your video s Create a new insignia or edit an existing insignia 1 Click on the button Create New The new interface will appear as shown in Figure 5 2 2 Select a name and dimensions for the insignia 3 Use the drawing tools to create or edit the insignia 4 Click Save to save it Figure5 2 VideumInsigniaApplet Videum Insignia ...

Страница 65: ...is particularly useful for video surveillance applications When you enable System Time Overlay it will not be previewed on the little preview window To actually see the time overlay you must close and start again the Videum Capture applet Figure 5 3 shows you how it will look like on your video s Figure5 3 SystemTimeOverlay Videum Insignia ...

Страница 66: ...t one audio source represented by a dice icon Make sure you did not mute all the audio sources If you have Videum 4100 only one dice will be activated even though the four dices show up Dice one represents the audio channel 1 labeled ch 1 on the four channel audio cable provided with your Videum board Dice two represents the audio channel 2 labeled ch2 on the four channel audio cable And so on for...

Страница 67: ...he number of absolute db for the left channel The minus sign means attenuation 3 Check the on box of the audio signal output you want to select and adjust the volume The volume is indicated in absolute db at the bottom of each slider The sign means amplification The stereo bar graph shows you the range of db absolute value 4 Repeat the steps 2 and 3 for each audio device Spkr Speaker It controls t...

Страница 68: ...um Source switch 3 Set up the following parameters Sequence number between 1 and 3 Time intervals measured in seconds 4 Click StartCycle By looking at the Videum Capture Applet you will see the video automatically switches The name of Video Source drop down menu will also switch as the video switches How to switch remotely You can remotely switch the video sources of another computer from your com...

Страница 69: ... you have connected theWatchdog reset cable to the Watchdog connector located on the Videum board For more information 2 Right click on the dog icon located on your system tray Upon first installation of the drivers a little dog icon representing the Watchdog program will be located at your system tray on the bottom right of your screen By default the Watchdog program is disabled you need to enabl...

Страница 70: ...g is not enabled Watchdog is enabled and running It also tells you the history of your system boot System boot was not caused by Watchdog Watchdog was triggered but did not reset the system because the cable was not connected Watchdog was triggered and reset the system because the cable was connected Figure 7 1 DisableWatchdog 5 Right click on theWatchdog icon and select EnableWatchdog Wathdog fun...

Страница 71: ...face also provides you with some information on the reasons why the system had to reboot How to access the failure log 1 OpenWindows Explorer and follow this path C my documents program files Winnov Videum NT 2 Locate the file named WatchDog log in theWinnovVideum NT folder This notepad file automatically keeps track of all the failures Figure 7 3 shows you a sample of the log Figure7 3 Sample ofW...

Страница 72: ...pt driven status reporting of the digital input output ports The inputs are 5 V tolerant even when operated in 3 3 V mode However the logic threshold is lower in 3 3 Volt mode TechnicalSpecifications 5V operation Input Voltage for High State Min 2V Max 5 5V Input Voltage for Low State Max 0 8V Min 0 5V Minimum Output Voltage H 4V max 10mA Maximum Output Voltage L 0 7V max 24mA 3 3V operation Input...

Страница 73: ...t Pin 1 is on the top left side Via J24 the output level on this connector can be switched between 3 3 and 5 Volts 8 BitTTL I OVoltage Level J24 Refer to Figure 8 1 in order to identify the voltage level Figure 8 1 8 bit TTL I O voltage level Connect 3 2 for 5V operation 1 2 for 3 3 V operation Pin 1 is on the bottom white dot on the board Digital Inputs Outputs ...

Страница 74: ...le is checked set on which transition you want to raise the event NC means Normally Closed and represents a transition from 1 0 Since you are dealing with a Normally Closed contact NC the action is happening when a contact opens NO means Normally Open and represents transition from 0 1 Since you are dealing with a Normally Opened contact NO the action is happening when a contact closes 4 If the Ev...

Страница 75: ... Figure8 3 Definingnewactions Digital Inputs Outputs 1 Line is set as Input 2 Event Enable is checked 3 An action is selected from the dropdown box 4 An event is fired 5 To create an action An action is a script executable or patch files 1 Click on the Advanced button An interface shown in Figure 8 3 will pop up 2 Type in the name of the action and the action 3 Click on Add action 4 Click OK You h...

Страница 76: ...Videum Application Utilities Net Listen And click on Net Listen A little grey remote control shows up in the right part of your tray 2 Click Right on the little remote control as shown in Figure 6 1 Figure 6 2 will show up 3 Select ConfigureServer 4 Check the Auto start Server at login time This guarantees the Remote Control Server starts every time you log in 5 Make sure that you haven t checked ...

Страница 77: ... s address the text you want to add Click Send This feature is available if your email application is Windows messaging compatible If not save your video and send it attached Use the Internet to see your friends or relatives worldwide Just install Microsoft NetMeeting from the Videum Software CD ROM or any other video conferencing application of your choice Connect to the Internet via a fast modem...

Страница 78: ...t slides automatically Supports Windows Media and Real Media technologies plus Live Poll send a question your to your audience and gather and summerize the results instantaneously On Demand Live creation of table of contents Content management system for on demand presentations Complete system solution Rich Media Presentation Manager with control of motor cameras Webserver and database Streaming m...

Страница 79: ...t the computer recognize your face to gain access to your PC and restrict the access of other users Please find sample applications on the CD ROM or check www visionics com and www miros com Motion detection Set up the camera and a motion detection application such as Gotcha www prescientsys com to protect your office or your home Specify hot areas Gotcha activates capturing as soon as motion is d...

Страница 80: ...tion Audio monitoring How to installWinnov s SDK In order to install the Winnov s SDK help file you need to select the custom installation during the setup of your Videum Sofware Application as shown in Figure 7 0 and make sure that you have selected the Videum Help file and OCX Helpfiles We include several help files that will greatly help you when developing your own applications The help files ...

Страница 81: ...ch Web based automatic pan tilt and zoom Go to http www winnov com products capture videum4400_quad com to open the Web based four video display sample Support Support for ActiveX Controls and any programmatic features or issues will be provided only through the Winnov Newsgroups Please visit our website for more information http www winnov de developers index htm Software Development Kit SDK ...

Страница 82: ... use the Four Video Display Application Sample 1 Start the Four Video Display Application by opening your internet browser and typing in http www winnov com products capture videum4400_demo v4000demo htm Figure 11 2 will appear in your internet browser Figure11 2 Four VideoDisplay ApplicationSample The Four Video Display Application Sample only works with the Videum 4400 capture card Please make s...

Страница 83: ...ure 5 Stop capturing the video by clicking on the button stop video capture 6 Play back the video by clicking on the play button located on the bottom left side of the sample application Figure 11 3 is an example of the four running video displayed on the same web based interface As a web based interface you can access and control each video from anywhere at anytime Figure 11 3 Capturing 4 video c...

Страница 84: ...e YUY2 or RGBT Speckled or grainy video Your display is set to 256 colors or less Set it to 16 bit or better 24 bit color No audio Multiple sound cards are supported in parallel The Videum AV and the VideumCam AV integrate an audio in and out device a second sound card in addition to the sound card which may already be installed Use the Multimedia control panel to select the sound device for recor...

Страница 85: ... playback device Echo during video conferencing You hear yourself talking with a delay of about a second The person you are calling uses a loudspeaker Your voice is then picked up by the microphone and transmitted back to you Please ask the person you are calling to use a headset or a loudspeaker microphone combination with echo cancellation Please use a headset yourself too You need help If you h...

Страница 86: ...table below S Video 4 pin mini DIN with 75 Ω input impedance 2 video signals luminance and chrominance no audio connect audio to Line Mic or Aux In MXC Connector Pinout Pin Assignment 1 I2 C SCL control data bus 2 I2 C SDA control data bus 3 Ground 4 5V DC at 500mA unregulated from PC motherboard 5 Ground 6 Line level audio from camera microphone 7 5V DC at 500mA regulated from Videum card 8 Compo...

Страница 87: ...TSC 704x576 25 fps uncompressed PAL Capture Modes High speed time lapse stop motion webcam File Format AVI and ASF Still Image 32x24 640x480 NTSC 704x576 PAL 24 bit color 16 bit color 8 bit color or grey scale Format BMP JPEG Webcam Applet included Audio not available on Videum 1000 Plus VO Capture format 8 bit or 16 bit mono or stereo Sampling Rates Up to 48 Khz Full duplex audio for internet tel...

Страница 88: ...nt Panel Labels with legend Three blank self sticking Front Panel Labels One A V Media Cable to connect one VideumII Broadcaster Capture Card to one VideumII Broadcaster Breakeout Box One Winnov Videum Software CD to install the drivers and capture software for the Videum II Broadcaster Lite Kit The VideumII Broadcaster Light kit contains One Videum II Broadcaster Capture Card to capture audio and...

Страница 89: ...escreen format Performance 640x480 30 fps uncompressed NTSC 768x576 25 fps uncompressed PAL Audio Selectable input level 10dB and 4dB 8 bit and 16 bit mono or stereo Sampling Rates 11kHz 22kHz and 44kHz multimedia 8kHz 16kHz 32kHz and 48kHz communications full duplex at all sampling rates DVI Connector Video In 1 and Video In 2 Video In 3 and Video In 4 Audio in 1 and Audio In 2 balanced stereo Au...

Страница 90: ...4 6 3mm TRS phone jacks Left and right Audio In 1 balanced stereo Audio In 2 Two combination XLR phone jacks female 3 pin XLR jack and 1 4 6 3mm TRS phone jack Left and right Audio In 1 balanced stereo Audio Out Two 1 4 6 3mm TRS phone jacks Left and right Audio Out balanced stereo Dimensions 1080mm x 95mm x 38mm Weight 0 175kg A VMediaCable Length 6 ft 1 8m 29 pin DVI connector Internal signals V...

Страница 91: ...0fps NTSC per channel Up to 768x576 at 25fps PAL per channel Digital I Os 8 port TTL I O with interrupt event signaling Display Full screen with direct draw capable graphic card Text and Graphics Overlay Yes programmable per channel Date and Time Overlay Yes selectable per channel Watchdog Function Yes programmable with automatic failure log Audio Audio Sources 4 stereo inputs 10dBu Audio Capture ...

Страница 92: ...channel Up to 704x576 at 25fps PAL per channel Digital I Os 8 port TTL I O with interrupt event signaling Display Full screen with direct draw capable graphic card Text and Graphics Overlay Yes programmable per channel Date and Time Overlay Yes selectable per channel Watchdog Function Yes programmable with automatic failure log Audio Audio Sources 4 stereo 10dBu Audio Capture Channels 4 independen...

Страница 93: ...nd vertical scaling range variable zoom to 1 64 icon Vertical scaling with linear phase interpolation and accumulating filter for anti aliasing 6 bit phase accuracy Audio Codec Digitization 20 Bit ADC 20 Bit DAC High performance Sigma Delta technology Audio sample rates 48kHz 44 1kHz 32kHz 22 05kHz 16kHz 11 025kHz and 8kHz other rates supported by software Input impedance 50kOhm Line full scale in...

Страница 94: ...aused by time delay noise DSL Refers collectively to all types of digital subscriber lines the two main categories being ADSL and SDSL Encoding A method of compressing audio and video to turn it from analog to a digital format Fps Frames per second Frame rate Number of frame of video displayed within one second Frame size Refers to the size of a video window usually described in pixel Frame size c...

Страница 95: ...her words it is a one to many communication NTSC National Television Systems Committee which determines standards for color picture broadcasting Used in the USA Canada and Japan PAL PhaseAlternatingLine Standardfortelevisionbroadcast receptionusedin Europe PCI Peripheral Component Interconnect It has become one of the most industrial computers It solves a wide range of compatibility problems and p...

Страница 96: ...s the color information Chrominance from the brightness Luminance which prevents nasty things and helps increase clarity and sharpness Synchronization The linking of image and sound signals in order to run image and sound eventssimultaneously WAV Used for waveform and uncompressed audio file format XLR Multi pole stable plug connection YUV A method for encoding analog video signals for digital vid...

Отзывы: