background image

Shower panel 

WimTec OCEAN P10       

43

EN

 OCEAN P10

EN

Description of the functions

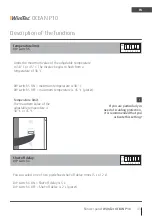
Temperature limit

The maximum value of the 
adjustable temperature is 
38 °C or 45 °C. 

Temperature limit:

DIP switch 5

Limits the maximum value of the adjustable temperature 
to 38 °C or 45 °C. The display begins to flash from a  
temperature of 38 °C.

DIP switch 5 ON = maximum temperature is 38 °C.
DIP switch 5 OFF = maximum temperature is 45 °C (preset).

If you are particularly in 

need of scalding protection, 

it is recommended that you 

activate this setting!

!

ON

OFF

2

1

3 4 5 6

You can select one of two predefined shut-off delay times (5 s or 2 s).

DIP switch 6 ON = Shut-off delay is 5 s.
DIP switch 6 OFF = Shut-off delay is 2 s (preset).

Shut-off delay:

DIP switch 6

ON

OFF

2 3 4 5 6

1

Содержание OCEAN P10

Страница 1: ...12 V Netzbetrieb 12 V mains operation OCEAN P10 Montage und Bedienungsanleitung Assembly and operating instructions DE EN ...

Страница 2: ...hlen wir ein regelmäßiges Reinigen der Glasoberfläche mit einem Kraftreiniger Diese Anleitung ist gültig für folgende Produkte WimTec OCEAN P10 12 V Glas weiß Art Nr 121 650 Glas schwarz Art Nr 121 643 Lieferumfang Grundkörper Sicherheitsglas Frontplatte mit integrierter Elektronik WimTec UP Netzteil elektrischer Thermostatmischer mit Heißwasser sperre und Temperaturfühler Regendusche mit integrie...

Страница 3: ...Bedienung 12 Einschalten 12 Ausschalten 12 Temperatur Regulierung 13 Wassermengen Regulierung 13 Warmlauf Automatik 14 Reinigungsstopp 15 Verbrühschutz bei thermischer Desinfektion 16 Funktionseinstellung 17 Thermische Desinfektion 17 Abschalt Automatik 18 Memory Funktion 19 Intelligente Freispül Automatik 20 Temperaturbegrenzung 21 Nachlaufzeit 21 Ersatzteile 22 Inhalt ...

Страница 4: ...ar Abschalt Automatik aktivierbar Intelligente Freispül Automatik aktivierbar Spülintervall nach 3 h bis 48 h Nichtbenutzung Spüldauer automatisch für max 45 s von Warmwasser und Kaltwasser Leitung Reinigungsstopp aktivierbar für 5 min Fließdruck max 0 5 MPa 5 bar Statischer Druck max 1 MPa 10 bar Wassertemperatur max 70 C max 80 C für max 10 min Durchflussmenge max 22 l min bei 0 3 MPa 3 bar Durc...

Страница 5: ... max 100 m Gesamt Kabellänge Achtung Netzteil nicht im Paneel oder eventuellen Schutzbereichen anbringen Leitung für Schlüsselschalter 2 x 0 2 1 5 mm2 YSLCY OZ Auf bestehende Zweipunktanschlüsse Standardmaß 150 mm ist eine Montage ebenfalls möglich WW R 1 2 IG KW R 1 2 IG 30 30 30 35 1590 67 8 485 Schwalldusche 260 230 430 250 910 1145 1530 80 155 181 525 2000 2100 Unterkante Regendusche 12 V B L ...

Страница 6: ...r Regendusche F AquaCap Sensortaste zum Ein Ausschalten der Schwalldusche G AquaCap Sensortaste zum Ein Ausschalten der Handbrause H Infrarot Sensor für die Benutzer erkennung Ansprechbereich I Intervall Regler J Zeit Regler K Reichweiten Regler L DIP Schalter zum Einstellen der Programme und Funktionen M Anschluss Schlüsselschalter N Anschluss IR Sensor O Anschluss 12 V Spannungsversorgung Einste...

Страница 7: ...20 min einstellbar K Reichweiten Regler für den Ansprechbereich 70 cm voreingestellt 30 cm bis 70 cm einstellbar Einstellregler DIP Schalter Funktion Beschreibung 1 Verbrühschutz bei thermischer Desinfektion 1 Seite 17 2 Abschalt Automatik Seite 18 3 Memory Funktion 1 Seite 19 4 Intelligente Freispül Automatik Seite 20 5 Temperaturbegrenzung ON 38 C OFF 1 45 C Seite 21 6 Nachlaufzeit ON 5 s OFF 1 ...

Страница 8: ...kopfes lösen und die Abdeckplatte abnehmen 4 Schläuche für Regen und Schwalldusche durch die Glas front führen und den Duschkopf mittels beigepacktem Schraubenset im Duschkopf befestigen Abdeckplatte wieder montieren 5 Bohrschablone auf der Rückwand aufkleben Unterkante Duschkopf auf Bohrschablone für gewünschte Montagehöhe beachten Standard 200 210 cm ACHTUNG Folgende Schritte unbe dingt in besch...

Страница 9: ...ehend montieren 8 Vorspülung durchführen und Vorabsperrungen wieder schließen 9 Grundkörper mit dem beiliegenden Befestigungsmaterial 4x Linsenschraube 5 5x50 mm an der Wand montieren 10 Kalt und Warmwasserschläuche des Mischers mit der Dichtung an den Vorabsperrungen anschließen farbliche Kennzeichnung am elektr Mischer beachten ACHTUNG Folgende Schritte unbe dingt in beschriebener Reihenfolge au...

Страница 10: ...rpers auf dem hinteren Revisionshaken einhängen 14 Schläuche für Regen und Schwallbrause am Mischer anschließen Nummerierung beachten 15 Steuerleitung und Versorgungskabel des Elektronikmoduls mit dem Mischer verbinden 16 Niederspannungsanschluss über die Klemmen am dafür vorgesehenen Kabel Markierung 12 V beachten herstellen Korrekte Polarität beachten ACHTUNG Folgende Schritte unbe dingt in besc...

Страница 11: ...oben einsetzen 19 Spannungsversorgung einschalten und Funktionstest durchführen i Tipp In Verbindung mit Nässe kann es durch Kalkablagerungen auf der Glasfrontplatte zu einer Funk tionsbeeinträchtigung der AquaCap Sensortasten kommen Um dies vorbeugend zu vermeiden empfehlen wir ein regelmäßiges Reinigen der Glasoberfläche mit einem Kraftreiniger 19 17 18 ...

Страница 12: ...rch erneutes Antippen der aktivierten Wasserabga bestelle schaltet diese ab Regendusche Schwalldusche Handbrause Sicherheitsspülstopp Nach Ablauf der eingestellten Spülstoppzeit siehe Seite 7 schaltet die Dusche ab Abschalt Automatik DIP 2 ON siehe Seite 7 Nach dem Verlassen des Ansprechbereichs schaltet die Dusche automatisch ab 2 b Auswählen von Benutzerprofilen 1 Benutzertaste drücken 2 Wasserm...

Страница 13: ...tiviert Wassermengen Regulierung Durch Tippen auf die Wassermengen Tasten wird für die aktivierte Abgabestelle zwischen 3 vordefinierten Wassermengen gewechselt gering mittel viel Ab einer Temperatur von 38 C beginnt die Warm Taste zu blinken Das Erhöhen der Temperatur ist nur mehr in einzelnen 0 5 C Schritten bis 45 C möglich Temperaturbegrenzung bei aktivierter Temperaturbegrenzung liegt die Max...

Страница 14: ...nzeige blinkt bis die Soll Termperatur erreicht ist bei erreichter Soll Temperatur leuchtet die Anzeige permanent Befindet sich kein Benutzer im Ansprechbereich wird der Wasserfluss gestoppt Benutzererkennung Der Benutzer tritt vor die Dusche durch Pulsieren der Leuchtsymbole wird die Be nutzererkennung signalisiert Warmlauf aktivieren 1 Gewünschte Temperatur mittels Temperatur Regulie rungstasten...

Страница 15: ...utzererkennung signalisiert Reinigungsstopp deaktivieren 1 Automatisch 5 min nach der Aktivierung 2 Manuelles Deaktivieren durch Drücken der Benutzer taste für ca 3 s Danach geht die Dusche wieder in den normalen Betriebsmodus über 30 70 cm Reinigungsstopp aktivieren 1 Benutzertaste drücken 2 Wassermengen Tasten verwenden um zum Profil OFF zu navigieren 3 Reinigungsstopp durch Drücken der Benutzer...

Страница 16: ...r in den Aktivbereich begibt In diesem Fall beginnt die thermische Desinfektion erneut wenn sich 2 Minuten kein Benutzer im Aktivbereich aufgehalten hat Nach dem Beenden wird 10 s Kaltwasser gespült Danach beginnt die AquaCap Taste der Regendusche zu leuchten und visualisiert so den Abschluss des Desinfektionszyklus Wird der Schlüsselschalter wieder in die Ausgangssituation gebracht so wird die th...

Страница 17: ...neel annähert Dient zum Überwachen des Aktivbereiches während der thermischen Desinfektion siehe Seite 16 Eine starke Dampfentwicklung vor der Duscharmatur kann zu einem unbeabsichtigen Abbruch der thermischen Desinfektion führen Für diesen Fall sollte die Verbrühschutz Funktion deaktiviert werden DIP Schalter 1 ON Verbrühschutz aktiviert voreingestellt DIP Schalter 1 OFF Verbrühschutz deaktiviert...

Страница 18: ... verlässt i Tipp Wenn der Benutzer bei aktivierter Abschalt Automatik unabsichtlich den Ansprechbereich beim Duschen verlässt wird empfohlen die verlängerte Nachlaufzeit von 5 s zu aktivieren DIP 6 ON Dient zum automatischen Stoppen des Wasserflusses sobald der Benutzer den Ansprechbereich des Duschpaneels verlässt DIP Schalter 2 ON Abschalt Automatik aktiviert DIP Schalter 2 OFF Abschalt Automati...

Страница 19: ...r gewünsch ten Temperatur und Wassermenge 2 Benutzertaste drücken und gewünschtes Profil mit Hilfe der Tasten für die Wassermenge wählen 3 Gewünschte Wasser abgabestelle für ca 3 s drücken bis das Speichern durch Blinken des Displays bestätigt wird Auswählen von Benutzerprofilen 1 Benutzertaste drücken 2 Wassermengen Tasten verwenden um ge wünschtes Profil zu wählen 3 Profil durch Drücken der Benu...

Страница 20: ...on 3 48 h siehe Seite 7 Freispül Automatik Wird die Armatur für die ein gestellte Zeit nicht benutzt löst die Armatur eine auto matische Freispülung der Regendusche für max 1 5 min aus Während dieser ist am Display abzulesen Sicherheit Befindet sich ein Benutzer im Ansprechbereich oder ist der Reinigungsstopp aktiviert löst die Freispül Automatik erst 2 min nach dem Wegtre ten bzw deren Deaktivier...

Страница 21: ...beginnt die Anzeige zu blinken DIP Schalter 5 ON maximal Temperatur beträgt 38 C DIP Schalter 5 OFF maximal Temperatur beträgt 45 C voreingestellt Bei besonderen Anforde rungen an den Verbrühschutz wird empfohlen diese Einstellung zu aktivieren ON OFF 2 1 3 4 5 6 Es kann zwischen 2 vordefinierten Nachlaufzeit 5 s bzw 2 s gewählt werden DIP Schalter 6 ON Nachlaufzeit beträgt 5 s DIP Schalter 6 OFF ...

Страница 22: ...23 715 14 Kartusche Schwallbrause 123 722 15 Kartusche Regendusche 114 140 16 Grundkörper Regendusche 123 739 17 Netzteil 113 792 Bezeichnung Art Nr 1 Sicherungsdeckel 123 661 2 Schlauch Schwallbrause 123 623 3 Schlauch Kopfbrause 123 630 4 Schlauch Handbrause 123 647 5 Elektronischer Mischer 123 654 6 Anschlussschlauch 1 Stk 123 678 7 Brausestange Set 115 727 8 Handbrause 115 680 9 Handbrause Sch...

Страница 23: ...Duschpaneel WimTec OCEAN P10 23 DE OCEAN P10 ...

Страница 24: ...panel using a power cleaner This manual is valid for the following products WimTec OCEAN P10 12 V White glass Art no 121 650 Black glass Art no 121 643 Delivery scope Base body safety glass front plate with integrated electronics module WimTec flush mount power supply electrical thermostat mixer with hot water blocking mechanism and temperature sensor rain shower with integrated waterfall shower h...

Страница 25: ...29 DIP switches 29 Assembly 30 Operation 34 Switch on 34 Switch off 34 Temperature control 35 Water volume control 35 Warm water rinse function 36 Cleaning stop 37 Scalding protection during thermal disinfection 38 Description of the functions 39 Thermal disinfection 39 Automatic stop 40 Memory function 41 Intelligent stagnation flush 42 Temperature limit 43 Shut off delay 43 Spare parts 44 ...

Страница 26: ...time adjustable from 10 s to 20 min Automatic stop can be enabled Stagnation flush can be enabled flushing interval after 3 h to 48 h of non usage flushing duration max 45 s for warm and cold water pipe Cleaning stop can be enabled for 5 min Flow pressure max 0 5 MPa 5 bar Static pressure max 1 MPa 10 bar Water temperature max 70 C max 80 C for max 10 min Flow rate max 22 l min at 0 3 MPa 3 bar Fl...

Страница 27: ...al cable length max 100 m Attention Do not install the power supply in the panel or protected zones if applicable Line for key switch 2 x 0 2 1 5 mm2 YSLCY OZ Can be attached to existing two point connections 153 mm standard measure PWH R 1 2 IT PWC R 1 2 IT 30 30 30 35 1590 67 8 485 Waterfall shower 260 230 430 250 910 1145 1530 80 155 181 525 Lower edge of rain shower unit 2000 2100 12 V B L Mou...

Страница 28: ...er on and off F AquaCap sensor button to switch the waterfall shower on and off G AquaCap sensor button to switch the hand shower on and off H Infrared sensor for user detection detection range I Interval control J Time control K Range control L DIP switches for configuring the programs and functions M Connection for thermal disinfection N IR sensor connection O Power supply connection 12 V Module...

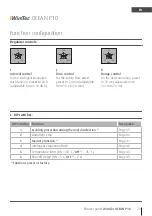
Страница 29: ... preset to 20 min adjustable from 10 s to 20 min K Range control for the detection range preset to 70 cm adjustable from 30 cm to 70 cm Regulator controls DIP switches Function Description 1 Scalding protection during thermal disinfection 1 Page 39 2 Automatic stop Page 40 3 Memory function 1 Page 41 4 Intelligent stagnation flush Page 42 5 Temperature limit ON 38 C OFF 1 45 C Page 43 6 Shut off d...

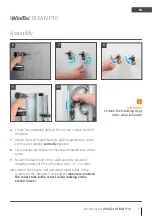
Страница 30: ...ower head and remove the cover plate 4 Guide the tubes for the rain and waterfall shower through the glass front and attach the shower head using the pro vided screw set in the shower head Reattach the cover plate 5 Stick the drill template on the back wall Ensure the lower edge of the shower head on the drill template is at the desired installation height Standard 200 210 cm ATTENTION Perform the...

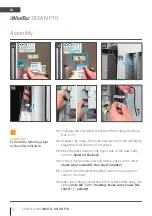
Страница 31: ...pwards 8 Carry out the pre flush and close the integrated stop valves again 9 Mount the base body on the wall using the provided mounting material 4x over head screws 5 5 x 50 mm 10 Connect the mixer s cold and warm water tubes to the gaskets on the integrated stop valves make sure to attach the correct tube to the correct colour marking on the electric mixer ATTENTION Perform the following steps ...

Страница 32: ...panel on the upper side of the base body onto the hooks on the back 14 Connect the rain and waterfall shower tubes to the mixer make sure to attach to the correct number 15 Connect the electronics module s control line and power cable to the mixer 16 Make low voltage connection to the correct cable using the clamp note the 12 V marking Make sure you use the correct polarity ATTENTION Perform the f...

Страница 33: ...al position and attach securing cap from above 19 Switch on power supply and perform the system test i Tip Limescale deposits on the glass front panel combined with wetness can impair the functionality of the AquaCap sensor buttons To prevent this outcome we recommend regular cleaning of the glass panel using a power cleaner 19 17 18 ...

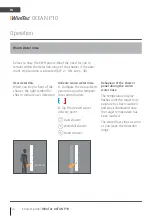
Страница 34: ... activated water delivery point to switch this off Rain shower Waterfall shower Hand shower Safety flow arrest The shower will shut off after the configured flushing stop time has elapsed see p 29 Automatic stop DIP 2 ON see p 29 The shower switches off automatically after the detection range has been cleared 2 b Select the user profile 1 Press the user button 2 Use water volume button to select t...

Страница 35: ...er period of time Water volume control Change between the three predefined water volumes for the activated water delivery point by tapping the water volume buttons low medium high The warm button begins to flash from a temperature of 38 C It is now only possible to increase the temperature in increments of 0 5 C to a temperature of 45 C Temperature limit When the temperature limit is activated the...

Страница 36: ... The temperature display flashes until the target tem perature has been reached and stays illuminated once the target temperature has been reached The water flow stops as soon as you leave the detection range User detection When you step in front of the shower the light symbol fla shes to indicate user detection Activate warm water rinse 1 Configure the desired tem perature using the tempera ture ...

Страница 37: ...ashes to indicate user detection Deactivate cleaning stop 1 Takes place automatically five minutes after activation 2 Manually deactivate by holding down the user button for approx 3 s The shower then resumes normal operation 30 70 cm Activate cleaning stop 1 Press the user button 2 Use the water volume buttons to navigate to OFF profile 3 Confirm cleaning stop by pressing the user button 3 s ...

Страница 38: ...user enters the detection range In this case thermal disinfection will start again two minutes after no user has been present in the detection range A cold water PWC rinse takes place for 10 s after the thermal disinfection has ended The AquaCap button belonging to the rain shower then lights up to indicate that the disinfection cycle has been completed If you return the key switch to the off posi...

Страница 39: ... cut off if you approach the panel This function serves to monitor the detection range during thermal disinfection see p 38 Thermal disinfection may be accidently aborted if dense steam forms in front of the shower fitting If this happens disable the scalding protection function DIP switch 1 ON Scalding protection function activated preset DIP switch 1 OFF Scalding protection function deactivated ...

Страница 40: ...elapsed see p 29 i Tip If you accidentally leave the detection range during a shower while the automatic stop function is activated it is recommen ded that you activate the extended shut off delay of 5 s DIP 6 ON This function automatically stops the water flow as soon as the user leaves the detection range of the shower panel DIP switch 2 ON automatic stop function activated DIP switch 2 OFF auto...

Страница 41: ...ture and water volume 2 Press the user button and select the desired pro file using the water volume buttons 3 Press the desired water delivery point for approx 3 s until the display flashes to confirm that the user profile has been saved Select user profiles 1 Press the user button 2 Use water volume button to select the desired profile 3 Select the profile by pres sing the user button or acti va...

Страница 42: ...interval control see p 29 Intelligent stagnation flush If the device has not been used for the set period the rain shower s intelligent stagnation flush function is executed for a maximum of one and a half minutes The display shows during the automatic flush Safety If you are in the detection range or if the cleaning stop function is activated the automatic flush function will not start until two ...

Страница 43: ...isplay begins to flash from a temperature of 38 C DIP switch 5 ON maximum temperature is 38 C DIP switch 5 OFF maximum temperature is 45 C preset If you are particularly in need of scalding protection it is recommended that you activate this setting ON OFF 2 1 3 4 5 6 You can select one of two predefined shut off delay times 5 s or 2 s DIP switch 6 ON Shut off delay is 5 s DIP switch 6 OFF Shut of...

Страница 44: ...all shower cartridge 123 722 14 Rain shower cartridge 114 140 15 Rain shower base body 123 739 16 Power supply 113 792 Description Art no 1 Securing cap 123 661 2 Hose waterfall shower 123 623 3 Hose head shower 123 630 4 Hose hand shower 123 647 5 Electronic mixer 123 654 6 Connection hose 1 pc 123 678 7 Shower rod set 115 727 8 Hand shower 115 680 9 Hand shower hose 114 119 1 7 8 5 10 9 12 13 11...

Страница 45: ...Shower panel WimTec OCEAN P10 45 EN OCEAN P10 EN ...

Страница 46: ...46 Shower panel WimTec OCEAN P10 EN OCEAN P10 EN ...

Страница 47: ...Shower panel WimTec OCEAN P10 47 EN OCEAN P10 EN ...

Страница 48: ...WimTec Sanitärprodukte GmbH p A 3325 Ferschnitz Freidegg 50 AUSTRIA t 43 0 7473 5000 f 43 0 7473 5000 500 m verkauf wimtec com i www wimtec com Auflage 15 03 2017 Art Nr 1002790 www wimtec com ...

Отзывы: