32 Shower panel
WimTec OCEAN P10
EN
OCEAN P10
EN
Assembly
14
11.
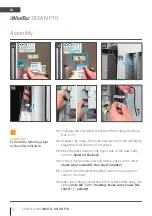
Configure the electronics module with the desired settings
(see p. 29).
12.
Readjust the range, flow time and interval of the intelligent
stagnation flush function if necessary.
13.
Hook the glass panel on the upper side of the base body
onto the
hooks on the back
.
14.
Connect the rain and waterfall shower tubes to the mixer
(
make sure to attach to the correct number!
).
15.
Connect the electronics module’s control line and power
cable to the mixer.
16.
Make low voltage connection to the correct cable using the
clamp (
note the ‘12 V=’ marking
).
Make sure you use the
c/- polarity!
!
ATTENTION!
Perform the following steps
in the order indicated!
16
12
13
11
12
15
Содержание OCEAN P10
Страница 23: ...Duschpaneel WimTec OCEAN P10 23 DE OCEAN P10 ...
Страница 45: ...Shower panel WimTec OCEAN P10 45 EN OCEAN P10 EN ...
Страница 46: ...46 Shower panel WimTec OCEAN P10 EN OCEAN P10 EN ...
Страница 47: ...Shower panel WimTec OCEAN P10 47 EN OCEAN P10 EN ...


