12
Personal PA
®
DSP FM Wideband Transmitter
• While the transmitter is displaying the
Menu
on the screen:
• The
Up
“
^
” button
navigates upward
in the menu or
changes
a setting. (Figure 9)
• The
Down
“v” button
navigates downward
in the menu or
changes
a setting. (Figure 9)
• The
Left
“<” button
backs out of the menu
one step at a time (see the menu tree). (Figure 9)
• The
Right
“>” button
navigates forward
in the menu (see the menu tree) or selects a setting. When entering a Description, IP
Address, or Subnet Mask for the Transmitter (see the menu tree) this button advances to the next character. (Figure 9)
Headphone Jack
A headset plugged into the headphone jack allows monitoring either the audio input before it is processed and transmitted by
the T45 (Analog Sources only) or the T45 audio output after it gets processed. By default, the headphone jack audio is set for
“TRANSMITTED AUDIO”. The Menu also allows the listener to select “INPUT AUDIO”. When monitoring a digital input, the only
option available will be “TRANSMITTED AUDIO”, since the digital source cannot be listened to directly, it must be converted to
analog audio first (Figure 7).
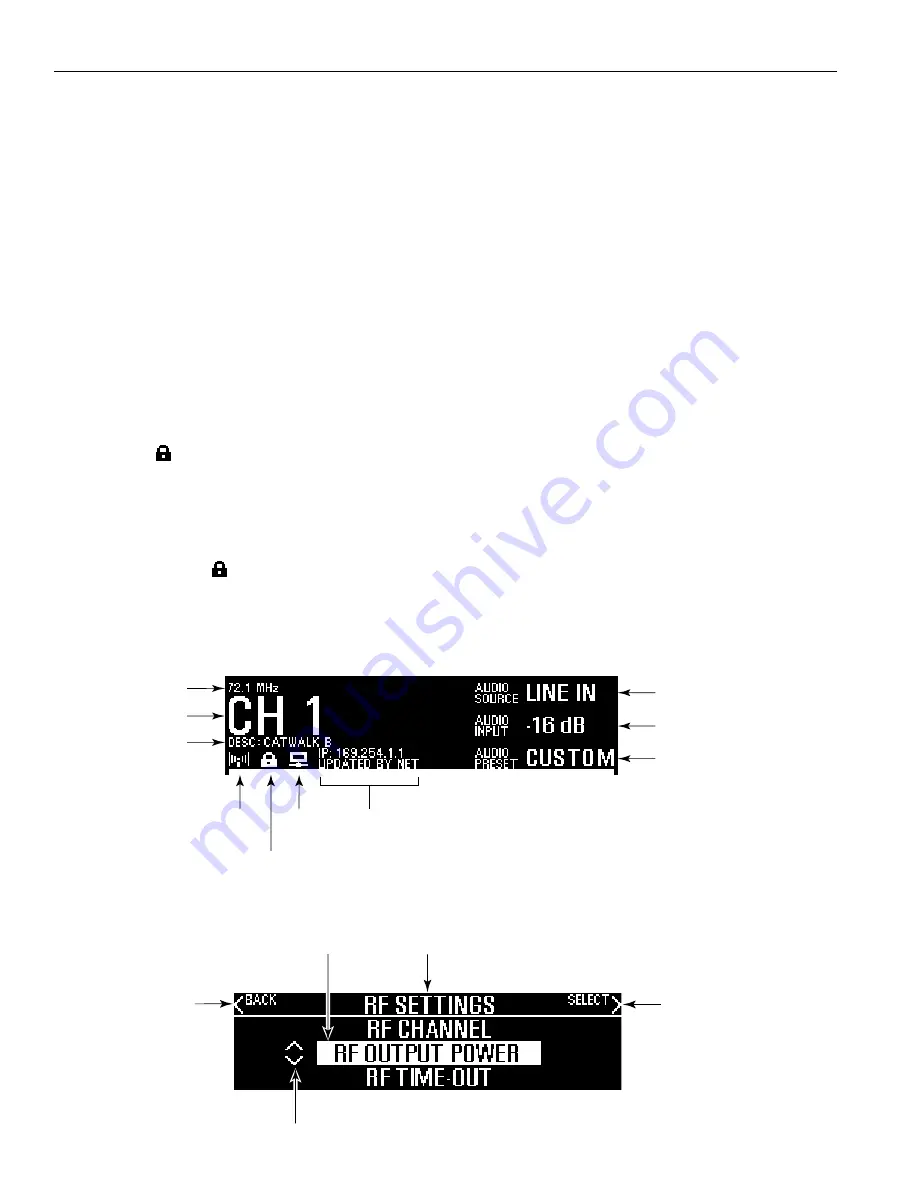
Main Info Screen and Screen Navigation
The Main Info Screen will show the following information: Operating Frequency/Channel, Device Description (if entered, otherwise
blank), RF Power Level, Network Link (PPA T45NET only), Audio Source, Audio Application Preset, Audio Input Gain Setting,
and Locked
. The lock symbol indicates that the front panel buttons are locked, which prevents any functions from being
accidentally changed. If the front panel (menu) has been locked the display will show the lock symbol, otherwise this area will be
blank. (Figure 8)
If the T45NET is connected to a network or a PC, the network link will be displayed as shown in Figure 8. If the T45NET is not
connected, the network symbol will have an “X” through it (not shown).
Lock/Unlock Settings
To lock or unlock the front panel buttons, press and hold the
Left
“<” and
Right
“>” buttons together on the front of the T45 for 3
seconds. Three dashes will appear in the area where the lock symbol is shown (below), then disappear. When the last dash has
disappeared, a pop-up screen will appear indicating the settings have been locked (or unlocked) and the buttons can be released.
Figure 8: Main Info Screen
FREQUENCY (OR CH)
CHANNEL (OR FREQ)
USER-ENTERED
TRANSMITTER
DESCRIPTION
(BLANK IF
NOT ENTERED)
RF
POWER
LEVEL
NETWORK
LINK
(CONNECTED)
SETTINGS
LOCKED
ADD-ON MODULE INFO
(TWO LINES)
AUDIO SOURCE SELECTED
AUDIO PRESET SELECTED
AUDIO INPUT GAIN LEVEL SELECTED
A403
While navigating through the menu, caret symbols (<,>,^,v) will show up, indicating that parts of the menu exist “off-screen” to the
left, right, above or below. (Figure 9)
Figure 9: Navigating the Menu
MENU TREE EXISTS
TO THE LEFT
SELECTION BOX
MENU TREE EXISTS
TO THE RIGHT
A403
MENU / SUBMENU TITLE
MENU TREE EXISTS ABOVE / BELOW


