


DL107, DL207 and DL210 2.0 Digi-Loop™ DSP Induction Loop Amplifiers
22
To re-install the firmware, follow these instructions
in sequence.
1. Unplug the ethernet and USB cables from the amplifier and computer.
2. Power OFF the amplifier.
3. Power OFF the computer.
If the computer is already powered up, shut it down. Then power it on. (Do not just reboot).
This clears
any previously established telnet connections and makes the USB port ready for connection. Wait for the computer to completely
boot into Windows.
4. Turn on the amplifier and wait for it to fully boot, showing the VU meters on the front LCD display.
5. Connect the USB cable from the computer to the amplifer.
6. Double-click on the firmware exe file to reinstall the firmware.
d. PC App Detail
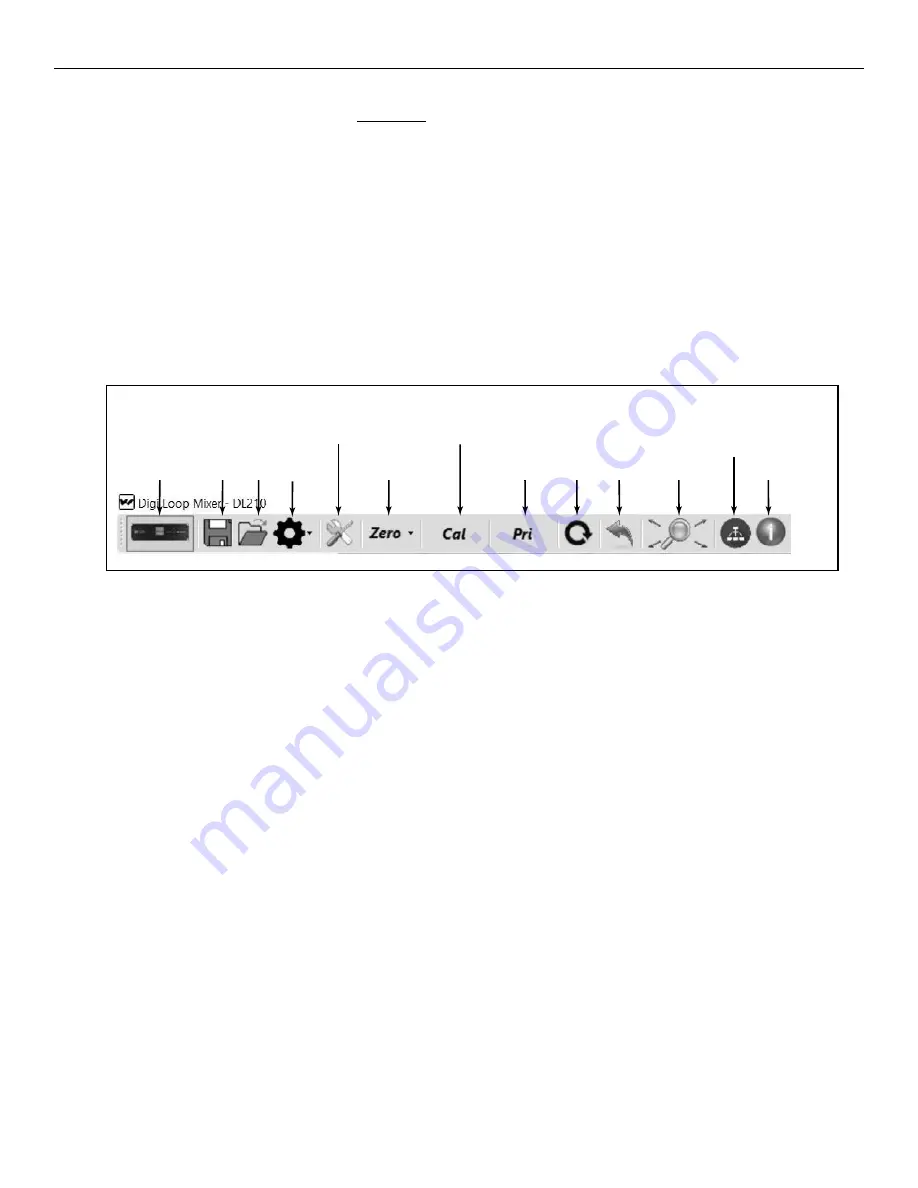
PC APP TOOLBAR
A598
Connect to
Amplifier
Save
Config
Load
Config
Application Settings
including
Communication Setup
Reset
Levels
Priority
Input
Selection
Calibration
System Info
including
App and
Firmware
Versions
Loop
Test
Network Info
(Ethernet and
Dante)
Connect to
Amplifier
Save
Config
Load
Config
Application Settings
including
Communication
Setup
Get Levels
and Status
Calibration
System Info
including
App and
Firmware
Versions
Loop
Test
Amplifier
Reset
Full-Screen
View
Revise
Tsbt
Presets
Connect to Amplifier
- This symbol establishes connection between the amplifier and the PC. When connected, the indicator turns green.
Save Config
- Stores all of the system settings in a file.
We recommend saving the settings in a file in case of power outage or other catastrophic failure. Settings should be saved
immediately after the system is calibrated.
Load Config
- Loads saved system settings from a file.
Tsbt Presets -
Resets the amplifier to factory default settings or user saved presets.
Application Settings
- This is where communication between the amplifier and the PC is set up. You can also change the quality of the
graphics or run a demo of the application - with simulated VU meter activity.
Reset Levels
- This will reset all of the slider and rotary dial levels to -INF.
Calibration
- This opens the calibration window, which provides a convenient way to calibrate the loop by generating a test tone (using
the amplifier’s internal tone generator), adjusting the frequency and output level, and measuring the signal level of the loop with a field-
strength meter.
Note: The field strength meter can be purchased through Williams Sound, model PLM FSMP. Please see our website or call us for more
information.
Priority Input Selection
- Allows selection of an input designated as an override to any/all inputs currently in use. When signal level
appears on the priority input, all other outputs are muted until the signal on the priority input is not present for a period of time. This is
useful for overhead paging/distributed speaker systems where announcements need to be heard by loop users.
Loop Test
- Performs a test on the loop(s) looking for an open or faulty loop.
Amplifier Reset
- This resets all settings to factory defaults and re-boots the amplifier.
Full-Screen View
- This returns the App to a full-screen view if the window has been re-sized or moved.
Network Info
- This shows the Ethernet Network Address settings and Dante™ Network Address settings.
System Info
- This shows the currently loaded firmware versions of: main CPU, DSP chipsets, network driver and bootloader. It also
displays the current PC App version.


