47xxN Series Time Zone Display
Operating and Installation Instructions
3 - Function Programming
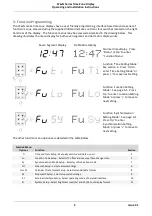
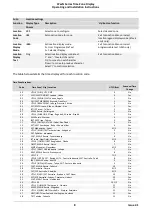
The 47xxN series time zone displays have a user friendly programming interface based around a series of
function menus, accessed using the supplied Infrared remote control or four switches located on the right
hand rear of the display. The function menus may be accessed as detailed in the drawing below. This
drawing illustrates the menu display for both seven segment and dot matrix display units.
Seven Segment Display
Dot Matrix Display
Normal time display. Press
‘Menu’ or ‘Up’ to enter
‘Function Menu’.
Function ‘Time Setting Mode’.
See section 4. Press ‘Up‘ to
enter ‘Time Setting Mode’ or
press ‘+’ to move next setting.
Function ‘Location Setting
Mode’. See page 5-1. Press
‘Up‘ to enter ‘Location Setting
Mode’ or press ‘+’ to move to
next setting.
Function ‘Synchronisation
Setting Mode’. See page 6-1.
Press ‘Up‘ to enter
‘Synchronisation Setting
Mode’ or press ‘+’ to move to
next setting.
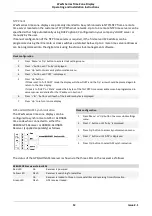
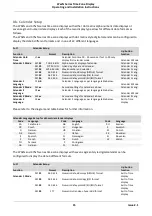
The other function menu options are detailed in the table below.
Function Menu
Options
Function
Section
Ti
Time and Date Setup - Manually set time and date on unit.
4
Lo
Location Code Setup - Select UTC offset and seasonal time change rules.
5
Sy
Synchronisation Mode Setup - Select synchronisation mode.
7
Nt
Ethernet Setup - Select network settings.
6
Cl or Di
Calendar / Date format Setup - Select calendar/date format.
8
SS
Stopwatch Setup - Select stopwatch settings.
9
Et
External Interface Setup - Select operating mode of external interface.
10
St
System Setup - Select brightness level (br) and 12/24 hour display format.
11
5
Issue 2.1


