4.
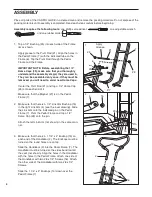
The Monitor (1) requires two “AA” batteries (not
included); alkaline batteries are recommended.
Remove the battery from the back of the Monitor. Insert
two “AA” batteries into the battery compartment of the
Monitor. Make sure that the negative (–) ends of the bat-
teries are touching the springs in the battery compart-
ment.
Reattach the battery cover to the back of the Monitor (1).
5. Connect the Sensor Wire (15) to the wire on the Monitor
(1). Insert any excess wire into the Frame (6). Attach the
Monitor to the Frame with a #8 x 1/2” Screw (16). Make
sure not to pinch the wire between the Frame and the
Monitor.
6. Remove the two 1/4” x 2” Screws (17) attaching the Seat
(3) to the underside of the Seat Tube (5). Attach the
Seat to the top of the Seat Tube with the two Screws as
shown. Make sure that the narrow end of the Seat is fac-
ing forward.
7. Pivot the Pedal Frame (7) until the Magnet (27) is
aligned with the Reed Switch (15). See the inset draw-
ing. Loosen the #8 x 3/4” Screw (18). Slide the Reed
Switch slightly closer to the Magnet. Tighten the #8 x
3/4” Screw. Exercise on the CARDIO GLIDE for a
moment. Repeat until the monitor displays correct feed-
back.
Make sure that the Magnet does not hit the
Reed Switch.
Note: One extra #8 x 1/2” Screw (16) and one extra 1/2”
Dome Cap (29) may have been included.
17
3
5
Narrow End
6
7
27
15
18
27
7
15
7
5
1
15
6
16
5
4
5
“AA” Batteries
Battery Cover


