background image

ELECTRONIC MONITOR

The simple-to-operate electronic monitor features five different modes to provide you with instant exer-

cise feedback. The five modes are described below:

• Speed—Displays your speed, in repetitions per minute.
• Time—Displays the length of time you have exercised. Note: If you stop exercising for ten seconds or longer,

the time mode will pause until you resume.

• Distance—Displays the total number of repetitions you have completed, up to 999. The display will then reset

to zero and continue counting. (Monitor 2 below will display up to 9,999 repetitions.)

• Calories—Displays the approximate number of Calories you have burned. Note: If the resistance is near the

highest or lowest setting, the actual number of Calories you have burned will be slightly higher or lower than

the number displayed.

• Scan—Displays all of the above modes, for approximately 5 seconds each, in a repeating cycle.

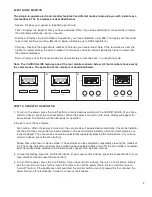
Note: The CARDIO GLIDE features one of the four monitors shown below. All four monitors have exactly

the same modes. The operation of the monitors is described below.

HOW TO OPERATE THE MONITOR

1. To turn on the power, press the on/off button or simply begin exercising on the CARDIO GLIDE. (If you have

monitor 2 above, press the on/reset button.) When the power is turned on, the entire display will appear for

two seconds. The monitor will then be ready for operation.

2. Select one of the five modes:

Scan mode—When the power is turned on, the scan mode will be selected automatically. One mode indicator

will show that the scan mode has been selected, and a second mode indicator will show which mode is cur-

rently displayed. The scan mode can also be selected by repeatedly pressing the mode button. (If you have

monitor 3 above, press the scan button).
Speed, time, distance or calories mode—These modes can be selected by repeatedly pressing the mode but-

ton. The mode indicators will show which mode has been selected. (Make sure that the scan mode is not select-

ed.).The modes will be selected in the following order: speed, time, distance, calories.

3. To reset the display, press the on/off button twice. (If you have monitor 2 above, press the on/reset button; if you

have monitor 4 above, press the clear button).

4. To turn off the power, press the on/off button. (If you have monitor 2 above, there is no on/off button. Simply

wait for about four minutes for the “auto-off” feature to turn off the power.) Note: All four monitors have an

“auto-off” feature. If the pedals are not moved and the monitor buttons are not pressed for four minutes, the

power will turn off automatically in order to conserve the batteries.

SPEED

TIME

DISTANCE

SCAN

CALORIE

MODE

ON/OFF

SPEED

TIME

DISTANCE

SCAN

CALORIE

MODE

ON/RESET

- AUTO-OFF -

Speed

Time

Mode

Scan

On/Off

Distance Calories

Scan

Speed

Time

Mode

Clear

On/Off

Distance Calories

Scan

1

2

3

4

7

Содержание WLMC003410

Страница 1: ...ory TO AVOID UNNECESSARY DELAYS PLEASE CALL DIRECT TO OUR TOLL FREE CUSTOMER HOT LINE The trained techni cians on our Customer Hot Line will provide immediate assis tance free of charge to you CUSTOMER HOT LINE 1 800 999 3756 Mon Fri 6 a m 6 p m MST Model No WLMC003410 Serial No Serial Number Decal PATENT PENDING CAUTION Read all safety precautions and instructions in this man ual carefully before...

Страница 2: ...S IMPORTANT PRECAUTIONS 3 ASSEMBLY 4 ADJUSTMENT AND OPERATION 6 MAINTENANCE AND TROUBLE SHOOTING 8 CONDITIONING GUIDELINES 9 PART LIST 10 EXPLODED DRAWING 11 ORDERING REPLACEMENT PARTS Back Cover WARRANTY Back Cover 2 ...

Страница 3: ...RDIO GLIDE when the resistance cylinder is below room tempera ture or damage may occur 8 The CARDIO GLIDE should not be used by persons weighing more than 250 pounds 113 kg Never allow more than one person at a time on the CARDIO GLIDE 9 Inspect and tighten all part regularly Replace any worn parts immediately 10 Use the CARDIO GLIDE only as described in this manual 11 The CARDIO GLIDE is intended...

Страница 4: ...nter the Pivot Rod 21 and tap a 1 2 Dome Cap 29 onto each end of it Make sure that the Magnet 27 is on the Pedal Frame 7 2 Make sure that there is a 1 2 Link Arm Bushing 19 in the right Link Arm 4 see the inset drawing Slide the Link Arm onto the indicated pin on the Pedal Frame 7 Pivot the Pedal Frame and tap a 1 2 Dome Cap 29 onto the pin Attach the left Link Arm not shown in the same man ner 3 ...

Страница 5: ...and the Monitor 6 Remove the two 1 4 x 2 Screws 17 attaching the Seat 3 to the underside of the Seat Tube 5 Attach the Seat to the top of the Seat Tube with the two Screws as shown Make sure that the narrow end of the Seat is fac ing forward 7 Pivot the Pedal Frame 7 until the Magnet 27 is aligned with the Reed Switch 15 See the inset draw ing Loosen the 8 x 3 4 Screw 18 Slide the Reed Switch slig...

Страница 6: ...our toes and rotate your heels downward CAUTION To avoid injury keep you feet firmly on the pedals to pre vent them from slipping UPPER BODY EXERCISE To focus on the muscles of the upper body rest your feet on the foot pegs rather than the pedals as you exercise ABDOMINAL EXERCISE To exercise your abdominal muscles keep your arms straight and bend back at the waist as you exercise Remember to keep...

Страница 7: ...or two seconds The monitor will then be ready for operation 2 Select one of the five modes Scan mode When the power is turned on the scan mode will be selected automatically One mode indicator will show that the scan mode has been selected and a second mode indicator will show which mode is cur rently displayed The scan mode can also be selected by repeatedly pressing the mode button If you have m...

Страница 8: ... back of the Monitor 1 ADJUSTING THE MAGNET AND REED SWITCH If the monitor does not function properly the Magnet 27 and Reed Switch 15 should be checked Pivot the Pedal Frame 7 until the Magnet is aligned with the Reed Switch See the inset drawing Loosen the indicated 8 x 3 4 Screw 18 Slide the Reed Switch 15 slightly closer to the Magnet 27 Tighten the 8 x 3 4 Screw Exercise on the CARDIO GLIDE f...

Страница 9: ... GUIDELINES Each workout should consist of three basic parts a warm up 20 to 30 minutes of training zone exercise and a cool down Warming up prepares the body for exercise by increasing circulation delivering more oxygen to the muscles and raising the body tempera ture Begin each workout with 5 to 10 minutes of stretching and light exercise to warm up Then increase the intensity of your exercise t...

Страница 10: ... 1 4 x 1 1 4 Endcap 11 1 1 1 2 x 2 Endcap 12 2 Pedal 13 2 1 1 4 x 1 Endcap 14 2 Bumper 15 1 Reed Switch Sensor Wire 16 5 8 x 1 2 Screw 17 2 1 4 x 2 Screw 18 1 8 x 3 4 Screw Key No Qty Description 19 4 1 2 Link Arm Bushing 20 2 1 2 Spacer 21 1 1 2 x 10 3 4 Pivot Rod 22 1 1 2 x 3 3 4 Rod 23 2 1 2 Cylinder Bushing Set 24 2 15 16 Spacer 25 4 1 2 Bushing 26 2 Foot Peg Foam 27 1 Magnet Retainer 28 1 1 2...

Страница 11: ...LODED DRAWING Model No WLMC003410 R0197A 32 18 28 29 15 29 31 8 21 13 16 29 26 7 12 30 10 27 26 29 19 19 4 30 12 23 23 24 24 20 9 23 20 8 8 14 29 6 29 14 8 25 15 25 25 19 29 4 16 1 2 19 3 29 5 17 11 22 11 ...

Страница 12: ...se All returns must be pre authorized by ICON This warranty does not extend to any product or damage to a product caused by or attributable to freight damage abuse misuse improper or abnormal usage or repairs not provided by a ICON authorized service center products used for commercial or rental pur poses or to products used as store display models No other warranty beyond that specifically set fo...

Отзывы: