

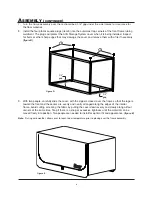
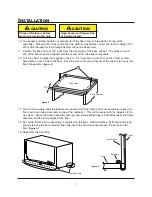


16. Once the front and rear flaps are pulled in place, insert wood screws through the clearance holes in
the side frames and the floor and then into the center of the cabinet(s) side panels. Do not let the
screw wander to the side or at an angle as damage to the cabinet(s) may result. Do not fully tighten
the screws against the frame at this time, keeping about 1/8” clearance between the screw head
and the tubing.
17. Pull the cover down to best fit position, pull the rear flap up to tighten the rear fabric panel. Pull the
front flap up to approximately the same position as the rear flap and carefully close the zippers to
check that the front flap is lightly tensioning the front cover to keep it straight. Repeat as necessary.
18. Open the zippers and tighten the side screws to hold the Attic Storage System assembly in position
on top of the cabinet.
19. Note the information on the white tag on the inside, upper rear seam of the cover and be certain that
it is legible and not obstructed by items stored in the Attic Storage System during use.
20. The zippers may be locked by passing a small padlock through the holes in the zipper pulls.
21. Do not place any items on top of the Attic Storage System cover or frame.
22. Do not allow items stored inside the Attic Storage System to rest against the fabric cover.
23. The fabric cover is not fire rated.
24 Do not exceed a load of 40 lbs per foot of width, evenly distributed, on the floor of the attic.
25. Unstable or heavy items should be placed in the rear corners to allow more stability and lighter
items to be near the front of the Attic Storage System when the zippers are opened and closed.
I
NSTALLATION
(
CONTINUED
)
Attic Width
Max. Weight Capacity
27" (69 cm)
90 lbs (41 kg)
42 1/2" (108 cm)
142 lbs (64 kg)
48" (122 cm)
160 lbs (73 kg)
54 1/2" (139 cm)
182 lbs (82 kg)
60" (152 cm)
200 lbs (91 kg)
8


