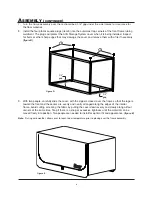
Wenger Attic Storage System Скачать руководство пользователя страница 6

7.

Turn the frame assembly over, there should be a 3/4" gap under the side frames for clearance for
the floor material. 

8.

Install the four plastic square plugs (item 5) into the outermost top corners of the front frame tubing
weldment. The plugs will protect the Attic Storage System cover when it is being installed. Inspect
for burrs or other sharp edges that may damage the cover and remove them with a file if necessary.

(figure D)

9.

With two people, carefully slide the cover, with the zippers closed, over the frame so that the logo is
toward the front and the seams are evenly and neatly arranged along the edges of the interior
frame. Avoid cutting or tearing the fabric by pulling the cover down evenly and slowly along all four
corners at the same time. Stop if there is a snag or excessive tightness until the material can be
moved freely into position. Two people are needed to install for optimal fit and appearance

(figure E)

Note: 

During cold weather, allow cover to reach room temperature prior to placing over the frame assembly.

figure D

5

3/4"
gap

3/4"
gap

6

A

SSEMBLY

(

CONTINUED

)

Your Performance Partner

Your P

erform

ance P

artner

figure E

5

Содержание Attic Storage System

Страница 1: ...tions 2 Warranty 2 Important User Information 3 General 3 Manufacturer 3 Intended Use 3 Required Tools 4 Parts and Fastener List 4 Assembly 5 6 Installation 7 Please read and understand these Assembly...

Страница 2: ...r Service Representative at 1 800 887 7145 and state the reason you are dissatisfied If a product return is necessary your representative will issue a return authorization This is your sole remedy for...

Страница 3: ...n be liable for technical or editorial omissions made herein nor for direct indirect special incidental or consequential damages resulting from the use or defect of this manual The information in this...

Страница 4: ...2 2 Front Frame 7 8 Machine Screw 10 24 x 2 3 2 Side Frame 8 4 Wood Screw 8 x 2 1 2 4 1 Bottom 9 2 Wood Screw 8 x 1 1 4 5 4 Plastic Square Plug The following tools are required to assemble the Attic...

Страница 5: ...em 7 through the front frame and then through the side frame Screw heads on the outside of the front frame Assemble the nuts item 6 snugly with the knurl locking feature toward the tube figure A 4 Pos...

Страница 6: ...r with the zippers closed over the frame so that the logo is toward the front and the seams are evenly and neatly arranged along the edges of the interior frame Avoid cutting or tearing the fabric by...

Страница 7: ...o position figure F 13 Two or more people and step ladders are required to lift the frame and cover assembly up over the floor and to set it down securely on top of the cabinet s This will be easier w...

Страница 8: ...mbly in position on top of the cabinet 19 Note the information on the white tag on the inside upper rear seam of the cover and be certain that it is legible and not obstructed by items stored in the A...

Отзывы: