


4
•
Remove components from packaging carefully.
•
Use corrugation as a cushion on which to assemble.
•
Keep hardware together until needed for assembly.
•
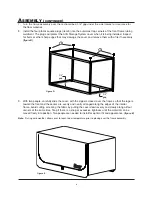
It is recommended that two people are used in the assembly process to ensure easy installation
without damage to cover.
B
EFORE
A
SSEMBLY
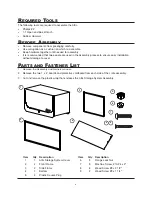
Item
Qty Description
Item
Qty Description
1
1
Attic Storage System Cover
6
8
Flange Lock Nut
2
2
Front Frame
7
8
Machine Screw, #10-24 x 2"
3
2
Side Frame
8
4
Wood Screw #8 x 2 1/2"
4
1
Bottom
9
2
Wood Screw #8 x 1 1/4"
5
4
Plastic Square Plug
The following tools are required to assemble the Attic.
•
Phillips #2
•
7
/
16
" Open and Box Wrench
•
Rubber Hammer
R
EQUIRED
T
OOLS
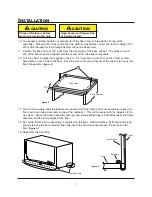
1.
Remove the Assembly and Owners manual.
2.
Remove the two 1 x 4” boards and protective cardboard from each side of the crate assembly.
3.
Cut and remove the plastic wrap that encloses the Attic Storage System Assembly.
P
ARTS AND
F
ASTENER
L
IST
Your Performance Partner
Your P
erform
ance P
artner
1
2
3
4
5
6
7
9
8


