


7
I
NSTALLATION
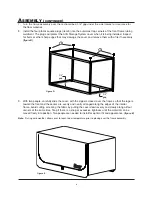
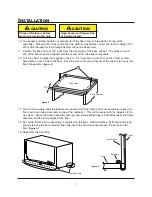
10. Two people and step ladders are required to lift the floor (item 4) into position on top of the
cabinet(s). Measure first to be certain that the width and depth are correct and that the height (30")
of the Attic Storage System Storage System will not be obstructed.
11. Position the floor (item 4) 3/4" back from the front edge of the base cabinet. The holes on each
end of the floor should be aligned with the center of the cabinet(s) end panels.
12. Once the floor is aligned into position insert a 1 1/4" wood screw (item 9) into the center counter-
bored hole on each side of the floor. Drive the screw into the end panel of the cabinet to secure the
floor into position.
(figure F)
13. Two or more people and step ladders are required to lift the frame and cover assembly up over the
floor and to set it down securely on top of the cabinet(s). This will be easier with the zippers all the
way open. Grasp the frame assembly securely and avoid getting fingers pinched between the frame
assembly and the sharp edges of the floor.
14. Be certain that the frame assembly is centered on the floor. With assistance, lift the back frame up
enough to bring the back material flap underneath the frame and up between the frame and the
floor.
(figure G)
15. Repeat for the front flap.
Check all fasteners before
moving or raising the unit.
!
CAUTION
Keep hands and fingers free
of being pinched.
!
CAUTION
Cover
Rear Frame
Floor
Pull Flap
figure G
Your Performance Partner
Your P
erform
ance P
artner
Attic Floor
Base Cabinet
9
Material Flap
figure F
3/4"


