WELL WRC500N / WRC5010N / WRC5010NU
105
WPS
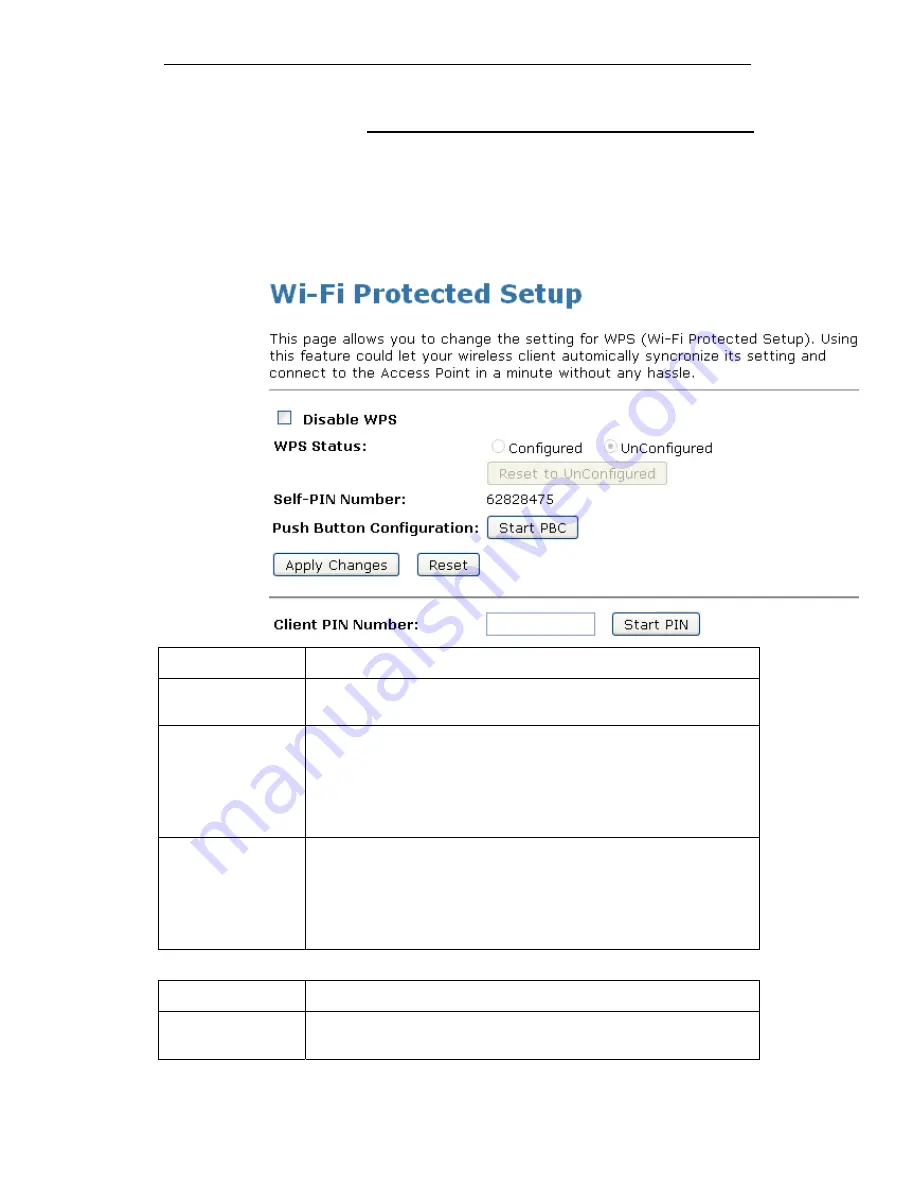
This page allows you to change the setting for WPS (Wi-Fi
Protected Setup). Using this feature could let your wireless
client automatically syncronize its setting and connect to the
Access Point in a minute without any hassle. To access the
Wireless Network WPS
page:
From the left-hand
Wireless
menu, click on
WPS
. The following
page is displayed:
Field Description
Disable WPS
Checking this box and clicking “Apply Changes” will disable Wi-Fi
Protected Setup. WPS is turned on by default.
WPS Status
When AP’s settings are factory default (out of box), it is set to open
security and un-configured state. It will be displayed by “WPS
Status”. If it already shows “Configured”, some registrars such as
Vista WCN will not configure AP. Users will need to go to the
“Save/Reload Settings” page and click “Reset” to reload factory
default settings.
Self-PIN Number
“Self-PIN Number” is AP’s PIN. Whenever users want to change
AP’s PIN, they could click “Regenerate PIN” and then click “ Apply
Changes”. Moreover, if users want to make their own PIN, they
could enter four digit PIN without checksum and then click “ Apply
Changes”. However, this would not be recommended since the
registrar side needs to be supported with four digit PIN.
Field Description
Push Button
Configuration
Clicking this button will invoke the PBC method of WPS. It is only
used when AP acts as a registrar.
Содержание WRC5000N
Страница 14: ...WELL WRC500N WRC5010N WRC5010NU 14 2 Single RIGHT click on Local Area connection then click Properties ...
Страница 15: ...WELL WRC500N WRC5010N WRC5010NU 15 3 Double click on Internet Protocol TCP IP ...
Страница 19: ...WELL WRC500N WRC5010N WRC5010NU 19 3 Single RIGHT click on Local Area connection then click Properties ...
Страница 23: ...WELL WRC500N WRC5010N WRC5010NU 23 2 In the Control Panel Home click on Change adapter settings to continue ...
Страница 24: ...WELL WRC500N WRC5010N WRC5010NU 24 3 Single RIGHT click on Local Area Connection then click Properties ...
Страница 25: ...WELL WRC500N WRC5010N WRC5010NU 25 4 Double click on Internet Protocol Version 4 TCP IPv4 ...
Страница 30: ...WELL WRC500N WRC5010N WRC5010NU 30 3 Click on the ratio of Gateway and then click on Next ...
Страница 35: ...WELL WRC500N WRC5010N WRC5010NU 35 2 Double click Network Connections ...
Страница 75: ...WELL WRC500N WRC5010N WRC5010NU 75 Figure 8 Wireless Network page ...
Страница 104: ...WELL WRC500N WRC5010N WRC5010NU 104 15 Connect successfully Click on OK button to confirm and return ...
Страница 113: ...WELL WRC500N WRC5010N WRC5010NU 113 7 Click on Turn on network discovery and file sharing ...
Страница 114: ...WELL WRC500N WRC5010N WRC5010NU 114 8 Click on No make the network that I am connected to a private network ...
Страница 115: ...WELL WRC500N WRC5010N WRC5010NU 115 9 AP s icon will show up Double click on it ...
Страница 116: ...WELL WRC500N WRC5010N WRC5010NU 116 10 Users could also Click Add a wireless device if the icon is not there Click next ...
Страница 117: ...WELL WRC500N WRC5010N WRC5010NU 117 11 Enter AP s Self PIN Number and click next ...
Страница 118: ...WELL WRC500N WRC5010N WRC5010NU 118 12 Choose a name that people who connect to your network will recognize ...
Страница 119: ...WELL WRC500N WRC5010N WRC5010NU 119 13 Enter the Passphrase and then click Next ...
Страница 144: ...WELL WRC500N WRC5010N WRC5010NU 144 5 Change setting successfully Click on Reboot Now button to confirm ...
Страница 146: ...WELL WRC500N WRC5010N WRC5010NU 146 4 Change setting successfully Click on Reboot Now button to confirm ...
Страница 148: ...WELL WRC500N WRC5010N WRC5010NU 148 5 Change setting successfully Click on Reboot Now button to confirm ...
Страница 150: ...WELL WRC500N WRC5010N WRC5010NU 150 5 Change setting successfully Click on Reboot Now button to confirm ...
Страница 152: ...WELL WRC500N WRC5010N WRC5010NU 152 5 Change setting successfully Click on Reboot Now button to confirm ...
Страница 155: ...WELL WRC500N WRC5010N WRC5010NU 155 5 Change setting successfully Click on Reboot Now button to confirm ...
Страница 176: ...WELL WRC500N WRC5010N WRC5010NU 176 ...
Страница 187: ...WELL WRC500N WRC5010N WRC5010NU 187 6 Change setting successfully Click on Reboot Now button to confirm ...
Страница 191: ...WELL WRC500N WRC5010N WRC5010NU 191 6 Change setting successfully Click on Reboot Now button to confirm ...
Страница 195: ...WELL WRC500N WRC5010N WRC5010NU 195 5 Firmware update has been update complete The following page is displayed ...
Страница 202: ...WELL WRC500N WRC5010N WRC5010NU 202 ...


