background image

TABLE OF CONTENTS

SECTION 1 − SAFETY PRECAUTIONS - READ BEFORE USING

. . . . . . . . . . . . . . . . . . . . . . . . . . . . . . . . . . . 
1-1.

Symbol Usage

. . . . . . . . . . . . . . . . . . . . . . . . . . . . . . . . . . . . . . . . . . . . . . . . . . . . . . . . . . . . . . . . . . . . . . . . 

1-2.

Tungsten Grinding Hazards

. . . . . . . . . . . . . . . . . . . . . . . . . . . . . . . . . . . . . . . . . . . . . . . . . . . . . . . . . . . . . 

1-3.

California Proposition 65 Warnings

. . . . . . . . . . . . . . . . . . . . . . . . . . . . . . . . . . . . . . . . . . . . . . . . . . . . . . . 

1-4.

Principal Safety Standards

. . . . . . . . . . . . . . . . . . . . . . . . . . . . . . . . . . . . . . . . . . . . . . . . . . . . . . . . . . . . . 

SECTION 2 − DEFINITIONS

. . . . . . . . . . . . . . . . . . . . . . . . . . . . . . . . . . . . . . . . . . . . . . . . . . . . . . . . . . . . . . . . . . . 

2-1.

Manufacturer’s Rating Label For CE Products

. . . . . . . . . . . . . . . . . . . . . . . . . . . . . . . . . . . . . . . . . . . . . 

2-2.

Symbols And Definitions

. . . . . . . . . . . . . . . . . . . . . . . . . . . . . . . . . . . . . . . . . . . . . . . . . . . . . . . . . . . . . . . 

SECTION 3 − SPECIFICATIONS

. . . . . . . . . . . . . . . . . . . . . . . . . . . . . . . . . . . . . . . . . . . . . . . . . . . . . . . . . . . . . . . . 

3-1.

Description

. . . . . . . . . . . . . . . . . . . . . . . . . . . . . . . . . . . . . . . . . . . . . . . . . . . . . . . . . . . . . . . . . . . . . . . . . . 

3-2.

Included With Your Unit

. . . . . . . . . . . . . . . . . . . . . . . . . . . . . . . . . . . . . . . . . . . . . . . . . . . . . . . . . . . . . . . . 

3-3.

Specifications

. . . . . . . . . . . . . . . . . . . . . . . . . . . . . . . . . . . . . . . . . . . . . . . . . . . . . . . . . . . . . . . . . . . . . . . . 

SECTION 4 − INSTALLATION

. . . . . . . . . . . . . . . . . . . . . . . . . . . . . . . . . . . . . . . . . . . . . . . . . . . . . . . . . . . . . . . . . . 

4-1.

Connecting Input Power

. . . . . . . . . . . . . . . . . . . . . . . . . . . . . . . . . . . . . . . . . . . . . . . . . . . . . . . . . . . . . . . . 

4-2.

Connecting Grinder To Exhaust (Vacuum) Hose

. . . . . . . . . . . . . . . . . . . . . . . . . . . . . . . . . . . . . . . . . . . . 

SECTION 5 − OPERATION

. . . . . . . . . . . . . . . . . . . . . . . . . . . . . . . . . . . . . . . . . . . . . . . . . . . . . . . . . . . . . . . . . . . . 

5-1.

Grinder Components

. . . . . . . . . . . . . . . . . . . . . . . . . . . . . . . . . . . . . . . . . . . . . . . . . . . . . . . . . . . . . . . . . . 

5-2.

Grinding And Cutting Electrodes

. . . . . . . . . . . . . . . . . . . . . . . . . . . . . . . . . . . . . . . . . . . . . . . . . . . . . . . . . 

5-3.

Replacing Grinding Wheels

. . . . . . . . . . . . . . . . . . . . . . . . . . . . . . . . . . . . . . . . . . . . . . . . . . . . . . . . . . . . . 

5-4.

Installing Optional Double-Decker Kit

. . . . . . . . . . . . . . . . . . . . . . . . . . . . . . . . . . . . . . . . . . . . . . . . . . . . . 

5-5.

Installing Grinder Mounting Bracket

10 

. . . . . . . . . . . . . . . . . . . . . . . . . . . . . . . . . . . . . . . . . . . . . . . . . . . . . . 

SECTION 6 − MAINTENANCE & TROUBLESHOOTING

11 

. . . . . . . . . . . . . . . . . . . . . . . . . . . . . . . . . . . . . . . . . . . 

6-1.

Routine Maintenance

11 

. . . . . . . . . . . . . . . . . . . . . . . . . . . . . . . . . . . . . . . . . . . . . . . . . . . . . . . . . . . . . . . . . . 

6-2.

Troubleshooting

11 

. . . . . . . . . . . . . . . . . . . . . . . . . . . . . . . . . . . . . . . . . . . . . . . . . . . . . . . . . . . . . . . . . . . . . . 

SECTION 7 − PARTS LIST

12 

. . . . . . . . . . . . . . . . . . . . . . . . . . . . . . . . . . . . . . . . . . . . . . . . . . . . . . . . . . . . . . . . . . . . . 

Содержание TTG Plus

Страница 1: ...ESPA OL OM 230 915D 2010 04 ENGLISH File TIG GTAW Owner s Manual Manuel de L utilisateur Manual del Operador Description TIG GTAW Welding Tungsten Grinder Triad Tungsten Grinder TTG Plus FRAN AIS...

Страница 2: ...SPECIFICATIONS 4 3 1 Description 4 3 2 Included With Your Unit 4 3 3 Specifications 4 SECTION 4 INSTALLATION 5 4 1 Connecting Input Power 5 4 2 Connecting Grinder To Exhaust Vacuum Hose 5 SECTION 5 OP...

Страница 3: ...r bare wiring replace cord immediately if damaged bare wiring can kill Turn off all equipment when not in use Use only well maintained equipment Repair or replace damaged parts at once Maintain unit a...

Страница 4: ...National Fire Protec tion Association Quincy MA 02269 phone 1 800 344 3555 website www nfpa org and www sparky org Safe Handling of Compressed Gases in Cylinders CGA Pamphlet P 1 from Compressed Gas...

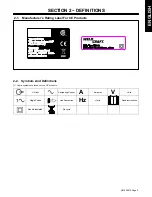
Страница 5: ...S 2 1 Manufacturer s Rating Label For CE Products 2 2 Symbols And Definitions Some symbols are found only on CE products Output Alternating Current A Amperes V Volts Single Phase Line Connection Hz He...

Страница 6: ...na or yttria instead of thoria Grinding dust from thoriated electrodes contains low level radioactive material Properly dispose of grinder dust in an environmentally safe way Wear proper face hand and...

Страница 7: ...ion at the grinder or wear an approved respirator Read MSDS for safety infor mation Consider using tungsten containing ceria lanthana or yttria instead of thoria Grinding dust from thoriated electrode...

Страница 8: ...5 1 Grinder Components 804 718 1 On Off Switch 2 Identification Label 3 Grinding Head 4 Tungsten Sharpening Angle 5 Tungsten Sharpening Diameters 6 Tungsten Sharpening Holes 7 Tungsten Surface Grindin...

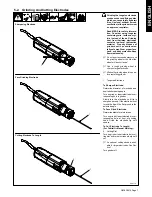
Страница 9: ...o sharpen large electrodes Wait until grinding wheel stops be fore restarting grinder 1 Tungsten Electrode To Sharpen Electrode Determine diameter of electrode and desired sharpening angle Turn on gri...

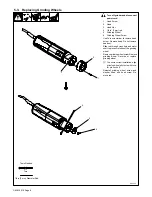
Страница 10: ...ew Remove head Do not remove head nut Slide rod through cross hole and motor shaft to prevent rotation of the grinding wheel Remove grinding wheel screw Remove grinding wheel Reverse or replace grindi...

Страница 11: ...0 Additional Head Screw M4 x 34 Use Torx screwdriver to remove original head screw Remove original head Do not remove head nut Slide rod through cross hole and motor shaft to prevent rotation of the g...

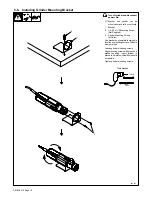
Страница 12: ...4 20 x 1 2 Mounting Screw Not Supplied 3 Grinder Mounting Screws w Collar Use bracket as a template to mark hole location on mounting surface Drill hole where marked Loosen grinder mounting screws Al...

Страница 13: ...2 Troubleshooting Trouble Remedy Motor does not run Have Factory Authorized Service Agent check power cable and replace if necessary Have Factory Authorized Service Agent check motor and replace if ne...

Страница 14: ...WC232 144 Brush Carbon 2 3 WC232 145 Wheel Grinding Standard 1 4 WC232 146 Screw Grinding Wheel M4 x 6 1 5 WC232 147 Head Grinding 1 6 WC232 148 Screw Head w Collar M4 x 15 Includes Head Nut 2 WC232 1...

Страница 15: ...Head Grinding 1 10 WC232 149 Wheel Grinding Rough 1 11 WC232 156 Extension Shaft 1 WC232 157 Case Steel Carrying 1 WC232 158 Screwdriver Torx 1 10 WC232 149 Wheel Grinding Rough 1 WC232 150 Electrode...

Страница 16: ...pment Service and Repair Replacement Parts Welding Process Handbooks Contact the Delivering Carrier to For Service Owner s Record File a claim for loss or damage during shipment For assistance in fili...

Страница 17: ...OM 230 915D fre 2010 04 File TIG GTAW Manuel de L utilisateur Description TIG Meuleuse d lectrodes au tungst ne Meuleuse triple action d lectrodes au tungst ne TTG Plus FRAN AIS...

Страница 18: ...s 3 SECTION 3 FICHE TECHNIQUE 4 3 1 Description 4 3 2 Accessoires inclus 4 3 3 Fiche technique 4 SECTION 4 INSTALLATION 5 4 1 Branchement de l alimentation 5 4 2 Raccordement de la meuleuse au flexibl...

Страница 19: ...ux V rifier fr quemment le cordon d alimentation pour voir s il n est pas endommag ou d nud remplacer le cordon imm diatement s il est endommag un c ble d nud peut provoquer une lectrocution Mettre l...

Страница 20: ...t l phone 1 877 413 5184 site Internet www global ihs com Norme AWS F4 1 Safe Practices for the Preparation of Containers and Piping for Welding and Cutting chez Global Engineering Documents t l phon...

Страница 21: ...fabricant pour produits certifi s CE 2 2 Symboles et d finitions Certains symboles se retrouvent sur les produits certifi s CE uniquement Puissance Courant alternatif A Amp res V Volts Monophas Racco...

Страница 22: ...tungst ne contenant du c rium du lanthane ou de l yttrium au lieu de thorium La poussi re provenant du meulage d lectrodes thori es contient des mati res faiblement radioactives liminer la poussi re...

Страница 23: ...signal tique Utiliser un tungst ne contenant du c rium du lanthane ou de l yttrium au lieu de thorium La poussi re prove nant du meulage d lectrodes tho ri es contient des mati res faiblement radioact...

Страница 24: ...4 718 1 Interrupteurd alimentation 2 tiquette d identification 3 T te de meulage 4 Angle d aff tage pour tungst ne 5 Diam tres d aff tage pour tungst ne 6 Trous d aff tage pour tungst ne 7 Trous de re...

Страница 25: ...and diam tre Attendre que la meule arr te de tourner avant de red marrer la meuleuse 1 lectrode de tungst ne Pour aff ter l lectrode D terminerle diam tre de l lectrode et l angle d aff tage d sir Met...

Страница 26: ...retirer l crou de t te Introduire la tige dans le trou de passage et travers l arbre du moteur pour emp cher la rotation de la meule Retirer la vis de meule Retirer la meule Inverser ou remplacer la m...

Страница 27: ...onnelle M4 x 34 Utiliser le tournevis Torx pour retirer la vis de t te d origine Retirer la t te d origine Ne pas retirer l crou de t te Introduirela tige dans le trou de passage et travers l arbre du...

Страница 28: ...ie 3 Vis de montage avec collier Utiliser l trier comme gabarit pour marquer la position du trou sur la surface de montage Percer le trou la position marqu e Desserrer les vis de montage de la meuleus...

Страница 29: ...er 6 2 D pannage Probl me Mesures correctives Manque du moteur d marrer Faire v rifier le c ble d alimentation par le repr sentant de service agr ou la remplacer s il le faut Faire v rifier le moteur...

Страница 30: ...lai carbone 2 3 WC232 145 Meule standard 1 4 WC232 146 Vis de meule M4 x 6 1 5 WC232 147 T te de meulage 1 6 WC232 148 Vis De t te avec collier M4 x 15 inclut crou de t te 2 WC232 159 tiquette sur bri...

Страница 31: ...e de meulage 1 10 WC232 149 Meule rugueuse 1 11 WC232 156 Arbre rallonge 1 WC232 157 Valise en acier 1 WC232 158 Tournevis Torx 1 10 WC232 149 Meule rugueuse 1 WC232 150 Porte lectrode sans colliers d...

Страница 32: ...z le dans vos dossiers Informations propri taire TRADUCTION DES INSTRUCTIONS ORIGINELLES IMPRIME AUX USA 2010 Weldcraft Products Inc 2010 01 Weldcraft An Illinois Tool Works Company 2741 N Roemer Rd A...

Страница 33: ...ESPA OL OM 230 915D spa 2010 04 File TIG GTAW Manual del Operador Descripci n Soldadura TIG Amoladora de Tungsteno Amoladora de Tungsteno tres en uno TTG Plus...

Страница 34: ...n 4 3 2 Incluido con su unidad 4 3 3 Especificaciones 4 SECCI N 4 INSTALACI N 5 4 1 Conectando la potencia de entrada 5 4 2 Conexi n de la amoladora a la manguera de una aspiradora 5 SECCI N 5 OPERACI...

Страница 35: ...este equipo Instale este equipo de la forma correcta siguiendo las indicaciones del Manual del Usuario y de acuerdo con las normas nacionales estatales y locales Frecuentementeinspeccione el cord n de...

Страница 36: ...ing and Allied Processes ANSI Standard Z49 1 from Global Engineering Documents phone 1 877 413 5184 website www global ihs com Safe Practices for the Preparation of Containers and Piping for Welding a...

Страница 37: ...e capacidades del fabricante para los productos CE 2 2 S mbolos y definiciones Algunos s mbolos s lo se encuentran en los productos CE Salida Corriente alterna A Amperios V Voltios Monof sica Conexi n...

Страница 38: ...o en vez de torio pues el polvo producido al esmerilar los electrodostoriados contiene material con bajo nivel de radioactividad Deseche el polvo producido por la amoladora de forma segura para el med...

Страница 39: ...e las Hojas de datos de seguridad de los materiales MSDS Procure utilizar electrodos de tungsteno que contengan cerio lantano o itrio en vez de torio pues el polvo producido al esmerilar los electrodo...

Страница 40: ...terruptor de encendido apagado 2 Etiqueta de identificaci n 3 Cabezal de esmerilado 4 ngulo de afilado del tungsteno 5 Di metro de afilado del tungsteno 6 Agujeros para afilado del tungsteno 7 Agujero...

Страница 41: ...ectrodos de gran tama o Antes de volver a encender la amoladora espera a que la rueda de amolar se detenga 1 Electrodo de tungsteno Para afilar el electrodo Determineel di metro y el ngulo de afilado...

Страница 42: ...a tuerca Introduzca la varilla a trav s del agujero transversal y el eje del motor para impedir que la rueda de amolar gire Retire el tornillo de la rueda de amolar y desmonte la rueda D vuelta la rue...

Страница 43: ...el destornillador Torx para retirar el tornillo del cabezal original Desmonte el cabezal original pero no retire la tuerca del cabezal Introduzca la varilla a trav s del agujero transversal y el eje...

Страница 44: ...la amoladora con collar Utilice el soporte a modo de plantilla para marcar la posici n del agujerosobre la superficie de montaje y luego perf rela en la marca Afloje los tornillos de montaje de la amo...

Страница 45: ...otor no funciona Haga que un agente del servicio t cnico autorizado de la f brica revise el cable de alimentaci n y lo reemplace si es necesario Haga que un agente del servicio t cnico autorizado de l...

Страница 46: ...rb n 2 3 WC232 145 Rueda de amolar Est ndar 1 4 WC232 146 Tornillo de la rueda de amolar M4 x 6 1 5 WC232 147 Cabezal de esmerilado 1 6 WC232 148 Tornillo del cabezal con collar M4 x 15 Incluye la tue...

Страница 47: ...1 10 WC232 149 Rueda de amolar Desbaste 1 11 WC232 156 Extensi n del eje 1 WC232 157 Maleta de acero para transporte 1 WC232 158 Destornillador Torx 1 10 WC232 149 Rueda de amolar para desbaste 1 WC23...

Страница 48: ...n un DISTRIBUIDOR o AGENCIA DE SERVICIO cerca suyo Comun quese con su transportista para Para ubicar un distribuidor o agencia de servicio llame al No en Estados Unidos 1 800 752 7620 o 920 882 6800 N...

Отзывы: