background image

2 of 32

Part Number 020006830  04/23/2018


Subject: Installation Procedure Model WBK10X Water Booster Pump

ATTENTION: PRESSURE REQUIREMENTS

Max. inlet water pressure: 0.345 MPa (3.45 bar) (50 psi)
Min. inlet water pressure: 0.138 MPa (1.38 bar) (20 psi)

INTRODUCTION

The following instructions cover the installation of a 

220 VAC, 50/60 Hz (international) booster. An appropriate 

3-wire power receptacle must be located within 6 ft (1.8 m) 

of the Booster Kits. 
Unpack the unit from its transportation packaging and 

visually check for any signs of damage.
NOTE: Do not plug in Booster Pump Module at this time.

Installation

IImortant


This booster pump is intended to be installed outside 

zone 1 and 2, as specified in IEC 60364-7-701.
The booster pump needs to be installed with a horizontal 

distance to possibly spraying water of 1.8 meter. It is not 

allowed to install the water booster above or below 

(vertically) of possibly spraying water sources.
The water booster has to be installed vertical and NOT 

horizontal.

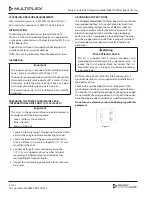
PREPARING THE POWER CORD/MAINS LEAD 

(INTERNATIONAL UNITS ONLY [P.N. 00216382])

IImortant


The wires in the power cord/mains lead are colored in 

accordance with the following code:

•  Green / Yellow = Ground/Earth
•  Blue = Neutral
•  Brown = Line/Live

1.  Locate a 3-terminal plug. This plug (not furnished with 

kit) must have a ground-wire-connecting terminal.

2.  Locate the loose end of the power cord attached to 

the kit. All three (3) wires are stripped to 1/2" (1.3 cm) 

length from the end.

3.  Connect all three (3) wires to the plug using the 

1/2" (1.3 cm) stripped ends or any other terminal 

requirements. Different plugs and terminals may 

require different stripped lengths.

4.  Inspect the cord and plug connection for any loose or 

bare wires.

GROUNDING INSTRUCTIONS

The Multiplex Model WBK10X Water Booster Pump should 

be grounded/earthed. In the event of an electrical short 

circuit, grounding reduces the risk of electric shock by 

providing an escape wire for the electrical current. This 

product is equipped with a cord having a grounding/

earth wire with an appropriate grounding plug. The plug 

must be plugged into an outlet that is properly installed 

and grounded in accordance with all local codes and 

ordinances.

n

Warning

Risk of Electric Shock

This kit is supplied with a ground conductor and 

grounding-type attachment plug (domestic only). To 

reduce the risk of electric shock, be certain that it is 

connected only to a properly grounded, grounding-

type receptacle.

NOTE: For 220-240 VAC, 50/60 Hz International Units, a 

ground male plug must be supplied at the installation of 

the booster pump.
Check with a qualified electrician or serviceman if the 

grounding instructions are not completely understood or 

if in doubt as to whether the product is properly grounded. 

Do not modify the plug provided; if it will not fit the outlet, 

have the proper outlet installed by a qualified electrician.
Do not use an extension cord or an adapter plug with this 

equipment.

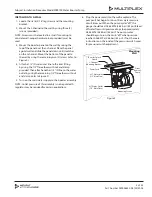
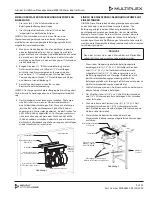
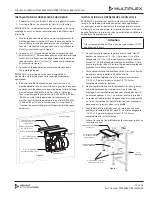
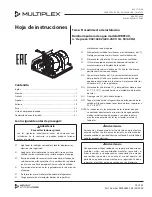
Figure 1

Содержание Multiplex WBK10X

Страница 1: ...on DO Store CO2 cylinder s in well ventilated areas DO Use proper protective equipment when performing maintenance or cleaning on the unit DO NOT Throw or drop a CO2 cylinder Secure the cylinder s in an upright position with a chain DO NOT Connect the CO2 cylinder s directly to the product container Doing so will result in an explosion causing possible death or injury Best to connect the CO2 cylin...

Страница 2: ... attached to the kit All three 3 wires are stripped to 1 2 1 3 cm length from the end 3 Connect all three 3 wires to the plug using the 1 2 1 3 cm stripped ends or any other terminal requirements Different plugs and terminals may require different stripped lengths 4 Inspect the cord and plug connection for any loose or bare wires GROUNDING INSTRUCTIONS The Multiplex Model WBK10X Water Booster Pump...

Страница 3: ...Then attach another 1 2 ID line to the water outlet by using the remaining 1 2 flare elbow with nut and clamp refer to Figure 2 5 Turn on the main water supply to the booster assembly NOTE Outlet pressure of this assembly is not regulated A regulator may be required for certain applications 6 Plug the power cord into the wall receptacle The pump will not begin to run until low water pressure circu...

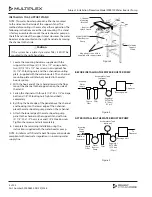
Страница 4: ...he stand 3 Fasten the channel with three 3 1 4 20 x 1 2 carriage bolts and 1 4 20 locking nuts Tighten all bolts completely 4 By lifting the back edge of the panel above the channel and hooking it on the lower edge of the J channel place the water booster pump panel on the J channel 5 Attach the lower edge of the water booster pump panel to the channel on the support stand with two 2 1 4 20 x 1 2 ...

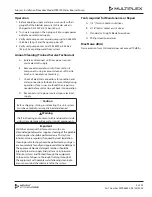
Страница 5: ...nnect unit to power source mains electrical supply Caution Before shipping storing or relocating this unit system must be vented of pressure drained and cleaned nWarning Ifleftinafreezingenvironmentwithresidualwaterinside unit system damage will occur to internal components Importan Welbilt recommends that for countries with non chlorinated potable water supplies cleaning of the potable water supp...

Страница 6: ......

Страница 7: ...n Metallflächen am gesamten Gerät besonders vorsichtig GEHEN Sie mit den CO2 Zylindern und Druckmessgeräten vorsichtig um Schützen Sie die Zylinder angemessen vor Abnutzung LAGERN Sie die CO2 Zylinder in gut belüfteten Räumen VERWENDEN Sie geeignete Schutzausrüstung bei der Durchführung von Wartungs oder Reinigungs am Gerät LASSEN Sie den CO2 Zylinder NICHT fallen oder werfen Sie ihn nicht Sichern...

Страница 8: ...dose mit 3 Leitern aufsuchen Dieser Stecker nicht im Satz mitgeliefert muss über einen Pol mit Erdungsdraht verfügen 2 Das lose Ende des Netzkabels aufsuchen das mit dem Satz verbunden ist Alle drei Drähte müssen 1 3 cm vom Ende abisoliert werden 3 Alle drei 3 Drähte an den 1 3 cm abisolierten Enden am Stecker befestigen bzw andere Abschlussanforderungen erfüllen Unterschiedliche Stecker und Absch...

Страница 9: ...justiert wird Spritzschutz Befestigungshalterung mit J Profil Netzkabel Wassereinlass Nr 27 1 2 Zoll Anschlussbuchse Wasserauslass Nr 27 1 2 Zoll Anschlussstecker Montagewand Wasser drucker höhungs pumpe Befestigungsschrauben Abbildung 2 EINBAU DER WASSERDRUCKERHÖHUNGSPUMPE AUF EINEM STÄNDER HINWEIS Diese Wasserdruckerhöhungspumpe kann entweder an der Seite oder in einem Ständer montiert werden Di...

Страница 10: ...Lappen C Alle elektrischen Anschlüsse auf Zustand und Wasseranschlüsse auf Dichtheit prüfen um die Sicherheit während des Betriebs zu gewährleisten Wenn irgendwelche Probleme gefunden werden dann Reparaturen sind erforderlich bevor Gerät kann wieder in Betrieb genommen werden D Schließen Einheit an die Stromquelle Netzstromversorgung Vorsicht Vor dem Versand Lagerung oder ein anderer Standort des ...

Страница 11: ...caution Protéger correctement les cylindres de l abrasion Garder le s cylindre s à dioxyde de carbone CO2 dans des lieux bien aérés Ne Utilisez équipement de protection approprié lors de l entretien ou de nettoyage sur l appareil Éviter de jeter ou de laisser tomber un cylindre à dioxyde de carbone CO2 Protéger le s cylindre s en le s plaçant dans une position verticale à l aide d une chaîne Évite...

Страница 12: ...rnes Cette prise non livrée avec le kit doit être reliée à la masse 2 Trouver l extrémité libre du cordon d alimentation fixé au kit Les trois 3 fils sont dénudés à 1 3 cm 1 2 po à partir du bout 3 Raccorder les trois 3 fils à la prise à l aide des extrémités dénudées de 1 3 cm 1 2 po ou selon les besoins de tout autre terminal D autres prises ou terminaux peuvent nécessiter différentes longueurs ...

Страница 13: ...asement mâle 1 2 po Mur de fixation Surpresseur d eau Vis de fixation Figure 2 INSTALLATION DU SURPRESSEUR SUR UN SOCLE REMARQUE Ce surpresseur peut être monté sur le côté ou dans le socle La méthode est identique pour ces deux applications Les consignes suivantes portent sur le montage latéral Ce socle a été monté en usine pour fixer le surpresseur d eau sur son côté gauche Toutefois le surpresse...

Страница 14: ...poils doux ou une serviette non abrasif chiffon C Vérifiez toutes les connexions électriques pour les connexions de condition et de l eau pour les fuites pour assurer la sécurité pendant le fonctionnement Si des problèmes sont détectés puis des réparations sont nécessaires avant que l unité peut être remis en service D Rebranchez l unité de source d énergie alimentation secteur électrique Attentio...

Страница 15: ...CO2 en áreas bien ventiladas SÍ Utilizar el equipo de protección adecuado al realizar el mantenimiento o la limpieza de la unidad NO Arroje ni deje caer un cilindro de CO2 Fije los cilindros en posición vertical con una cadena NO Conecte los cilindros de CO2 directamente al recipiente del producto Si lo hace se producirá una explosión que puede provocar lesiones o la muerte Es mejor conectar los c...

Страница 16: ... del cable de alimentación que está conectado al kit Los tres 3 cables tienen los extremos pelados en 1 3 cm 1 2 pulg de longitud 3 Conecte los tres 3 cables al enchufe por los extremos pelados 1 3 cm 1 2 pulg o por cualquier otro requisito del terminal Los distintos enchufes y terminales pueden requerir distintas longitudes peladas 4 Inspeccione la conexión del cable y del enchufe en busca de ala...

Страница 17: ...esorio abocinado macho de 1 2 pulg Salida de agua n 27 accesorio abocinado macho de 1 2 pulg Pared de montaje Bomba impulsora de agua Tornillos de montaje Figura 2 CÓMO INSTALAR LA BOMBA IMPULSORA DE AGUA A UNA ESTRUCTURA DE SOPORTE NOTA Esta bomba impulsora de agua se puede instalar ya sea al lado o dentro de la estructura de soporte El método de montaje es el mismo para cualquiera de las dos apl...

Страница 18: ... toalla no abrasivo trapo C Compruebe todas las conexiones eléctricas para las conexiones de condición y el agua en busca de fugas para garantizar la seguridad durante el funcionamiento Si cualquier problema se encuentran a continuación se necesitan reparaciones antes de la unidad se puede poner de nuevo en funcionamiento D Vuelva a conectar la unidad a la fuente de alimentación red de alimentació...

Страница 19: ...CO2 Proteggere adeguatamente le bombole dall abrasione FARE Conservare le bombole di CO2 i ambienti bene aerati FARE Utilizzare i dispositivi di protezione adeguata durante l esecuzione di manutenzione o pulizia sull unità NON FARE Lanciare o lasciare cadere una bombola di CO2 Fissare le bombole in posizione verticale servendosi di una catena NON FARE Collegare direttamente le bombole di CO2 al co...

Страница 20: ...i e tre 3 i fili sono spellati per 1 3 cm 1 2 pollice dall estremità 3 Collegare tutti e tre 3 i fili alla spina mediante le estremità spellate per 1 3 cm 1 2 pollice o secondo gli eventuali altri requisiti di terminazione Spine e terminali diversi possono richiedere lunghezze di spellatura diverse 4 Controllare la spina e il cavo per verificare la presenza di eventuali fili fuoriusciti ISTRUZIONI...

Страница 21: ...ione per la regolazione dell interruttore Paraspruzzi Staffa di supporto a J Cavo di alimentazione 27 Ingresso acqua Maschio svasato da 1 2 pollici 27 Uscita acqua Maschio svasato da 1 2 pollici Montaggio a muro Pompa booster dell acqua Viti di montaggio Figura 2 COME INSTALLARE LA POMPA BOOSTER A UN SUPPORTO NOTA Questa pompa può essere installata su un lato o all interno del supporto Il metodo d...

Страница 22: ...asivo asciugamano rag C Controllare tutti i collegamenti elettrici per condizioni di acqua e le connessioni per eventuali perdite per garantire la sicurezza durante il funzionamento Se eventuali problemi sono trovati quindi sono necessarie riparazioni prima unità può essere rimessa in funzione D Ricollegare unità alla fonte di alimentazione di rete elettrica Attenzione Prima di spedire conservare ...

Страница 23: ... углекислым газом и манометрами Баллоны должны быть надежно закреплены для предотвращения их абразивного износа НЕОБХОДИМО хранить баллоны с углекислым газом в хорошо проветриваемых помещениях НЕОБХОДИМО использовать надлежащее защитное оборудование при выполнении техобслуживания или чистки устройства ЗАПРЕЩАЕТСЯ бросать или ронять баллоны с углекислым газом Баллоны должны быть закреплены в вертик...

Страница 24: ...те свободный конец шнура питания подсоединенного к комплекту Все 3 три провода имеют снятую изоляцию на длине 1 3 см 1 2 дюйма от конца 3 Подсоедините все 3 три провода к вилке используя концы 1 3 см 1 2дюйма со снятой изоляцией или в соответствии с иными требованиями для контактов Для различных вилок и контактов может потребоваться конец провода без изоляции иной длины 4 Осмотрите соединения шнур...

Страница 25: ...ВД к выпускному фитингу воды используя остающееся конусное колено 1 2 дюйма с гайкой и зажимом см Рис 2 5 Включите подачу воды к узлу насоса подкачки ПРИМЕЧАНИЕ Выходное давление этого узла не регулируется Для определенных сфер применения может потребоваться установить регулятор 6 Вставьте вилку шнура питания в настенную розетку Насос не начнет работу пока не закончит отсчет таймер контура низкого...

Страница 26: ...20 х 1 2 дюйма и стопорными гайками 1 4 дюйма 20 Полностью затяните все болты 4 Поместите панель насоса подкачки воды на Г образный швеллер подняв ее заднюю кромку и зацепив ее на нижней кромке Г образного швеллера 5 Прикрепите нижнюю кромку панели насоса подкачки воды к швеллеру на опорной стойке 2 двумя винтами с шестигранной головкой 1 4 дюйма 20 х 1 2 дюйма и стопорными гайками 1 4 дюйма 20 По...

Страница 27: ...де чем устройство будет возвращено в эксплуатацию D Подсоедините устройство к источнику электропитания Внимание Перед транспортировкой постановкой на хранение или перемещением устройства необходимо сбросить давление в системе осушить и очистить устройство nОсторожно Оставление устройства в условиях низких температур с остающейся в нем водой приведет к повреждению его внутренних компонентов Важн We...

Страница 28: ......

Страница 29: ...29 of 32 Part Number 020006830 04 23 2018 Subject Installation Procedure Model WBK10X Water Booster Pump WBK10X Exploded View ...

Страница 30: ......

Страница 31: ...31 of 32 Part Number 020006830 04 23 2018 Subject Installation Procedure Model WBK10X Water Booster Pump Declaration of Conformity ...

Страница 32: ...elbilt provides the world s top chefs and premier chain operators or growing independents with industry leading equipment and solutions Our cutting edge designs and lean manufacturing tactics are powered by deep knowledge operator insights and culinary expertise All of our products are backed by KitchenCare our aftermarket repair and parts service CLEVELAND CONVOTHERM DELFIELD FITKITCHEN FRYMASTER...

Отзывы: