


WI-GTWY-9-xxx Wireless Gateway V1.18
51
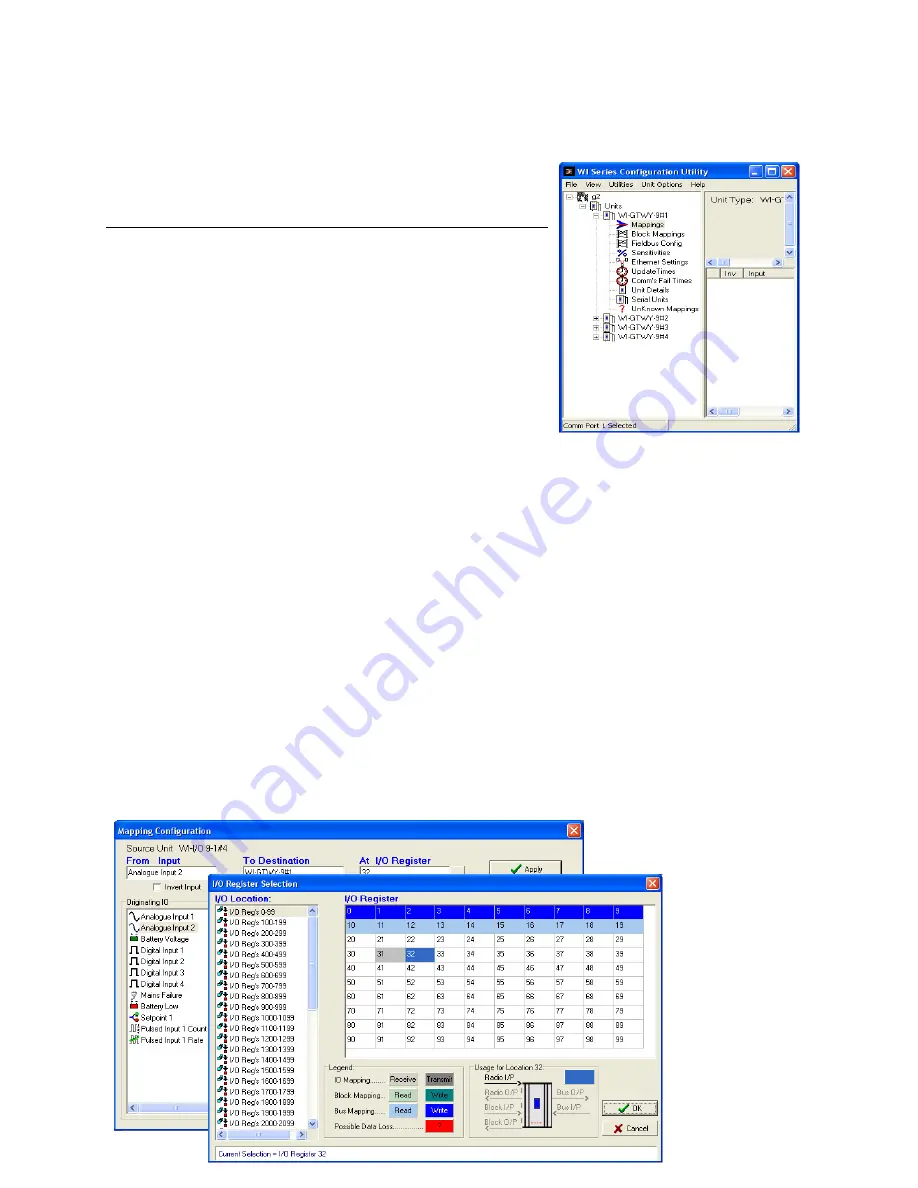
4.4
Mappings WI-GTWY-9-xxx to
WI-I/O 9-x I/O Modules
To transfer remote input signals to a WI-GTWY-9-xxx, or
transfer a value to a remote output from a WI-GTWY-9-
xxx, you set up “I/O mappings”. You enter mappings into
the source unit, not the destination unit. That is, you
configure a mapping at the “input” module. If you want to
transfer an input signal at a WI-I/O 9-x module to a WI-
GTWY-9-xxx register, you enter a mapping at the WI-I/O 9-
x I/O module. If you want to transfer a WI-GTWY-9-xxx
register to an output signal at a WI-I/O 9-x module, you
enter a mapping at the WI-GTWY-9-xxx module.
To configure mappings, double-click on the module in the left-hand menu - the menu will
expand with selections for that module. Select “Mappings”.
Each mapping comprises only one I/O point. “Block Mappings” provide more advanced
communications between WI-GTWY-9-xxx modules.
4.4.1
Mappings from Inputs at Remote WI-I/O 9-x I/O Modules
Refer to the WI-I/O 9-x I/O User Manual.
When mapping inputs to a WI-GTWY-9-xxx, you will be asked to select an I/O Register. Select
the “…” box beside the “At I/O Register” heading - this will allow you to select the I/O register
between 0 and 4299. Any I/O registers that have already been selected will have a color shading.
The update times, analog sensitivities for these mappings can be set as per normal I/O mappings.
To map several inputs to consecutive I/O registers, use “Shift”-select or “Ctrl” - select to
highlight the inputs, and select the first I/O register in the range. The selected mappings will be
entered with consecutive I/O registers.


