background image


6


Chainless Anchoring 
System


Uneven Floor 

Adjustment


Tools Required


1. 

Floor jack


2. 

2 - safety stands


3. 

Air wrench with a 3/4” socket


4. 

Hammer (3 lbs or 1.5 kg)


5. 

Open or box end wrench – 1 1/8” (29 mm)


Set Up Procedure


When setting up the Anchoring System for the first time it is 

important that you check for uneven floor conditions. This is done by 

positioning the anchoring stands over the floor rails approximately where 

they would normally be used when anchoring a car. 

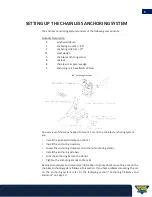
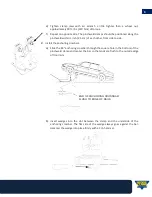
Adjust the leveling bolts at the bottom of the anchoring stands 

until about two threads (5mm) are showing on the top side of the stand 

base. (If you are using anchoring rails which are flush-mounted into the 

concrete then the bolts on the anchoring stands thread in from the top of 

the stand. Turn them into the thread holes until about two threads are 

protruding from the bottom side of the base.) 

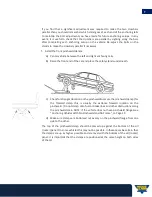
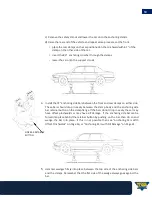
Place the two anchoring crossbars (80”) between each left and 

right hand pair of anchoring stands. You can determine uneven floor 

conditions by standing at one end of the repair bay and sighting across the 

two anchoring crossbars to determine if the two are parallel to each 

other. Adjust the bolts at the bottom of the low anchoring stand as 

shown until both the forward and rear anchoring crossbars are 

running parallel to each other.  


Содержание CHAINLESS ANCHORING SYSTEM

Страница 1: ...horing Problems and Solutions 14 Anchoring ToWeak Pinchwelds 16 Anchoring with Obstructions on the Pinchweld 16 Anchoring with Very Short Pinchwelds 16 Anchoring ToOffset Pinchwelds 17 Anchoring Wide...

Страница 2: ...These clamps secure the car by its pinchweld flange the 1 to 2 cm deep flange under most unibody vehicle sill rocker panels This pinchweld flange usually consists of two or more layers of sheet metal...

Страница 3: ...ing force than a single large jaw The clamp is constructed from a special high strength ferriferous steel allowing it to be made light in weightwithout losing strength The four pinchweld clamps are he...

Страница 4: ...em is secured to the floor The chainless system fastens to the floor with cast aluminum stands which attach to rails on the floor The chain system fastens to the floor with lengths of chain and chain...

Страница 5: ...e chainless anchoring system are Install the pinchweld clamps on the car Install the anchoring crossbars Lower the anchoring crossbars onto the rail anchoring stands Install the anchoring side bars Lo...

Страница 6: ...threads 5mm are showing on the top side of the stand base If you are using anchoring rails which are flush mounted into the concrete then the bolts on the anchoring stands thread in from the top of th...

Страница 7: ...stands underneath c Checkforstrongestlocationonthepinchweldtosecurethepinchweldclamp for the forward clamp this is usually the extreme forward location on the pinchweld Do not clamp onto fuel or brak...

Страница 8: ...hin 1 inch 2 5 cm of each other from side to side 2 Install the anchoring crossbars a Slide the 80 anchoring crossbar through the square hole in the bottom of the pinchweld clamp and center the bar so...

Страница 9: ...choring crossbar then hang the stands on the ends of the anchoring crossbar as shown at the left by the hole in the stand Lower the vehicle and raise again by jacking under the center of the anchoring...

Страница 10: ...drop in easily between the clamp body and the anchoring side bar retainer button on the clamp flange If the bars do not drop in easily the car may have offset pinchwelds or may have sill damage If th...

Страница 11: ...u must first remove the wedges at the top of the anchoring stands otherwise sill damage willoccur 7 Insert the rail spacer wedges between the anchor stands and the floor rail insert by hand until snug...

Страница 12: ...o swivelling wheels away from the heavier end engine end of the vehicle Removetheanchoringstandsandlowerthevehicle onto the mobility wheels WARNING Be sure that the wedges which secure the mobility wh...

Страница 13: ...es from the top of the anchoring stand on all four stands so that the cross bars may rotate freely on the anchoring stands before jacking or lowering the car 3 Remove the wedges on the 72 anchoring si...

Страница 14: ...without pinchweld flanges or vehicles with certain damage conditions in the pinchweld area WARNING Serious damage or injury can occur if a vehicle is not anchored securely for pulling It is your respo...

Страница 15: ...is usually a reliable point to anchor a unibody car However even this pinchweld flange does not exist on all models In order to handle as many different cars as possible Wedge Clamp has developed som...

Страница 16: ...he Pinchweld The Wedge Clamp pinchweld clamp has been specifically designed to fit around obstructions and at the same time provide maximum holding strength It may be necessary to remove fuel lines et...

Страница 17: ...and there is no apparent sill damage there is no need to be alarmed this is common with some vehicles 2 After all four pinchweld clamps have been installed and you are ready to place the anchoring sid...

Страница 18: ...rd Aerostar vans and the General Motors Astro vans The Wide Body Adapter Brackets can be ordered from your Wedge Clamp dealer or by specifying Wedge Clamp Part No 15000 The wide body adapter assembly...

Страница 19: ...ar into place on the undamaged side firmly Place the wedges through the clamps on the damaged side from the inside of the car pointing out so that the pinchweld clamp can slide on the anchoring crossb...

Страница 20: ...en the pinchweld clamps and the anchoring crossbars from the inside pointing out 3 Lower the car so that the weight of the car is resting on the pinchweld clamps On the damaged side allow the bottom o...

Страница 21: ...aged side so that the half jaw of the clampis as near as possible to the insideof the pinchweldflange Allow the car to rest on the half jaw You may then proceed to perform repairsand cut away the old...

Страница 22: ...ld Spring Nut Washer 7 17006 4 Retainer Button 8 17102 2 Anchoring Crossbar 72 long 17103 2 Anchoring Crossbar 80 long 9 16064 8 Rail Lock Washer 10 20060 12 Wedge 11 16066 72 Flush Mounting Bolt 12 1...

Страница 23: ...nput is invaluable and will help us improve and develop the best possible products Please feel free to contact us with any comments and or suggestions on any of our products or services at the address...

Отзывы: