20
7.
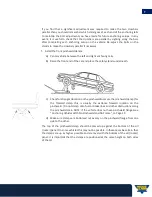
After the repair has been done a comparison check with the undamaged side can
be done by measuring from an underneath control point to the edge of the
pinchweld.
8.
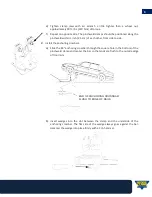
Set up the remainder of the anchoring system as normal.
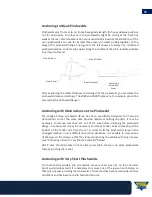
Anchoring Cars with Major Sill Damage
When the sill (rocker) area of the car has been so severely damaged that the
pinchweld clamps cannot be bolted to the sill on the damaged side of the vehicle use
the following procedure:
1.
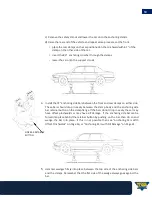
Raise one end of the vehicle and place the pinchweld clamp on the undamaged side
of the car.
2.
Slide the anchoring crossbar through this clamp, and on the damaged side place
the pinchweld clamp on the bar beneath the car inboard of the sill (rocker) area.
Wedge the clamp firmly in place.
NOTE: On the chainless system, insert the wedges between the pinchweld clamps and
the anchoring crossbars from the inside pointing out.
3.
Lower the car so that the weight of the car is resting on the pinchweld clamps. On
the damaged side allow the bottom of the vehicle’s floor pan to rest on top of the
pinchweld clamp.
NOTE: On the damaged side it may be convenient to place the anchoring stand on
the inside of the pinchweld clamp so that the working area near the sill will be
unobstructed.
4.
Jack up the rear of the vehicle and repeat the process:
•
place the pinchweld clamp on the undamaged side of the vehicle;
•
slide the anchoring crossbar through the clamp on the undamaged side, and
wedge the pinchweld clamp on the bar on the damaged side; and
•
lower the car onto the anchoring stand.
5.
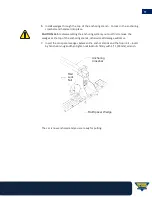
Drive the wedges through the top of the anchoring stands on the undamaged side.
6.
Repairs to the damaged sill (rocker) area can now be done. The clamps on the
undamaged side of the vehicle will secure the vehicle while pulling is done on the
damaged side.


