background image


26 | 

P a g e


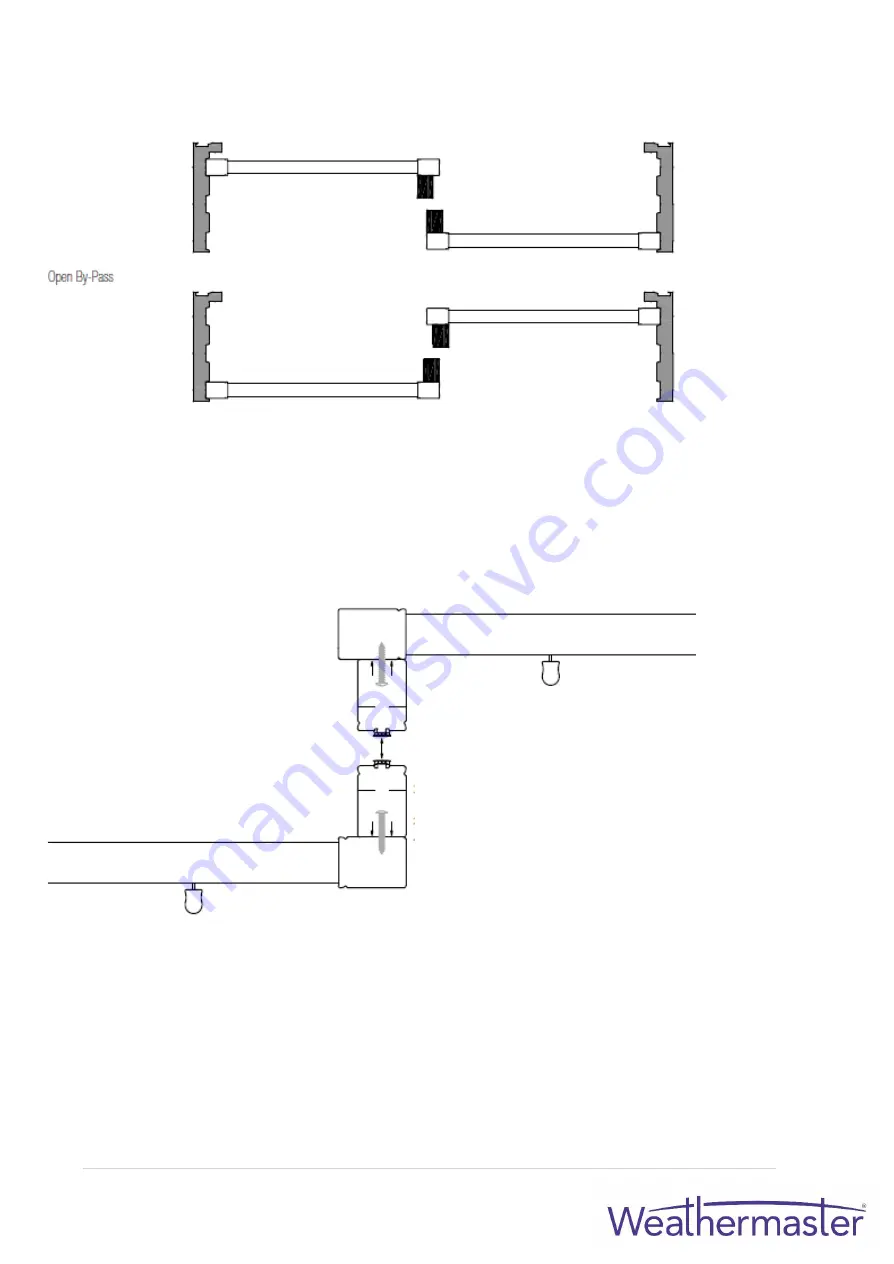
SLIDING SHUTTERS LIGHT BLOCK BETWEEN PANELS 


SLIDING SHUTTERS ASSEMBLY OF LIGHT BLOCK BETWEEN PANELS 


Top view 

 assembly of light block between Open SLIDING Panels 

1.


Orient the vertical jamb as shown (left).  

2.


Drill 9mm holes every 500mm from the top through the first two layers.  

3.


Screw Light block to jamb.  

4.


Cap holes with button plugs. 


Содержание Eclipse Shutters

Страница 1: ...Eclipse Shutters Installation Manual ...

Страница 2: ...ith 25mm head for tapping frames into position 10mm diameter drill bit Loctite 454 Instant Adhesive or contact cement required Caulking for mitred corners and gaps between the frames and window jambs for corner keys Robertson screwdriver bits 100mm x No1 38mm x No2 Jig saw hack saw Dremel tool or Stanley knife if cut outs are required 25mm or 30mm course threaded bugle headed needle point Gyprock ...

Страница 3: ...3 P a g e GENERAL INFORMATION SHUTTER PANEL PARTS DIAGRAM ...

Страница 4: ...4 P a g e TWO PART HINGES Available colours White Vanilla and Stainless Steel Note All panels frames and T Posts are pre hinged Except for mounts using Mounting Strips ...

Страница 5: ...5 P a g e SHUTTER PANEL PARTS ...

Страница 6: ...With optional 32mm extended leaf hinges the depth clearance for shutters can be reduced by up to 16mm However the hinges will protrude into the room With Tilt Bar SmartView With Clearview Hidden Tilt 64mm Louvre 48mm 64mm Louvre 64mm 89mm Louvre 60mm 89mm Louvre 76mm 114mm Louvre 73mm 114mm Louvre 89mm ...

Страница 7: ... clearance can be reduced by 25mm if mounting strip is installed closer to the edge of the opening However panels will project into the room by 25mm With Tilt Bar SmartView With Clearview Hidden Tilt 64mm Louvre 54mm 64mm Louvre 64mm 89mm Louvre 60mm 89mm Louvre 76mm 114mm Louvre 76mm 114mm Louvre 89mm ...

Страница 8: ...it mounts the depth clearance is measured from the front of the L frame Other frame options are the Sill Z and the Sill Trim With Tilt Bar SmartView With Clearview Hidden Tilt 64mm Louvre 54mm 64mm Louvre 64mm 89mm Louvre 60mm 89mm Louvre 76mm 114mm Louvre 76mm 114mm Louvre 89mm ...

Страница 9: ...TE Depth clearance is the minimum window opening required for louvres to operate without interference With Tilt Bar SmartView With Clearview Hidden Tilt 64mm Louvre 32mm 64mm Louvre 41mm 89mm Louvre 41mm 89mm Louvre 54mm 114mm Louvre 54mm 114mm Louvre 67mm ...

Страница 10: ...earance NOTE Depth clearance is the minimum window opening required for louvres to operate without interference With Tilt Bar SmartView With Clearview Hidden Tilt 64mm Louvre 35mm 64mm Louvre 45mm 89mm Louvre 41mm 89mm Louvre 57mm 114mm Louvre 54mm 114mm Louvre 70mm ...

Страница 11: ...nce NOTE Depth clearance is the minimum window opening required for louvres to operate without interference With Tilt Bar SmartView With Clearview Hidden Tilt 64mm Louvre 29mm 64mm Louvre 38mm 89mm Louvre 38mm 89mm Louvre 51mm 114mm Louvre 51mm 114mm Louvre 64mm ...

Страница 12: ... NOTE Depth clearance is the minimum window opening required for louvres to operate without interference With Tilt Bar SmartView With Clearview Hidden Tilt 64mm Louvre 29mm 64mm Louvre 38mm 89mm Louvre 38mm 89mm Louvre 51mm 114mm Louvre 51mm 114mm Louvre 64mm ...

Страница 13: ...OTE Depth clearance is the minimum window opening required for louvres to operate without interference With Tilt Bar SmartView With Clearview Hidden Tilt 64mm Louvre 0mm 64mm Louvre 13mm 89mm Louvre 13mm 89mm Louvre 26mm 114mm Louvre 22mm 114mm Louvre 38mm ...

Страница 14: ...E Extensions are required to prevent louvres from hitting the architrave Actual clearance depends on the size of the architrave With Tilt Bar SmartView With Clearview Hidden Tilt 64mm Louvre 0mm 64mm Louvre 0mm 89mm Louvre 0mm 89mm Louvre 0mm 114mm Louvre 0mm 114mm Louvre 0mm ...

Страница 15: ...15 P a g e SLIDING OPEN SLIDING SHUTTERS TRACK SYSTEM SLIDING SHUTTERS TRACK SYSTEM DIAGRAM ...

Страница 16: ...16 P a g e SLIDING SHUTTERS TRACK SYSTEM DIAGRAM OPEN SLIDING ...

Страница 17: ...ine the correct number of carriers are in each track 5 ATTACH DOUBLE PANELS IF APPLICABLE When two panels are to be joined lay panels face up and side by side on the floor Remove the two interior top jamb caps Insert the panel joiner by sliding it into the two interior jambs See Diagram G Place the jamb caps back onto the top jambs 6 ATTACH LIGHT BLOCK FOR OPEN SLIDING 2 pieces of vertical jamb wi...

Страница 18: ...alance further into the room Rotate the valance down to a vertical orientation until locked into all brackets Returns can be attached using the same bracket or glued in place using a corner key and loctite glue 11 BOTTOM TRACKS Install bottom tracks plumb with the centre of the top tracks Use either the screws provided or silicon along the centre of the track Insert two spring loaded bottom guides...

Страница 19: ...19 P a g e SLIDING SHUTTERS FRAME ASSEMBLY 1 Insert the provided 3 screws though the top frame 2 Line up the screw through the screw ports inside the side frames fasten tightly ...

Страница 20: ...20 P a g e SLIDING SHUTTERS RECESS MOUNT APPLICATION ...

Страница 21: ...21 P a g e SLIDING SHUTTERS RECESS MOUNT APPLICATION ...

Страница 22: ...22 P a g e SLIDING SHUTTERS FACE MOUNT APPLICATION ...

Страница 23: ...23 P a g e SLIDING SHUTTERS FACE MOUNT APPLICATION ...

Страница 24: ...24 P a g e SLIDING SHUTTERS BOTTOM TRACKS Internal Tracks A This is a standard track supplied Installed on top of carpets tiles etc B Recess track C Recess track used before laying tiles ...

Страница 25: ...t the extension so that it mates with the back of the frame Use an installation screw to attach the extension to the frame as shown below SLIDING Frame Extension increases the projection of the frame by 19mm SLIDING Open Frame with Extension SLIDING SHUTTERS PANEL JOINER The panel joiner slides into the grooves on the side of the Vertical Jamb This joiner connects two panels so that they move as a...

Страница 26: ...S ASSEMBLY OF LIGHT BLOCK BETWEEN PANELS Top view assembly of light block between Open SLIDING Panels 1 Orient the vertical jamb as shown left 2 Drill 9mm holes every 500mm from the top through the first two layers 3 Screw Light block to jamb 4 Cap holes with button plugs ...

Страница 27: ...27 P a g e TRIPLE SLIDING SHUTTERS TRACK SYSTEM DIAGRAM ...

Страница 28: ...UM TRACKS Mount aluminium tracks to the extreme left of the opening of the frame by screwing through the pre drilled holes in the track to the extrusion lines on the underside of the top frame See Diagram D and Diagram E 5 ATTACH DOUBLE PANELS IF APPLICABLE When two panels are to be attached lay panels face up and side by side on the floor Remove the two interior top jamb caps Insert the panel joi...

Страница 29: ...at it rests on the bracket The valance will need to be on a 45 degree angle with the bottom of the valance further into the room Rotate the valance down to a vertical orientation until locked into all brackets Returns can be attached using the same bracket or glued in place using a corner key and loctite glue 11 BOTTOM TRACKS Install bottom tracks plumb with the centre of the top tracks Use either...

Страница 30: ...30 P a g e SLIDING SHUTTERS RECESS MOUNT APPLICATION ...

Страница 31: ...31 P a g e SLIDING SHUTTERS FACE MOUNT APPLICATION ...

Страница 32: ...32 P a g e SLIDING SHUTTERS BOTTOM TRACKS Internal Tracks A This is a standard track supplied Installed on top of carpets tiles etc B Recess track C Recess track used before laying tiles ...

Страница 33: ... extension so that it mates with the back of the frame Use an installation screw to attach the extension to the frame as shown below Triple SLIDING Frame Extension increases the projection of the frame by 76mm Triple SLIDING Frame with Extension SLIDING SHUTTERS PANEL JOINER The panel joiner slides into the grooves on the side of the Vertical Jamb This joiner connects two panels so that they move ...

Страница 34: ...TWEEN PANELS Top view assembly of light block between Triple SLIDING panels 1 Orient the mounting strip as shown 2 Drill 10mm holes every 500mm from the top through the first two layers 3 Set 8 x 25mm SLIDING screws 4 Cap hole with button plugs ...

Страница 35: ...35 P a g e BI FOLD TRACK SYSTEM DIAGRAM Clearance 15mm Internal Tracks Nominal ...

Страница 36: ...ration has all the panels stacking to one side then install the pivot on the stacking side See Diagram D and Diagram E insert all the wheels one for every two panels B If the configuration has the panels stacking to both sides of track insert the proper number of wheel carriers Install the top pivot at both ends See Diagram D and Diagram E C If it is a floating system then there are no pivots inse...

Страница 37: ...rame using the 8 x 13mm screws Once all brackets are secure position the channel on the back of the valance so that it rests on the bracket The valance will need to be on a 45 degree angle with the bottom of the valance further into the room Rotate the valance down to a vertical orientation until locked into all brackets Returns can be attached using the same bracket or glued in place using a corn...

Страница 38: ...38 P a g e BI FOLD SHUTTERS DIAGRAM D FACE MOUNT ...

Страница 39: ...39 P a g e BI FOLD SHUTTERS DIAGRAM E RECESS MOUNT ...

Страница 40: ...40 P a g e BI FOLD SHUTTERS BOTTOM TRACKS Internal Tracks Bottom Tracks A This is a standard track supplied Installed on top of carpets tiles etc B Recess track C Recess track used before laying tiles ...

Страница 41: ...41 P a g e BI FOLD SHUTTERS FRAME EXTENSIONS ...

Страница 42: ... FEATURES AND BENEFITS 1 Three valance options available 127mm Crown Valance By pass Valance 89mm Bi Fold Valance 64mm 2 Corner keys can be used to assist in the assembly of valance returns 3 Valance brackets used to attach valance assembly to frame ...

Страница 43: ...ets should be 152mm from each end of the frame and spaced no more than 457mm apart 2 Once all brackets are secure position the channel on the back of the valance so that it rests on the bracket The valance will need to be on a 45 degree angle the bottom of the valance farther into the room ...

Страница 44: ...til locked into all brackets 4 To remove the valance use a flat head screwdriver or similar push up on the plastic tab located at the bottom of the valance bracket Repeat this for each bracket while holding the valance Once all brackets are released rotate the valance up and out to remove ...

Страница 45: ...45 P a g e VALANCE RETURN OPTIONS RECESS MOUNT FULLY RECESSED FRAME SQUARE CUT VALANCE ...

Страница 46: ...46 P a g e FACE MOUNT STANDARD FULL LENGTH VALANCE RETURNS ...

Страница 47: ... the bottom of the lowest hinge is on the panel Install one screw into the window jamb hinge that goes below the bottom hinge Check if position is accurate by installing the panel from the top and bottom hinges Shim using available hinge shims if necessary 3 LEVEL PANELS If more panels are to be installed repeat the first two processes by lining up the panel as the main concern If minor support or...

Страница 48: ...Lock Ramp on the frame with the back of the Ramp against the light block portion of the frame 5 Centre the ramp on the line marking the plunger location 6 Mark the centre of each screw hole of each Ramp 7 Remove the Ramps and drill a pilot hole for each screw using a 3mm drill bit 8 Place the Ramp back on the frame and set the screws Repeat as necessary 9 Operate the panel s to ensure proper funct...

Страница 49: ...ts on bottom and top cross rails Magnets Catches will not be used if the panel lock has been installed PROCEDURE 1 Install plate as shown on drawing with the holes towards the centre of panel 2 With panels closed pencil mark the sill or frame where the vertical jamb meets the top or bottom rail 3 Install magnet from the mark toward the inside of the panel 4 Install two magnets and plates per panel...

Страница 50: ...of top frame 4 Remove panel 5 Install top frame 6 Install each receiver 22mm from the edge of each frame 7 Insert catch into the receiver so the screw is sticking out into the room 8 Carefully place the panel into position 9 Press the panel against the screws to indent the panel 10 Remove the panel 11 Remove catches from the receivers 12 Screw the catches into the indent on the panel 13 Place the ...

Страница 51: ...side frames For Recess Mounts the Corner Keys will Snap into Place but Face Mounts will need to be glued Use a small amount of Loctite as it will be impossible to separate them if they have set If minor gaps appear use Caulk to seal the corners For Deluxe Frames and Trim Frames install a 90 degree metal bracket at the back of the frames to give a tight and more secure assembly If extensions are us...

Страница 52: ... brackets are placed at the back side of the T Post so that the bracket screw goes through the screw post in the T Post The stop hole is positioned at the top left and bottom right side Screw top right and bottom left brackets slotted holes to the frame centre the screws in the middle of each slot This will allow some movement for levelling purposes Hang panels and adjust T Post positioning until ...

Страница 53: ...ter as a standard 3 sided frame but install only the top screw on each side frame and one bottom screw if necessary Test the fit and position of the panels to determine the location of the T Post Mark the front and centre of the T Post with a pencil on the sill Mark the back of the T Post with a pencil on the sill Remove the panels and the frame Stack two T Post Alignment Blocks one with the tab f...

Страница 54: ...s into the top frame Attach the left side frame to the top frame Attach the right side frame to the top frame Attach T Post to the top frame by sliding the T Post over the blocks on the bottom frame Attach the top frame Make sure the corner keys in each end of the top frame align with the corner key cavities in the side frames At the same time make sure the T Post is positioned on the blocks attac...

Страница 55: ...pper and lower hinge pins only 5 SQUARE LEVEL PANELS TO THE OPENING Move bottom frame left or right until the panels are level If this does not work then Move left frame up or down until the panels are level If this does not work then Move right frame up or down until the panels are level When the panels are level within the frame hold bottom frame in position and place a screw in the middle botto...

Страница 56: ...OPENING Move bottom frame left or right until the panels are level A If this does not work then Move left frame up or down until the panels are level B If this does not work then Move right frame up or down until the panels are level C When the panels are level within the frame pull the bottom frame fully to one side and insert screw into the opposite bottom corner Continue to use this screw to ad...

Страница 57: ...e panels plumb 4 HANG PANELS With upper and lower hinge pins only 5 SQUARE LEVEL PANELS TO THE OPENING Adjust the bent leaf hinges if necessary by loosening the hinge screws and moving the hinge left or right Re tighten hinge screws once level 6 FASTEN REMAINING SCREWS Insert screws in the remaining holes and check to ensure panels are level after every screw has been screwed into position 7 FASTE...

Страница 58: ... until the panels are level A If this does not work then Move left frame up or down until the panels are level B If this does not work then Move right frame up or down until the panels are level C When the panels are level within the frame hold bottom frame in position and place a screw in the middle bottom frame hole 6 FASTEN REMAINING SCREWS Insert screws in the remaining holes and check to ensu...

Страница 59: ... panel on the bottom frame and locate the position of the top frame Then mark this location and remove panel Begin attaching the top frame making sure it is level and aligned properly with the bottom frame Install button plugs once all screws have been set Install each receiver 22mm from the edge of each frame Insert catch into the receiver so the screw is sticking out into the room Carefully plac...

Страница 60: ...the top and bottom screws of the hinge side frame making sure the frame is plumb Hang the panel and then move the bottom frame into proper position Open or remove panel then set installation screws to secure bottom frame Repeat the above step for the top frame If panel locks are being used ensure there is sufficient engagement between the frame and panel so the panel will not open while the door i...

Страница 61: ... make full contact to work properly If the shutters are not installed correctly the motor panel will operate and the non motor panel will incur lag in louvre rotation or fail to operate For additional information on installation refer to the following sections Installation for Standard Couplers engaged correctly Couplers not engaged too much gap between panels Coupler not engaged panels not aligne...

Страница 62: ...and forward so that it snaps in behind the two vertical wall 5 Plug the motor wire into the battery wand 6 Place the battery assembly in the routed hole in the rail a Make sure the wire is in the rail b The lock symbol on the face of the battery cover will be nearest the program button c There are four connection points once one is aligned properly all will be aligned d Align the gap between the r...

Страница 63: ...r with battery wand towards you 3 Disconnect the motor wire 4 Remove the battery wand from the battery cover 5 Pinch the tabs at the contoured end of the battery wand to release the end cap 6 Remove batteries 7 Install new batteries per the diagram on the clear housing 8 Reinstall end cap of battery wand 9 Follow battery assembly installation instructions 10 Slide the battery cover to lock slide a...

Отзывы: