background image

7 of 14

WX-501-0537 • 01.22

Note. 

If a vehicle exceeds the anticipated maximum speed and length, then the detection event may not 

be generated until the vehicle’s ETA is less than the desired value. In this case, the output will activate upon 

reception (without any additional delay).

In order to trigger an ETA to a sign:
1.  Select the Automatic (English) configuration options. 
2.  Specify the corresponding setback distance in feet. In this case, the setback distance is from the location of 

the SmartSensor HD unit to the location of the warning sign. 

3.  Specify the ETA in milliseconds.
4.  Specify the duration in milliseconds.

Note. 

If your SmartSensor HD unit is configured in Metric units, select the 

Automatic (Metric)

 configuration option. 

In this case, the setback distance is specified in decimeters instead of feet.

Since vehicles travel at different speeds, the amount of time from when the front edge of the vehicle enters the 

beam until it reaches the warning sign is variable. In addition, the amount of time the vehicle is in the beam is also 

variable (based upon vehicle speed and length).

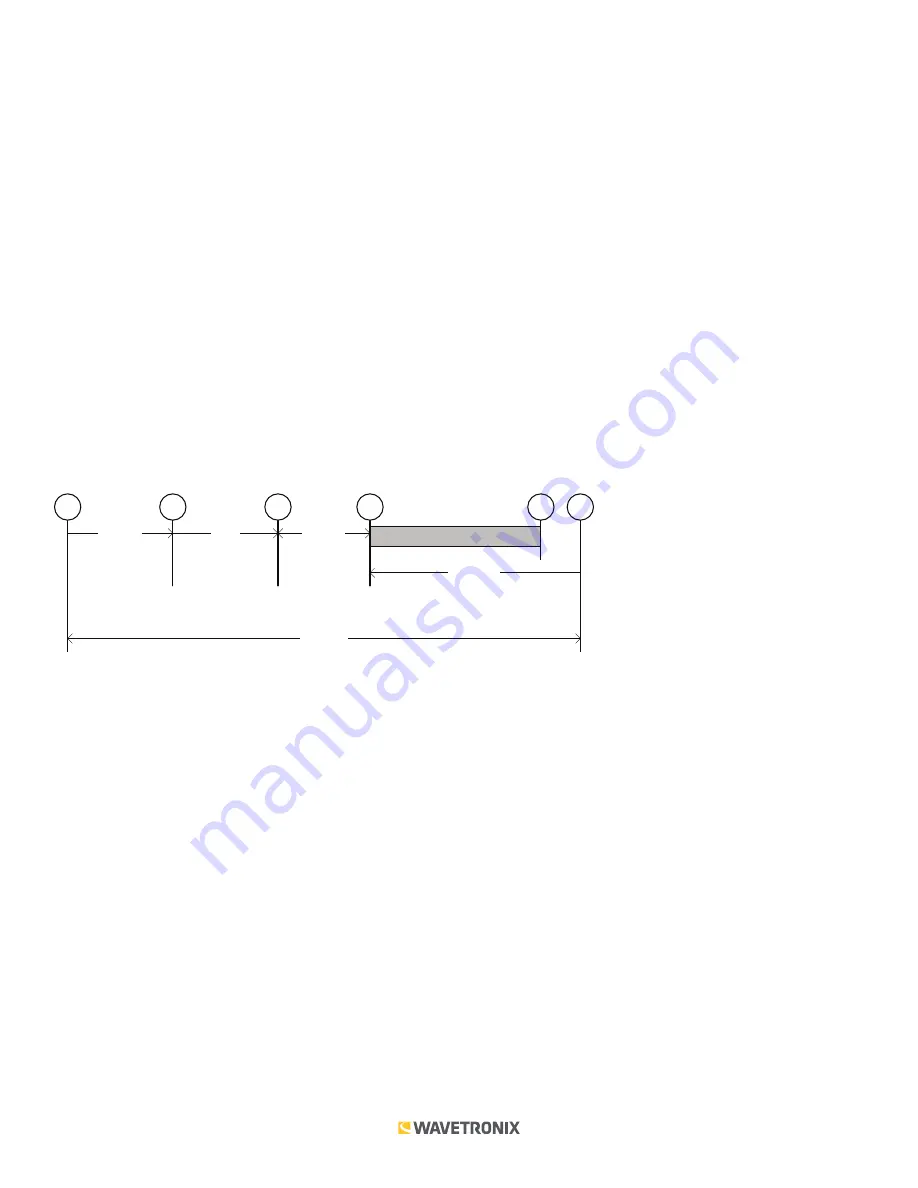
The following diagram illustrates the basic timing of this option as a series of six steps. Some portions of the timing 

are variable and others are fixed.

variable

L_ft / V_fps

fixed

1 s

variable

ETA (ms)

Duration (fixed)

1

2

3

4

6

5

variable

Time to Sign = SetbackDistance_ft / V_fps

1.  Front edge of vehicle enters beam.
2.  Back edge of vehicle leaves beam. The time from point 1 to point 2 is variable and is based on the length and 

speed of the vehicle.

3.  Detection event is generated one second after the vehicle leaves the beam. This one-second delay is fixed. 
4.  Output is activated.
5.  Output is deactivated at the end of the duration.
6.  Front-edge of vehicle reaches the sign (assuming constant speed).

Note. 

You can have a maximum of five vehicles concurrently being monitored from steps 3 to step 4. If you have 

extremely high traffic flow conditions where multiple over-speed/over-length vehicles are possible, consider 

dedicating a single output to each lane to prevent dropping detections.

Note. 

The 35-byte serial communication delay from the sensor to the Click 512 is 3 ms at 115.2 kbps. The 9-byte serial 

communication delay from the Click 512 to the Click 104/112/114 is 2 ms. This is a total of 0.005 seconds of additional 

delay (not depicted in preceding graph). At 9600 bps, this increases to up to 0.038 seconds of additional delay.

The second method, the point trigger method, also provides a certain level of uniformity, in that the warning sign 

is activated when vehicles reach a certain point. However, the warning sign will deactivate at different points since 

the duration is a predetermined fixed period of time. This method can require a setback distance of 300 (or more) 

Содержание Click 512

Страница 1: ...s met an alert will trigger through the contact closure and an ASCII string will be transmitted through the DB 9 port A possible application for the Click 512 is to warn specific drivers of a potentia...

Страница 2: ...pin 4 from the serial cable to prevent the device from going into Program mode If it enters Program mode all of the faceplate LEDs will turn off and you ll need to power cycle the device The other tw...

Страница 3: ...e LED does not have an activity indicating function The other three LEDs indicate system status as follows PWR red lights up when the device has power TD green lights up when the device is transmittin...

Страница 4: ...leasing the push button allows you to make a selection in the menu The menu is used to select and run an application s operating modes Select a mode by navigating through the main menu multicolored LE...

Страница 5: ...e Click 512 but are only signaled on the attached contact closure device For data verification purposes the event data messages pushed by SmartSensor HD are translated into readable text strings This...

Страница 6: ...se motorists in a timely and effective way There are three basic methods to synchronize this trigger Trigger at an ETA to the sign Trigger at a point upstream of the sign Trigger as soon as possible A...

Страница 7: ...ETA ms Duration fixed 1 2 3 4 6 5 variable Time to Sign SetbackDistance_ft V_fps 1 Front edge of vehicle enters beam 2 Back edge of vehicle leaves beam The time from point 1 to point 2 is variable and...

Страница 8: ...he length and speed of the vehicle 3 Detection event is generated one second after the vehicle leaves the beam This one second delay is fixed 4 Output is activated when front edge of vehicle reaches t...

Страница 9: ...ration the device will need to be changed to submode 1 The Click 512 is then configured using the Click Supervisor software See the knowledge base article 0514 Installing and Using Click Supervisor fo...

Страница 10: ...e made configuration changes on a driver and saved it to the Click device the word current will appear after that driver to indicate the driver that is currently loaded onto the device Note Changing a...

Страница 11: ...er unless another device on the network has the same ID number The Comm subtab allows you to configure how the Click device communicates see the figure and table below Setting Description Baud Rate Al...

Страница 12: ...12 tab you will see ten tabs The first is labeled Overall This tab allows you to configure values for the speed and length thresholds see the figure and table below Note Values in Click Supervisor wil...

Страница 13: ...d text strings There are nine other tabs you can access They correspond to the eight possible contact closure outputs the Click 512 can be configured to deal with The other eight tabs are labeled O1 t...

Страница 14: ...elapse before the activation of the output after the detection If the trigger sync method is Automatic this setting controls the time that will elapse before the activation of the output after the ET...

Отзывы: