background image

SPEEDLAN TM

43

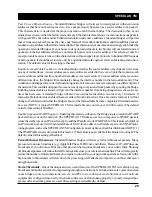
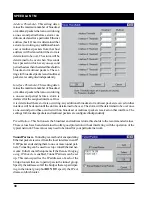
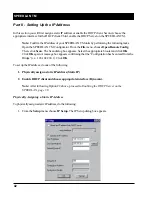
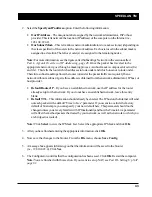
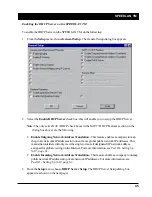
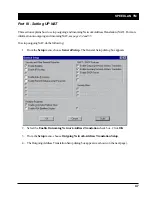
2. Select the 

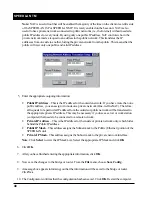
Specify an IP address

 option. Enter the following information:

Our IP Address

 – The unique number assigned by the network administrator, ISP or host

provider. This tells network the location (IP address) of the computer on the Internet (i.e.,
128.104.224.2).

Our Subnet Mask

 - This term allows network administrators to mask section(s) (depending on

the class specified) of the octets in the network address. Each octet used in the subnet mask is
assigned to a data link. The leftover octet(s) are assigned to the remaining nodes.

Note:

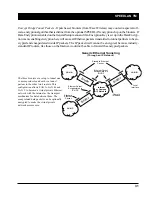
 For more information, see the figure called Subnetting a Network in the section called

Part I - A Quick Overview of IP Addressing, page


48

. Once the packet has traveled to the

appropriate network, it goes through a masking process. A subnet mask is composed of zeros (0s)
and (1s).  This tells the router which addresses to look under and which ones not to look under.
Therefore, subnet masking allows the router to transfer the packet traffic more quickly than a
network without a subnet. Again, this address is obtained from the network administrator, IP host, or
host provider.

Default Router IP

 – If you have an established network, use the IP address for the router

already set up for that network. If you do not have an established network, leave this entry
blank.

Default TTL

 – This information should already be entered. The IP host on the Internet will send

out each packet with a default “Time to Live” parameter. If you want to override the factory
default of 64 attempts, you can specify your new default here. This parameter should not be
changed unless you are very familiar with IP functionality and how the Time to Live parameter
will affect the method packets the treated by your network, as well as the network to which you
are bridged (or routed).

Note:

 Click 

Select

 to view the IP Mask List. Select the appropriate IP Mask and click 

OK

.

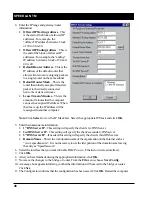
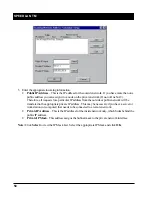
3. After you have finished entering the appropriate information, click 

OK

.

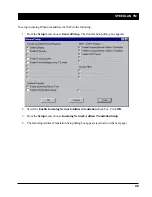
4. Now save the changes to the brouter. From the 

File

 menu, choose 

Save Config

.

5. A message box appears informing you that the information will be saved to the brouter

(i.e., 128.104.22.4). Click 

Yes

.

6. The Configurator confirms that the configuration has been saved. Click 

OK

. Restart the computer.

Note:

 You are finished with this section. If you want to set up NAT, see 

Part III - Setting Up NAT,

page 61

.

Содержание SPEEDLAN TM 6000

Страница 1: ...PEEDLAN SPEEDLAN SPEEDLAN TM 6000 OPERATOR S MANUAL Version 1 0 Last revised June 2000 Division 941 358 9283 941 355 0219 FAX 800 721 9283 www speedlan com sales speedlan com 1748 Independence Blvd C...

Страница 2: ......

Страница 3: ...may be purchased for 10 of the original list price Terms of the Extended Warranty include Spare in the Air privileges to allow the use of parts or a spare unit temporarily Spare in the Air Loaner Unit...

Страница 4: ...remedies Wave Wireless shall not be liable for any direct indirect special incidental or consequential damages whether based on contract tort or any legal theory OTHER IMPORTANT STATEMENTSAND WARNINGS...

Страница 5: ...ProtocolFiltering 27 Ethernet Protocols 27 MACFiltering 28 PermitEthernetMulticasts 28 PermitEthernetBroadcasts 29 StormThresholds 29 Tunnel Partners 30 Outgoing NAT 49 6 IP ROUTER SETUP 53 IP Router...

Страница 6: ......

Страница 7: ...SPEEDLAN TM INTRODUCTION...

Страница 8: ......

Страница 9: ...uter contained in the SPEEDLAN TM is intended to provide network security between a local LAN and a campus or enterprise wide network and since using multiple bridges in a Spanning Tree could compromi...

Страница 10: ...rks Learned Table Lockdown Expanded IP ARP Support Automatic Broadcast Storm Protection and Notification SNMP Features IP ping Support IP SNMP Support MIB II Ethernet Inteface SNMP and Bridge MIB IP S...

Страница 11: ...SPEEDLAN TM 11 USING CONFIGURATOR...

Страница 12: ......

Страница 13: ...ote SPEEDLANTM configuration opened with the Configuration Utility before any configurationfunctionsmaybeperformed Afteryouhaveopenedtheremotedeviceandconfiguredit youcan then save your configuration...

Страница 14: ...nConfigFile Thisfunctionisusedtoopenaconfigurationfilefromdisk OpenRemoteConfig Thisopenstheconfigurationfiledirectlyfromaremotedevice Save Config Saves the configuration you are working on to the pla...

Страница 15: ...SPEEDLAN TM 15 CONFIGURING SPEEDLAN TM...

Страница 16: ......

Страница 17: ...outing will work properly only if the routes are set up in the IP Route Menu If the routes are not set up properly before you save the configuration the bridge will become inoperable Default is off En...

Страница 18: ...ion It is not shipped standard as part of the XE units If you did not purchase it when you originally bought the SPEEDLAN TM units it can be purchased later as a software upgrade Data encryption is di...

Страница 19: ...sses into one or more global public network IP addresses This means that outsiders will onlyviewthesingle ormoreifdesignated IPnetworkaddressassignedforglobalviewingontheInternet For more informatoin...

Страница 20: ...portion of the configurationwhichcontrolshowtheindividualinterfacesareconfigured TheAdvanced Interface Setup has a few more advanced settings but essentially they are the same set up screen Note that...

Страница 21: ...alsosupportsfull duplexoperationwhenconnected to either a 10 or 100 Mbps LAN port The default setting is for Half Duplex The interface can be configured to operate inFullDuplexusingtheoptionsonthisset...

Страница 22: ...communicate directly with the base station The base station is respon sible for repeating packets that need travel between the satellite stations The Non Polling Base Station does notallocatebandwidt...

Страница 23: ...RFInterface Setup Network ID The Network ID is a security setting that allows the SPEEDLAN TM unit to reject packets from other wireless bridgesinthearea Althoughthebridgingorroutingtablewould reject...

Страница 24: ...he values will appear only as xxxxxxxxxx Warning This setting must be set to the same value on all XE units you wish to have communicate together Failure to set them to the same value will prevent any...

Страница 25: ...SPEEDLAN TM BRIDGING SETUP...

Страница 26: ......

Страница 27: ...figured to pass all net work protocols When you press the Edit button you will be presented with a list of protocolswhichyoucanselectforfiltering Afterselectingtheprotocols highlightthem onthisscreena...

Страница 28: ...esetypesofpackets whichareconsideredbadpackets Ourstudieshaveshownthat a common failure mode of many Ethernet interfaces and net workingsoftwareistotransmitpacketslikethese Ifyoudonot need to permit S...

Страница 29: ...ble that contains each source address and the interface number that address was received on If a source address is later seen on a different interface the bridge will immediately change the interface...

Страница 30: ...s determined to be over The storm will be determined to be over when 30 seconds have passed in which every one second periodhaslessthenthestatedthresholdin broadcast or multicast packets The set tings...

Страница 31: ...rt mechanism for data between them The encapsulated data packets can be optionally encrypted to make the virtual private network more secure Encrypt Bridge Tunnel Packets If purchased brouters from Wa...

Страница 32: ...SPEEDLAN TM 32...

Страница 33: ...SPEEDLAN TM 33 Setting Up the IP Addresses IP Host Setup...

Страница 34: ...ddresscontains32bitsofinformation whichisdividedintothefollowing Two sections the network address and the node address also known as the host address To keep it simple lets call it four bytes octets N...

Страница 35: ...or a total of 65 534 nodes Class C addresses use 24 bits 3 octets for the network portion and 8 bits two octets for the node or host section of the address This provides 16 7 million networks with 256...

Страница 36: ...eate multiple networks within one ClassA B or C network Each data link octet contains its own unique identifier also known as the subnet Also each node on the same data link must belong on the same su...

Страница 37: ...and D as well Router D knows exactly which subnet to transfer or turn the packets to by reading its IP and subnet mask address Note that each subnet on this network is 255 255 255 192 Why is 192 the...

Страница 38: ...is DHCP DynamicHostConfigurationProtocol DHCP allowsnetworkadministrators you toassignstaticor dynamic IP addresses for the period of time needed to connect to the Internet Think of DHCP as leasing a...

Страница 39: ...when there is a translation among an Internet Protocol IP address used within one network designated as inside network to a different IP addresses within another network designated as outside network...

Страница 40: ...will be re addressed as 204 101 20 3 public address of SPEEDLAN TM When the packet returns to the SPEEDLAN TM and then back to the private network the packet will be re addressed the IP address of the...

Страница 41: ...k that you would like to be available on the public network For example if a web server on a server is IPAddress 10 0 0 3 you can create a pair that will specify that all requests received on the publ...

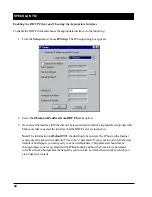
Страница 42: ...lick Scan The Scan dialog box appears Select the appropriate brouter and click OK Click OKagain Amessageboxappearsconfirmingthatthe Configurationhasbeenreadfromthe Bridge i e 128 104 224 1 Click OK To...

Страница 43: ...ained from the network administrator IPhost or hostprovider Default Router IP If you have an established network use the IP address for the router already set up for that network If you do not have an...

Страница 44: ...face drop down list Make sure that you select the interface that the DHCP server is located on Note The information for Default TTL should already be entered The IP host on the Internet sends out each...

Страница 45: ...Translation This feature enables a company to map the private networks IP addresses into one or more global public network IP addresses This meansthatoutsiderswillonlyviewthesingle ormoreifdesignated...

Страница 46: ...r computer Note Click Select to view the IP Mask List Select the appropriate IP Mask and click OK 5 Enterthedomainnameinformation 1st DNS ServerIP This setting will specify the client s 1st DNS Server...

Страница 47: ...see pages 54 and 55 TosetupoutgoingNAT dothefollowing 1 From the Setup menu choose General Setup The General Setup dialog box appears 2 Select the Enable Outcoming NetworkAddress Translation check bo...

Страница 48: ...ho in the private network made a request to an address in the public network This translates the IP addresses from one side to another hiding the private network from the public This means that the pu...

Страница 49: ...p menu choose General Setup The General Setup dialog box appears 2 Select the Enable Incoming NetworkAddressTranslation check box Click OK 3 From the Setup menu choose Incoming NetworkAddressTranslati...

Страница 50: ...e outside or public network will be translated to the appropriate private IP address This may be necessary if you have a server or workstation or computer that needs to be connected to a remote networ...

Отзывы: