Page
8
of
12
1
2
3
4
5
6
1.1
Setting
Parameters
Method
Menu
Viewing and Setting
Note the Cyclical
Nature of the Screen
Display Navigation
Left-Hand Side
Button Moves you
through the various
Displays
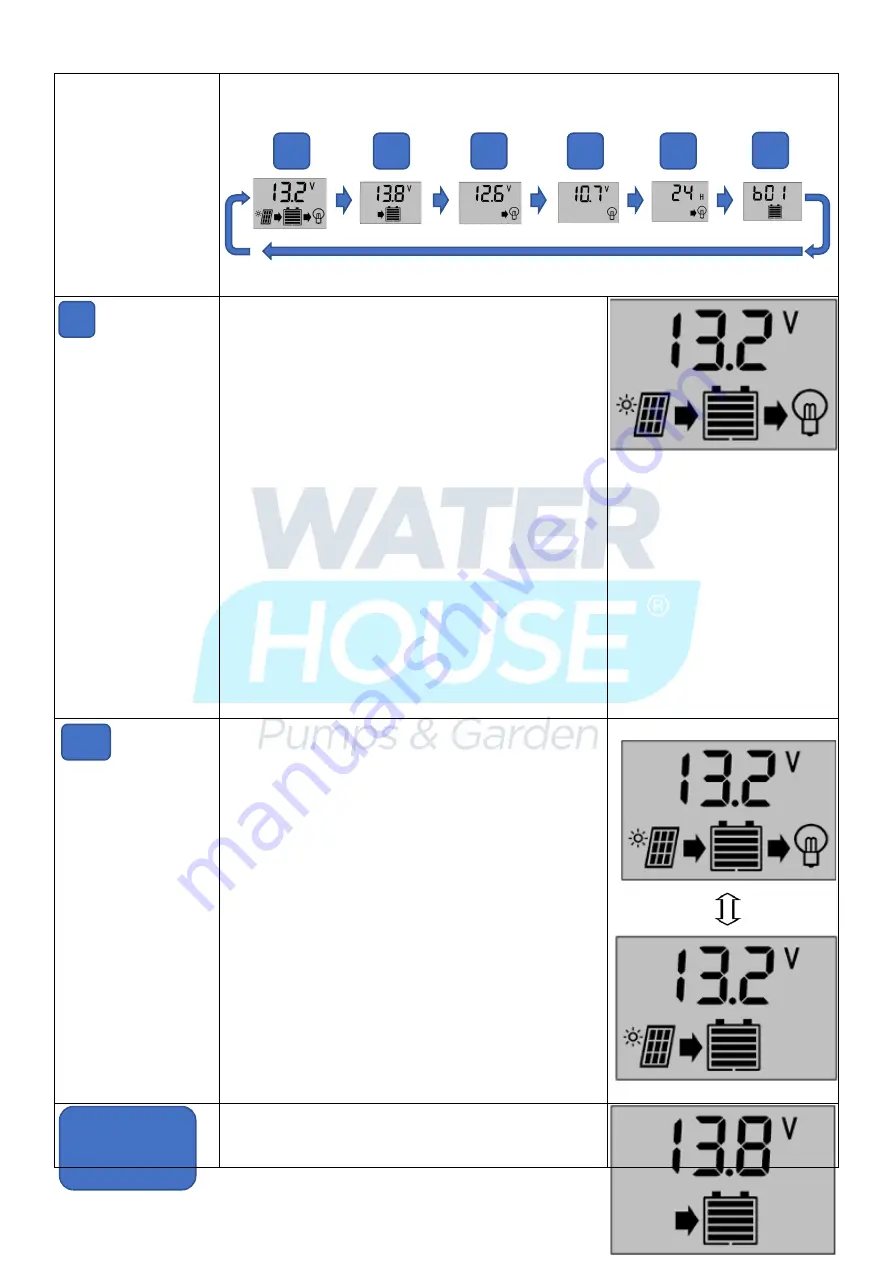
View System State
As pictured at right, the Floating Charge Voltage is
showed, and when it is in floating mode, the arrow
between the solar panel and battery icons in the display
will flash.
When the battery reaches the floating voltage, the
controller will maintain the voltage values by PWM
charging mode to avoid overcharge.
It must be noted that different battery types have
different bulk and float programs. Make sure you have
the correct battery type setup as a parameter in your
charge controller, as in item number 6 of this table.
Important
No solar Panel Icon on the display means that either your
solar panel is not connected, or it is short circuited.
Before you start using your pump, leave the battery
charging for about a day of two. Always switch off your
load as described in 1.1 of this table when you are
bringing your battery/s up to a serviceable level. (The
little lamp bulb Icon will disappear when you have
switched off your load / Pump.
View System State Display
Switching the Load
ON and OFF
(The
Load
in this
case the Pump)
As pictured at right.
You can use the Left-Hand Side Button (LHS-B) on the
faceplate to switch ON or switch OFF the load in the
default interface. To do this, you do not have to enter
the parameter set mode to do this single operation.
All you have to do, to switch off the LOAD (Your Pump)
Is to press the
Right-Hand Side Button (RHS-B).
You will
see the Light bulb icon Switch on and off for each press
of the RHS-B button.
(Additionally, it is interesting to note that the other
method works as well, LHS-B for > 5 Seconds, Press the
LHS-B once, Hold the RHS-B down to save the setting.)
Described Below.
Switching your Pump ON and OFF
The controller will Indicate the
default entry “battery
voltage” interface after
the unit is correctly powered-on.
This is the main interface.
1


