11
WARMBOARD COMFORT SYSTEM // GAS
WARMSOURCE FLEX
PREPARATION
Install Location
Like all gas-fired boilers, Warmsource makes some
noise and may be disruptive if installed near a
bedroom or common living space. Garages and
basements are the better choice. See the Lochnivar
Noble Manual (pg. 7-11) for additional requirements.
Use of a drain pan is recommended.
Installing Distribution Lines
After the tubing and manifolds, install the manifold
distribution lines. Sizing, layout and length of the
piping can be found in the WCS Design Drawings.
f
Pressure test all distribution lines for 15 minutes
at 100 PSI (International Mechanical Code,
section 1208.1)
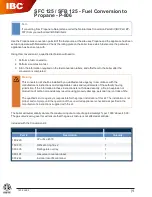
Minimum Clearances
This illustration shows the recommended minimum
dimensions for the Warmsource mechanical area.
This image also depicts the space necessary for
piping and mechanical components. The minimum
depth is 40" for access and serviceability.
Electrical Requirements
f
Warmsource boiler: 160W
• Warmsource pump: 30-165W (varies by heat load)
• Smart Reset Controller (SRC): 20W
(own 110V GFI outlet required for Warmsource unit)
f
Manifold Controller (MC): 10W per loop
(each requires own 110V GFI outlet)
f
Thermostat: 5W each
(each requires own 110V J-Box)
48” (min) width recommended when including distribution lines
Maximum space between both units is not to exceed 48”
Mounting
Bracket
4
3/8
"
80K
80K
199K
2
3/4
"
5"
9"
110K
2
3/4
"
15"
150K
2
3/4
"
9
1/4
"
11
3/4
"
18"
18"
18"
12
1/2
"
15
1/4
"
2
1/2
"
9
1/4
"
11
1/4
"
13"
16"
5"
8
1/2
"
17"
2
1/4
"
15
1/2
"
1
1/2
"
4
1/4
"
8
1/2
"
15
1/2
"
4
3/4
"
8
1/2
"
17
17"
Pressure
Relief Valve
Air Vent
Air Exhaust
Air Intake
Condensate
Gas
1-1
1/4
” Copper
(field supplied)
9"
17"
24"
2"
48”
Boiler
Warmsource
18”
24”
12”
Supply (back)
Return (front)
4
3/4
"
8
1/2
"
17"
17"
Install the Warmboard-supplied ball valves and
hose bibs as shown in our Design Drawings
for the proper filling and purging of air from
the system.
Pre-plumb boiler components prior to drywall.
Reference page 4 of this guide.
Warmsource Flex dimensions:
80K: 17W x 24H x 17D ea.
110,150,199K:
17W x 24H x 17D, 17W x 24H x 18D
To estimate labor costs, view the boiler page
in the WCS Design Drawings to see how the
manifold distribution lines should be plumbed.