background image

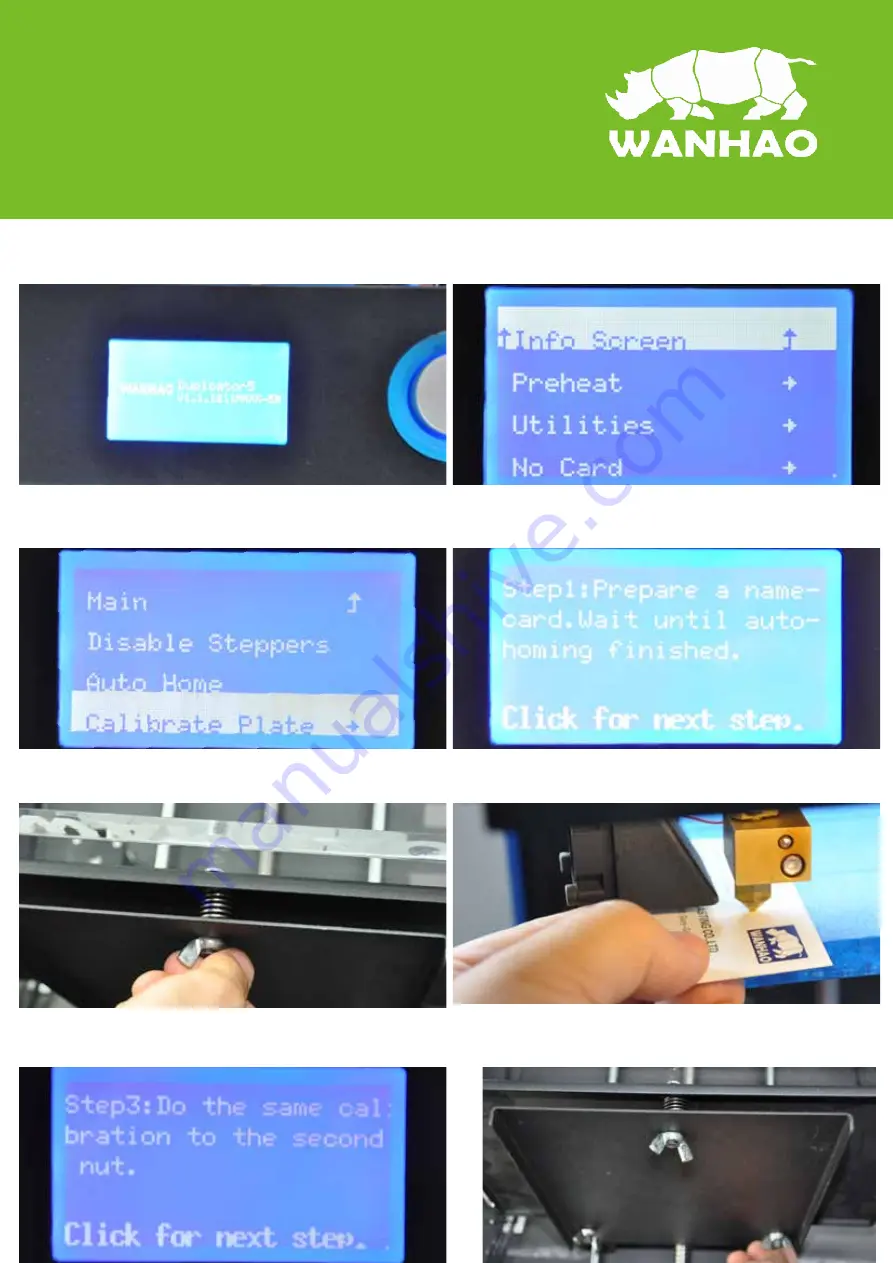
D2. How to level the building plate

1. Navigate the Rotate button and 

Push the button

2. Navigate the Rotate button to 

Utility and Push the button

7.  Navigate to Step2, 3 and 4

6. Insert one name card between 

the nozzle and plate(0.1mm thick)

5. Push the button and adjust nut 

below the plate

4. Prepare a name card, Wait until 

auto-homing finished

3. Navigate to Calibrate plate and 

push the button

8. Adjust the rest 2 nuts and ensure 

name card can go through

Содержание Duplicator Five

Страница 1: ...WANHAO 3DPRINTER Duplicator Five Tel 86 579 82346658 Email Sales WanHao3DPrinter com Web WWW WANHAO3DPRINTER COM USER MANUEL Resolution 0 02mm Speed 300mm second Software Wanhao Maker...

Страница 2: ......

Страница 3: ...ts You might be familiar with earlier types of Wanhao printers or other 3D printers It is essential that your read this manual carefully as there are a lot of new procedures with Duplicator 5 WANHAO i...

Страница 4: ...Dimension Length 460mm Width 400mm Height 860mm Shipping box Length 550mm Width 490mm Height 940mm Net Weight 35kg 77lbs Gross Weight 44kg 96lbs Temperature Ambient Operating Temperature 10 38 C Stor...

Страница 5: ...surface Placing it centrally on the floor will provide the best accessible position for unpacking 2 Lay down the printer Open the box from the bottom 3 Turn the bottom cardboard outwards and open fro...

Страница 6: ...essential accesoires that comes with this 3D printer All the following parts should be in the box please check contents 1 pc printer 1 pc build plate 1 pc spool holder 1 pc clamp 1 pc USB cable 1 pc...

Страница 7: ...glance 1 LED display 2 Push and Rotate button 3 Extruder Cable 4 Filament tube 5 MK10 Extruder 6 Building Plate 7 Building Plate Screw 8 Spool Holder 9 USB Socket 10 Power Switch 11 Material Feeder 1...

Страница 8: ...wer brick of the power supply 3 The connector has to be inserted at the back of the Duplicator 5 in the round hole next to the on off switch and USB slot The flat side of the power plug has to face to...

Страница 9: ...nd Push the button 7 Navigate to Step2 3 and 4 6 Insert one name card between the nozzle and plate 0 1mm thick 5 Push the button and adjust nut below the plate 4 Prepare a name card Wait until auto ho...

Страница 10: ...le when the printer is power off 3 Please make sure you have a filament spool positioned over the spool holder guided along the filament guide with the filament in counter clockwise direction 4 This s...

Страница 11: ...all the latest firmware as well as to calibrate your printer While you make decisions on the look and quality of your 3D object Wanhao Maker s slicer engine prepares your model at the background Faste...

Страница 12: ...e 6 View Check the object from different angle 7 Pan To Move the plate from all directions so you can check more clear 8 Move Move the object left right front and back wards 9 Rotate Move the object w...

Страница 13: ...Print Time Amount of material required And the weight of your 3D print 5 After you inserted the included SD card into your computer Maker changes the Save toolpath Button into the Toolpath to SD Butt...

Отзывы: