


Installation
11
DOK BEMO 11/20 Rev.01 PM
5 Installation
This chapter is intended for installers of the wallbox.
Wallboxes may only be installed by a qualified electrician with proven knowledge.
5.1 Transport and installation site
f
Ensure that the wall thickness is sufficient to bear the weight of the wallbox (for the weight of the wallbox,
see “14.2 smartEVO PRO 22 (example)” on page 27).
f
Place the wallbox in a location where it is protected from disproportionately strong sunlight (integrated
temperature monitoring in the charge controller reduces the power if necessary to prevent overheating).
f
For drilling dimensions, see “14.2 smartEVO PRO 22 (example)” on page 27.
f
Two people are needed to install the wallbox.
5.2 Preparatory work
f
Unpack the wallbox and check it for damage.
f
In the event of any damage to the wallbox, contact the manufacturer or a qualified electrician.
f
Select the anchor plugs and screws according to the ground.
f
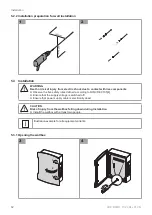
Strip the cable to the required length.
f
Select the cable entry for the supply cable into the housing according to the cable cross section.
f
The wallbox can be mounted with a base (optional purchased party) or directly on the wall:
–
Installation preparation for installation with base, see Page 11
–
Installation preparation for wall installation, see Page 12
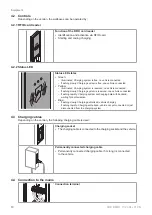
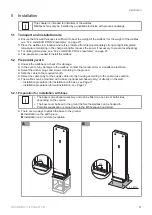
5.2.1 Preparation for installation with base
▪
The base is an optional accessory and can be fitted on one side or both sides,
depending on the version.
▪
The base must be fixed to the ground before the wallbox can be hooked in.
▪
Potential equalisation is carried out via the M8 hexagon head screw.
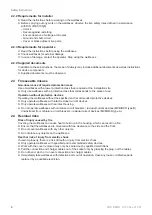
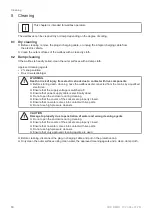
f
There are two ways to attach the base to the ground:
A
Installation on the earth piece
B
Installation on a concrete foundation
A
M8
B
4 x M12
M8


