


32
33
Caution
Never immerse the spray gun in solvent or any other cleaning solution. The func-
tional reliability and efficiency of the gun can otherwise not be guaranteed.
Caution
Do not use any hard, pointed or sharp-edged objects when cleaning the spray
gun. Any damage of the precision-made parts are likely to affect your spraying
results.
1. Dismantle the spray gun in accordance with
5.5 Replacement of Material
Nozzle and Needle.
2. Use a soft brush together with a compatible cleaning sulotion to clean the air
cap and nozzle.
3. Clean the remaining parts and the spray gun body with a suitable cloth and
cleaning solution.
4. Apply a thin film of the appropriate grease to the:
• sealing collar of the piston
• O-ring of the piston
• material control nee
• needle spring
Make sure to use a non-acidic, non-resinogenic grease and a soft brush. The
spray gun is then reassembled in reverse order.
6.3
Cleaning - Routine
The spray gun need not necessarily be dismantled for cleaning if and when the
spraying medium is changed in regular intervals or upon termination of work
(depending on the material used).
Note
Clean and lubricate the spray gun frequently in accordance with Chapter
6.2
Cleaning - Complete
. This will ensure functional reliability of the spray gun.
The following requirements must be met before the routine cleaning work can be
performed:
1. The material tank must be claen and then be filled with a compatible cleaning
aolution. Material pressure has to be available at the spray gun. The cleaning
solution should not be sprayed.
2. Take the spray gun into operation (see
5.2 Starting the Spray Gun
).
3. Do not stop the spray gun until clear cleaning solution emerges from the
nozzle.
The material supply of the PILOT WA 450, WA 451, WA 452 and WA 453 can be
manually released so that it is not necessary to operate the complete spraying
system. All pressures should then be removed from the complete spraying system
until the next operation.
7
Repairs / Replacements
Warning
Prior to any repairs / replacements: Make sure that the spray gun is in unpressuri-
zed condition, i.e. all air and material inputs must be shut off - if not, imminent risk
of injury.
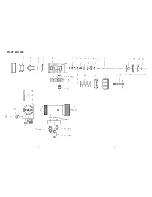
Note
Please use the drawing at the beginning of these operating instructions to perform
the following procedures.
7.1
Replacement of defective Needle Seal Packings
1. Remove the material needle (see
5.5 Retooling the Spray Gun
).
2. Unscrew the sealing screw in (pos. 14) with the O-ring and the packing screw
(pos. 13).
3. Remove the packing spring in (pos. 11) (replace, if damaged) and the pressu-
re ring in (pos. 10).
4. Pull out the needle seal packing in (pos. 9) with an auxilliary tool. Use a
strong wire on which one end is bent making a small hook.
5. Lubricate the new needle seal packing with non-acidic, non-resinogenic
grease.
6. Install the new needle seal packing in the gun body.
Installation of the remaining parts is performed in reverse order.
Note
Never reinstall a used needle seal packing (pos. 9) as otherwise the functional
sealing reliability of the spray gun will suffer.
7.2
Replacement of Nozzles, Needles, Springs and Seals
Dismantle the spray gun in accordance with Chapter
Replacement of Material
Nozzle and Needle
, if the following components have to be replaced:
•
Material nozzle
•
Piston spring
•
Material needle*
•
Needle spring*
•
Cup seal*
•
Piston O-ring*
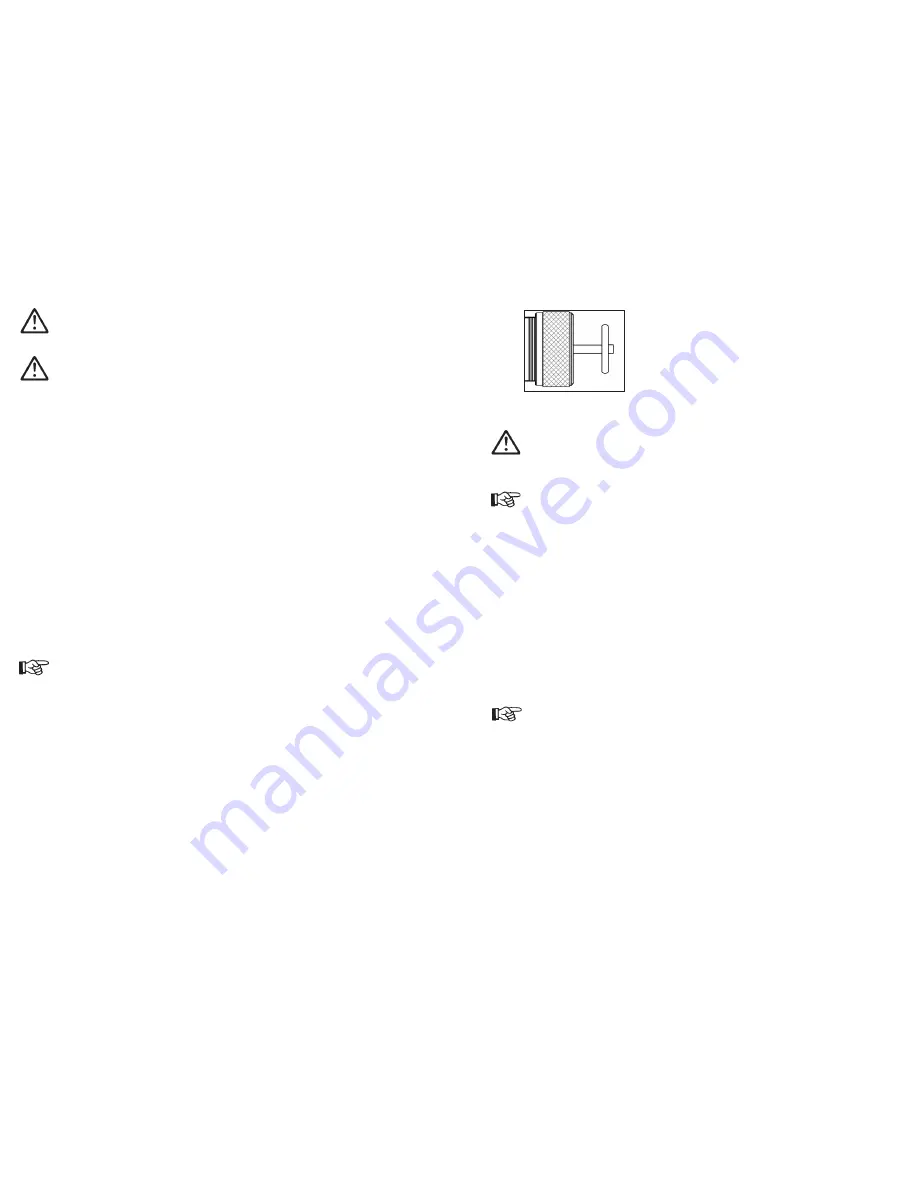
1. Pull back the draw bar of the spray gun. The material
inlet is now open and both material duct and material
nozzle will be cleaned.
2. Do not let go of the drawbar until clear cleaning soluti-
on emerges from the nozzle.
Содержание PILOT WA 450
Страница 3: ...4 5 PILOT WA 450...


