


39
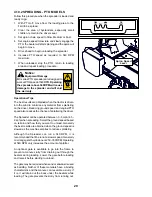
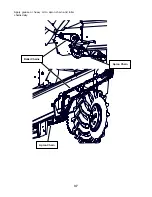
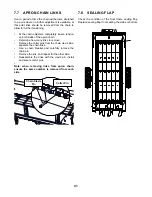
7�4�2 DRIVE BELT TENSION / REPLACEMENT (IF EQUIPPED)
The machine is designed with a sheave on the PTO shaft, which is used to drive the line shaft sheave through a
pair of drive belts.
When the belt is in disrepair or loose, the ability to efficiently drive the line shaft may be affected. It is important to
periodically check the condition as well as the tension of the belt. Frayed, cracked or worn drive belts should be
replaced. Drive belt should deflect no more than 3/4 - 1.0 in. (19 - 25 mm).
For accurate measurement use a drive belt tension gauge. Contact your dealer for more information on belt tension.
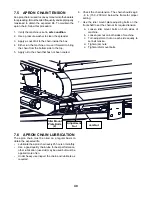
To replace the belt follow this procedure.
1. Verify the machine is set in
safe condition�
2. Remove the bolts that secure the belt shield, and
remove the shield.
3. Loosen (do not remove) the 4 bearing mount plate
bolts that hold the PTO bearing/ shaft assembly to
the main frame.
4. Turn the belt tensioning nut counter clockwise, until
the drive belts are loose enough to remove, then
remove the belts.
5. Install new belts.
6. Turn the belt tensioning nut clockwise to tighten
the belt.
7. Check the tension by pushing on the belt with your
finger and measure its defection. Drive belt should
deflect no more than 3/4 - 1.0 in. (19 - 25 mm).
8. Check pulley alignment then tighten four PTO
bearing/ shaft assembly bolts. Replace the belt
shield, cover and reinstall the bolts.
9. Recheck tension after 10 hrs of use.
Bearing
Mount Plate
Bolts (4)
Belt Tension Nut:
1. To tighten turn
clockwise.
2. To loosen
turn counter
clockwise.
Drive Belts
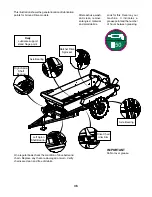
WARNING
Machine is shown with guard
removed for illustrative purposes
only� Do not operate machine
with guard removed�


