22
EN-RATIOfresh-250-400_TI-MA-0809-11214900
7. Maintenance and Care
The system should be checked annually:
●
Check all screw connections and soldered points for
leaks.
●
In case of potable water with an increased carbonate
content, the heat exchanger should be checked regu-
larly for lime buildup. The following changes are indica-
tive of lime buildup: Return temperatures of the primary
circuit are significantly above those listed in Table 14. The
max. hot water volume flow that can be withdrawn has
been reduced. The set nominal hot water temperature is
no longer reached with frequent water withdrawals.
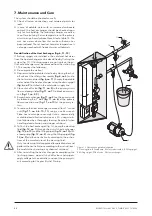
Decalcification of the Heat Exchanger (fig. 6, 11, 12)
If flushing spigots are installed in the cold and hot water
lines, the heat exchanger can be decalcified by flushing the
system (fig. 11). If flushing spigots are not in place, the en-
tire heat exchanger must be removed from the station (fig.
11. This requires the following:
●
De-energize the station!
●
Depressurize the potable water line by closing the shut-
off valves at the safety subassembly
(fig. 6, no. 3)
and in
the hot water network
(fig. 6, no. 11)
. Empty the potable
water side of the heat exchanger using the drain spigot
(fig. 6, no. 9)
installed in the cold water supply line.
●
Close shut-off valve
(fig. 11, no. 5)
in the primary circuit
flow and pump slider
(fig. 11, no. 7)
to block primary cir-
cuit
(fig. 11, no. 2, 9)
.
●
Empty heat exchanger
(fig. 11, no. 3)
on the primary side
by loosening the 1" bolt
(fig. 11, no. 6)
at the primary
flow connection and
(fig. 11, no. 10)
at the primary re-
turn.
●
To remove the heat exchanger, remove all four 1" swivel
nuts
(fig. 11, no. 4, 6, 10, 11)
using a size 36 wrench.
Place heat exchanger over night into a commercially
available decalcification solution or a 5 % vinegar solu-
tion followed by a thorough cleaning. Be careful when
handling decalcification and vinegar solutions!
●
To flush the heat exchanger (fig. 12), pump the cleaning
fluid
(fig. 12, no. 1)
through the circuit‘s heat exchanger
(fig. 12, no. 13)
and the filling spigot
(fig. 12, no. 10)
with
a feed pump
(fig. 12, no. 2)
using the filling spigot
(fig.
12, no. 9)
and then neutralize it according to the instruc-
tions of the manufacturer of the cleaning fluid.
Only use cleaning fluids approved for potable water and
perform the neutralization according to the instructions!
Be careful when handling any chemical solutions!
●
After reinstalling the heat exchanger or completing the
flushing process, open all shut-off valves and spigots,
apply voltage to the controller, and vent the primary cir-
cuit according to Chapter 5 Initial Startup.
90°
90°
10
9
11
3
1
13
2
Figure 12 Heat exchanger decalcification
1
Cleaning fluid;
2
Feed pump;
3
Safety subassembly;
9
Filling spigot;
10
Filling spigot;
11
Ball valve;
13
Heat exchanger.
Содержание RATIOfresh 250
Страница 25: ...EN RATIOfresh 250 400_TI MA 0809 11214900 25 ...
Страница 26: ...26 EN RATIOfresh 250 400_TI MA 0809 11214900 ...


