


Customizing
Page 38
ADJUSTING THE DISPLAY
FACTORY PRESETS, AUTO-SYNC, AND USER SETTINGS
Factory presets: For optimal display quality, set your video card to the maximum (native) resolution
that can be used with Cintiq. See the “Product specifications” on page 68 for details.
Auto-sync: Cintiq automatically synchronizes to the incoming signal. The auto-sync function sets the
horizontal and vertical screen position, as well as pitch and phase. Auto-sync will function between
the supported horizontal and vertical frequency ranges. See the “Product specifications” on page 68
for details.
If Cintiq does not automatically synchronize with the incoming signal, you can use the OSD A
UTO
A
DJUST
option to initiate display synchronization. Further screen display adjustments can be manually
made using the On Screen Display (OSD) controls.
Color calibration: Changing the color, color temperature, contrast, brightness, or backlight from their
default settings will invalidate the ICC color profile that was included on the Installation CD.
ON SCREEN DISPLAY (OSD) SETTINGS
The OSD function enables you to optimize a variety of display settings at the touch of a button.
Make adjustments using the OSD controls located on the back of the unit. Reach over the top of the
display to locate the buttons.
Note: After changing a setting, the OSD menu will automatically close after a few moments of inactivity. You can
also press the M
ENU
button to close the OSD menu. All settings are automatically saved when the OSD
menu closes and will be used the next time the unit receives a similar video signal. This is applicable to all
display modes. If you make changes to the display appearance and cannot return to the original settings,
use the R
ESET
option to return the pen display to its original factory defaults.
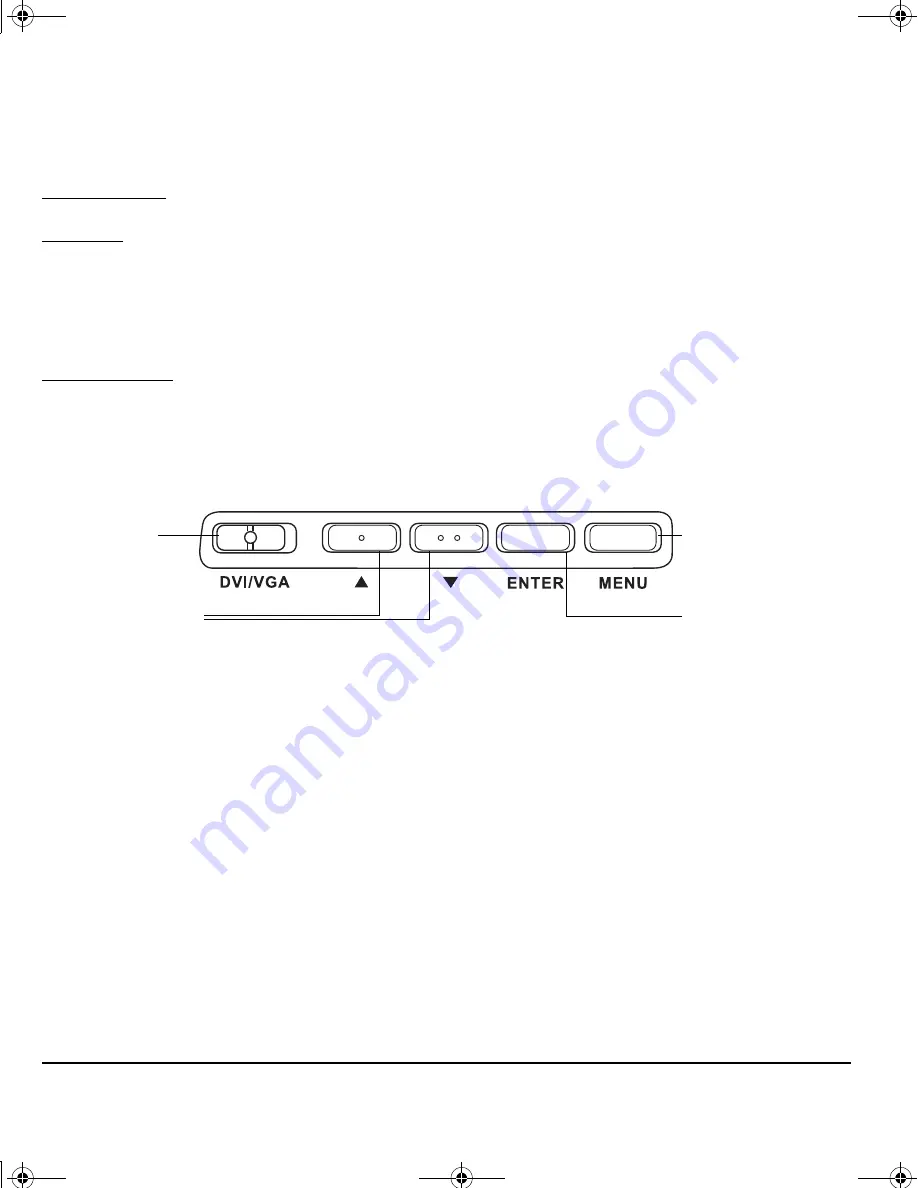
Digital/Analog
(DVI/VGA) switch
1. M
ENU
button
Press to open or exit
the OSD menu.
2. Selection buttons
Use these buttons to select and highlight an option.
Then press the E
NTER
button. The current settings and
adjustment sub-menu for that option will appear.
Some settings may not be available when in DVI mode.
Use the buttons to select and adjust the option
settings. (Press the up button to increase a selected
item value. Press the down button to decrease it.)
After making changes, press the E
NTER
button to save.
See the following pages for a detailed description of
menu options.
E
NTER
button
Activates the
selected OSD menu
option.
21UX_Monet_Manual.fm Page 38 Tuesday, January 19, 2010 9:15 AM
Содержание CINTIQ 21UX DTK-2100
Страница 2: ...21UX_Monet_Manual_Cover fm Page 0 Monday February 8 2010 8 45 AM ...
Страница 91: ...설치 가이드 및 하드웨어 설명서 모델 DTK 2100 21UX_Monet_Manual_KR fm Page 1 Thursday February 4 2010 11 50 AM ...
Страница 174: ...21UX_Monet_Manual_KR fm Page 82 Friday February 5 2010 5 43 PM ...
Страница 175: ...安裝指南及硬體手冊 機型 DTK 2100 21UX_Monet_Manual fm Page 1 Friday February 5 2010 11 32 AM ...
Страница 258: ...21UX_Monet_Manual fm Page 82 Friday February 5 2010 5 27 PM ...
Страница 259: ...安装指南与硬件手册 型号 DTK 2100 21UX_Monet_Manual_CS fm Page 1 Thursday February 4 2010 1 21 PM ...
Страница 339: ...21UX_Monet_Manual_Cover fm Page 1 Monday February 8 2010 8 45 AM ...


