


wc_tx004174gb_Fm10.fm
29
HDR 115
Machine Setup
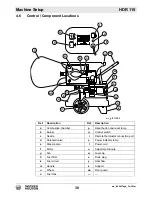
4.5
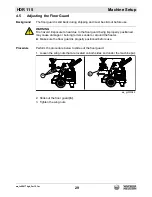
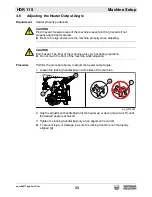
Adjusting the Floor Guard
Background
The floor guard is slid back during shipping and must be slid out before use.
Procedure
Perform the procedure below to slide out the floor guard.
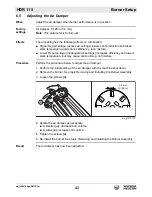
1. Loosen the wing nuts that are located on both sides and under the machine
(a)
.
2. Slide out the floor guard
(b)
.
3. Tighten the wing nuts.
WARNING
Fire hazard. Exposure to heat due to the floor guard being improperly positioned
may cause damage or burning to items under or around the heater.
►
Make sure the floor guard is properly positioned before use.
5200017248
5200017248
wc_gr013069
b
a
Содержание HDR115
Страница 6: ...Foreword HDR 115 6 wc_tx004151gb_FM10 fm...
Страница 17: ...wc_si000963gb_FM10 fm 17 HDR 115 Safety Information Notes...
Страница 18: ...wc_si000964gb_FM10 fm 18 Labels HDR 115 2 Labels 2 1 Label Locations wc_gr013182 A A B B C D E E F G H K M N...
Страница 56: ......
Страница 58: ......


