background image

4

Ensure the extension cord you use is of 

sufficient gauge for its length.  

Personal Safety

Dress properly. 

Don’t wear loose clothing or 

jewelry; they can be caught in moving parts. 

Protective, non-electrically conductive gloves 

and non-skid footwear are recommended when 

working. Wear protective hair covering to contain 

long hair and keep it from harm.

Use eye protection. 

Use a full-face mask


if the 

work you’re doing produces metal filings, dust 

or wood chips.


ANSI Z87.1 compliant, approved 

safety glasses with rigid side-shields or goggles 

are acceptable in other situations. Wear a clean 

dust mask if the work involves creating a lot of 

fine or coarse dust.

Don’t overreach. 

Keep proper footing and 

balance at all times. Do not reach over or across 

machines that are running.

Stay alert.  

Watch what you are doing & use 

common sense. Don’t operate any tool when you 

are tired.

Compressed air cautions: 

compressed air from 

this unit may contain carbon monoxide. The air 

produced is neither suitable for breathing nor 

food processing without filtering and testing to all 

applicable legal standards.

Breathing protection:

 always use a respirator 

when spraying paint or chemicals.

Tool Use and Care

Maintain tools with care.  

Keep tools sharp and 

clean for better and safer performance.  Follow 

instructions for lubricating and safe performance.  

Follow instructions for lubricating and changing 

accessories.  Keep handles dry, clean and free 

from oil and grease.

Avoid unintentional starting.

  Be sure the 

switch is in the 

off 

position before plugging in.

Always check and make sure to remove any 

adjusting keys or wrenches 

before turning the 

tool on.  Left attached, these parts can fly off a 

rotating part and result in personal injury.

Do not use the tool if it cannot be switched on 

or off.

  Have your tool repaired before using it.

Disconnnect the plug from power before 

making any adjustments.

  Changing attachments 

or accessories can be dangerous if the tool could 

accidentally start.

Store idle equipment.  

Store


equipment in a dry 

area to inhibit rust.  Equipment also should be in 

a high location or locked up to keep out of reach 

of children.

Don’t force the tool.  

It


will do the job better and 

more safely at the rate for which it was intended.

Use the right tool.  

Don’t force a small tool or 

attachment to do the work of a larger industrial 

tool.  Don’t use a tool for a purpose for which it 

was not intended.

Secure work. 

Use clamps or a vise to hold the 

work. It’s safer than using your hands and it frees 

both hands to operate the tool.

Check for damaged parts.

  Before using this 

tool, any part that is damaged should be carefully 

checked to determine that it will operate properly 

and perform its intended function. Check for 

alignment of moving parts, binding of moving 

parts, breakage of parts, mountings, and other 

conditions that may affect its operation. Inspect 

screws and tighten any ones that are loose. Any 

part that is damaged should be properly repaired 

or replaced by an authorized service center unless 

otherwise indicated elsewhere in the instruction 

manual. Have defective switches replaced by an 

authorized service center. Don’t use the tool if 

switch does not turn it on and off properly.

Never use this equipment 

if it is leaking air; has 

missing or damaged parts, guards, or shields; or 

requires repair. Make sure all screws and caps are 

securely tightened.

Do not use the air hose 

to move the compressor. 

Release the pressure in the storage tank before 

moving.

Maintain tools with care. 

Keep tools clean for 

better and safer performance. Follow instructions 

for lubricating and changing accessories. Keep 

dry, clean and free from oil and grease.

Do not attempt any maintenance or adjustment 

with the compressor in operation, the power 

connected, or air under pressure in the system. 

Содержание 650-4815

Страница 1: ...struction Manual Manual de instrucciones Manuel d instruction ITEM NO ART CULO NO CODE D ARTICLE v 090928 28 Gallon Air Compressor Compressor de aire de 28 galones Compresseur d air 28 gallons 650 481...

Страница 2: ...defects to material and workmanship for a period of ONE YEAR from date of purchase If defective the product will be repaired or replaced Call the Vulcan Power Tool customer service line at 1 800 482 0...

Страница 3: ...e followed to reduce the risk of fire electric shock and personal injury WARNING outlet only one way If you have difficulty inserting the plug try reversing it If it still doesn t fit do not alter the...

Страница 4: ...ol repaired before using it Disconnnect the plug from power before making any adjustments Changing attachments or accessories can be dangerous if the tool could accidentally start Store idle equipment...

Страница 5: ...sors get hot during operation Do not touch the motor discharge tubing or compressor while it is running The compressor turns itself on automatically while the power is connected Air tanks over pressur...

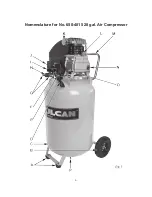
Страница 6: ...6 Nomenclature for No 650 4815 28 gal Air Compressor...

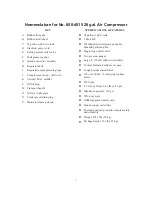
Страница 7: ...drain plug P Moisture release petcock SPECIFICATIONS FEATURES l 28 gallon 106 L tank l 3 Peak HP l Oil lubricated compressor pump for durability and long life l Single stage direct drive l Two pressur...

Страница 8: ...e air service connection The pump continues to add air until the air receiver pressure builds to the factory preset cut out pressure of the pressure switch The air inlet filter openings must be kept c...

Страница 9: ...separately from the compressor and enclosed with this manual Be sure there is a rubber O ring on the upper part of the threaded end 7 Put a little pipe thread sealing tape on the threaded end of the o...

Страница 10: ...cuit breaker rather than a fuse If a fuse is necessary a dual element time delay fuse should be used EXTENSION CORDS If you plan to use an extension cord when operating your air compressor please note...

Страница 11: ...ass N fig 1 5 OPERATION BEFORE OPERATING 1 Check that all nuts and bolts are all snug 2 Check the quantity and quality of oil see compressor lubrication above INITIAL BREAK IN 1 Open screw the knurled...

Страница 12: ...P fig 1 6 3 Plug in the power cord 4 Pull up on the On Off switch to turn the unit on 5 Adjust the Regulator H fig 1 5 so that the needle on the Regulated output pressure gauge I fig 1 is set to the...

Страница 13: ...air filter by twisting open the metal air filter cap Remove the filter element and clean it thoroughly with soap and water MONTHLY MAINTENANCE l Inspect air system for leaks by applying soapy water t...

Страница 14: ...cleaning air filter or any parts in direct contact with the air production do not use any flammable or toxic cleaner or solvent l During the break in period nuts and bolts have a tendency to loosen u...

Страница 15: ...seal fittings Do not over tighten Compressor will not start Fuse or circuit breaker tripped Check for cause replace or reset Loose electrical connections Check wiring connections Extension cord not co...

Страница 16: ...ief valve opens Defective pressure switch or improper adjustment Check for proper adjustment and if problem persists replace pressure switch Oil discharge in air Improper oil viscosity Replace with SA...

Страница 17: ...5 Valve plate 1 26 Pressing plate 1 27 Spring washer 3 1 28 Bolt M3 1 29 Gasket 1 30 Cylinder head 1 31 Washer 8 8 32 Spring washer 8 8 33 Bolt M8 4 NO DESCRIPTION QTY 34 Elbow 1 35 Air filter 1 36 Ou...

Страница 18: ...porting frame 1 70 Safety valve 1 71 Unloader tube 1 72 Nut G1 8 1 73 Small locking ring 1 74 Check valve 1 75 Locking ring 2 76 Nut 2 77 Exhaust pipe 1 78 Handle 1 NO DESCRIPTION QTY 79 Bolt M6 4 80...

Страница 19: ...a partir de la fecha de compra Si presentara alguna falla el producto ser reparado o reemplazado Llame a la l nea de servicio al cliente de herramientas el ctricas Vulcan 1 800 482 0131 y un represen...

Страница 20: ...LAS HERRAMIENTAS Lea y comprenda todas las instrucciones El incumplimiento de las instrucciones presentadas a continuaci n podr a resultar en da o personal grave CONSERVE ESTAS INSTRUCCIONES Al utiliz...

Страница 21: ...dad puede contener mon xido de carbono El aire producido no es adecuado para respirar ni procesar alimentos sin filtrar y probar si se adecua a los est ndares legales aplicables Protecci n respiratori...

Страница 22: ...energ a conectada o con aire bajo presi n en el sistema Servicio Revise para detectar partes da adas Haga revisiones frecuentes para el correcto funcionamiento de los componentes y mecanismos de segu...

Страница 23: ...lteraci n si se encuentra que alguno de los componentes anteriores ha sido cambiado o alterado se anular la garant a Al dar servicio recomendamos usar solamente partes de reemplazo id nticas y cualqui...

Страница 24: ...24 Nomenclatura para no Compresor de aire de 28 galones No 650 4815...

Страница 25: ...te del c rter P V lvula para bloqueo de humedad ESPECIFICACIONES Y CARACTER STICAS l Tanque de 28 gallones 106 L l 3 Peak HP l Bomba del compresor lubricada con aceite para durabilidad y larga vida l...

Страница 26: ...e Una v lvula de retenci n evita que regrese a la bomba El aire producido no est disponible de inmediato El aire est disponible para su uso cuando la presi n del receptor est por encima de la requerid...

Страница 27: ...o de la parte superior del c rter Q fig 3 para que sea visible el orificio de llenado de aceite 3 A trav s de este orificio llene el reservorio de aceite con aceite para compresor sin detergente SAE 2...

Страница 28: ...e plomo esta o para unir las tuber as y accesorios Puede fundirse a las temperaturas de descarga de aire del compresor y causar que la tuber a explote REQUISITOS EL CTRICOS Revise las especificaciones...

Страница 29: ...3 Si el nivel de aceite est bajo retire el tap n de aceite agregue suficiente aceite para subir el nivel hasta el punto rojo No llene en exceso 4 Vuelva a colocar el tap n de aceite antes de arrancar...

Страница 30: ...minutos para lubricar los cojinetes y los pistones 5 Cierre gire la perilla estriada en sentido horario la v lvula para bloqueo de humedad del tanque de aire 6 La presi n se acumular en el tanque y e...

Страница 31: ...m tica 9 Como esta herramienta usa aire el compresor se iniciar autom ticamente para reponer la presi n en los tanques y detenerlo cuando est lleno El ciclo continuar mientras usted trabaja ADVERTENCI...

Страница 32: ...ro y l mpielo cuidadosamente con agua y jab n MANTENIMIENTO MENSUAL Inspeccione el sistema de aire para detectar fugas aplicando agua jabonosa a todas las juntas Apriete esas juntas si observa alguna...

Страница 33: ...iar el filtro de aire o cualquier parte en contacto directo con la producci n de aire no use ning n limpiador o solvente inflamable o t xico Durante el per odo de asentamiento inicial las tuercas y pe...

Страница 34: ...a en el tanque Reemplace el tanque de inmediato No intente repararlo Sellos quemados Reemplace El compresor arranca y se detiene excesivamente cuando no est en uso La v lvula de desahogo est parcialme...

Страница 35: ...ptor a Off apagado y despu s reinicie Pinte con rociador las partes internas del motor Consulte al centro de servicios El interruptor autom tico se abre o el fusible se quema con demasiada frecuencia...

Страница 36: ...eite en el c rter Drene el c rter y llene hasta el nivel correcto Compresor recalentado Presi n de aire regulada demasiado alto Reduzca el ajuste del regulador Filtro de aire restringido Limpie y reem...

Страница 37: ...la v lvula 1 23 Junta de la v lvula 1 24 Conjunto de la v lvula 1 25 Placa de la v lvula 1 26 Placa de presi n 1 27 Arandela de resorte 3 1 28 Perno M3 1 NO DESCRIPCI N CANT 29 Junta de la culata del...

Страница 38: ...e presi n 1 67 Calibrador de presi n 2 68 Tapa posterior 1 69 Soporte de regulador del aire 1 70 V lvula de seguridad 1 71 Tubo de descarga 1 NO DESCRIPCI N CANT 72 Tuerca G 1 8 pulg 1 73 Peque o anil...

Страница 39: ...i contre tout d faut de mat riel et de fabrication pendant une p riode d UN AN suivant la date d achat Si le produit est d fectueux ce dernier sera r par ou remplac Appelez le num ro sans frais du ser...

Страница 40: ...ns d crites ci dessous peut entra ner des blessures corporelles s rieuses CONSERVEZ CES INSTRUCTIONS Durant l usage des outils lectriques des machines et de l quipement des pr cautions de s curit de b...

Страница 41: ...et utilisez le sens commun N utilisez pas un outil quand vous tes fatigu Mises en garde concernant l air comprim L air comprim provenant de cet appareil peut contenir du monoxyde de carbone L air pro...

Страница 42: ...ut Sa limite sp cifique est pr r gl e l usine selon le mod le particulier et l ajustement requis Ne modifiez jamais le r glage Ceci annulera automatiquement votre garantie Manostat Le manostat est pr...

Страница 43: ...soupape de s ret et n effectuez aucun r glage ni substitution Testez la soupape de temps en temps en tirant sur l anneau afin de vous assurer qu elle fonctionne librement Si la soupape ne fonctionne...

Страница 44: ...44 Nomenclature pour no 650 4815 Compresseur d air 28 gallons...

Страница 45: ...du niveau d huiles O Bouchon de vidange du carter P Robinet de purge SP CIFICATIONS l R servoir de 28 gallons 106 L l 3 HP max l Lubrification l huile pour plus de durabilit l Mono tage prise directe...

Страница 46: ...La pompe continue d emmagasiner de l air jusqu ce que la pression du r servoir atteigne le niveau requis sur le r gulateur ASSEMBLAGE Apr s l avoir retir du carton d emballage et avant de pouvoir util...

Страница 47: ...brication dans le r servoir 5 V rifiez l indicateur visuel de niveau N dans fig 1 et 3 L huile devrait indiquer un niveau avec le point rouge au centre de l indicateur visuel de niveau 6 Rep rez le bo...

Страница 48: ...CTRIQUES l V rifiez la plaque signal tique et assurez vous que le voltage et l intensit du courant pour le compresseur correspondent avec la capacit de la source d alimentation l Branchez votre compre...

Страница 49: ...z la quantit et la qualit de l huile Voir lubrification du compresseur ci dessus HUILE 1 V RIFIEZ la qualit et la quantit d huile chaque fois avant de faire fonctionner le compresseur Ne pas ajouter d...

Страница 50: ...r gulateur Votre compresseur est maintenant pr t utiliser REMARQUE Durant la p riode de rodage il peut y avoir une odeur l g re puisque les brosses du moteur lectrique se placent Ceci peut durer envi...

Страница 51: ...termin d branchez le tuyau d air en poussant l g rement l adaptateur raccord rapide pendant que vous glissez le manchon vers l arri re sur le coupleur pour rel cher l adaptateur 11 Appuyez sur l inter...

Страница 52: ...d air prenez toujours les pr cautions suivantes l D connectez l alimentation lectrique l Ouvrez le robinet pour laisser la pression s chapper du r servoir d air 1 Enlever le jauge visuelle du niveau d...

Страница 53: ...autoris s il est endommag l V rifiez r guli rement si les r servoirs ont des bosses des fissures ou autres dommages Ne pas utiliser si une pi ce du syst me pressuris est endommag e l Un centre de r pa...

Страница 54: ...nitialiser Connections lectriques desserr es V rifier le type de montage La rallonge n est pas ad quate Max 50 pi 15 m min ca 14 Basse tension Consulter un lectricien Surchauffe du moteur Utiliser le...

Страница 55: ...ent et si le probl me persiste remplacer le commutateur de pression D charge d huile dans l air Mauvaise viscosit de l huile Remplacer avec de l huile de compresseur non d tergente SAE 20 Trop d huile...

Страница 56: ...int statique de cylindre 1 20 Cylindre 1 21 Goupille 2 22 Plaque de soupape 1 23 Joint statique de soupape 1 24 Groupe soupape 1 25 Plaque de soupape 1 NO DESCRIPTION QT 26 Plaque de pression 1 27 Ron...

Страница 57: ...n M8 4 64 crou M8 4 65 Coupleur rapide 2 66 Pressostat 1 67 Manom tre 2 68 Embout 1 69 Cadre support du pressostat 1 NO DESCRIPTION QT 70 Soupape de s ret 1 71 Tuyau de marche vide 1 72 crou G 1 8 po...

Страница 58: ...58 SCHEMATIC DRAWING ESQUEMA SCH MA 650 4815 v 090928...

Отзывы: