Removing Tubes
Locate the tube you need to remove and hold onto the upper portion of the tube
towards its tip. Gently rotate and rock the tube with your fingers to loosen it from its
socket until its pins are completely disengaged from the socket. Take the tube out of
the unit.
Plugging in a new tube
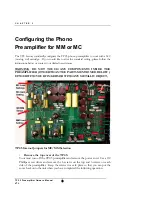
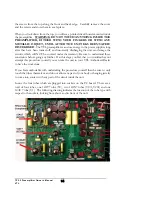
Consult the figure above to make sure that you are inserting the correct tube type into
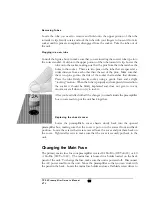
the correct socket. Hold onto the upper portion of the tube towards its tip. Lower the
tube onto the socket, making sure that the pins from the tube matches the
holes in the socket. There are two pins on the tube that are spaced at a
wider distance from each other than the rest of the pins. Make sure that
these two pins go into the side of the socket that matches that distance.
Press the tube firmly into its socket, using a gentle force and a slight
“rocking” motion. When the tube is properly and completely inserted into
the socket it should be firmly implanted and does not give in to any
movement at all when you try to rock it.
After you’re satisfied with all the changes you made inside the preamplifier
box you are ready to put the unit back together.
Replacing the chassis cover
Lower the preamplifier’s cover chassis slowly back into the opened
preamplifier box, making sure that the cover is put on in the correct front and back
position. Locate the screws that were removed from the cover and put them back on
the cover. Tighten all screws to make sure that the cover is securely put back to the
unit.
Changing the Main Fuse
The primary mains fuse for your preamplifier is rated 1A Slo Blo (120Volt AC) or .40
A Slo Blo (240 Volt AC). The mains fuse is housed in a holder located on the back
panel of the unit. To change the fuse, make sure the unit is powered off. Disconnect
the AC power cord from the unit. Move the preamplifier so that you can work with
the panel in the back. Locate the mains fuse holder and use a flat blade screw driver to
TP2.5 Preamplifier Owner’s Manual
VTL
15

