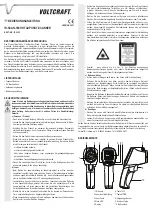
BUTTON fUNCTIONS
Press the release button (9) to turn the product on or off.
•
Press the laser button (3)
•
once to activate the dual-target laser (2),
-
twice to activate the backlight of the display (5),
-
three times to deactivate the target laser, or
-
four times to deactivate the backlight.
-
Press the button MODE (7) to toggle between the various display units in the top half of the
•
display:
Dew point temperature (“DP” indicator)
-
Ambient temperature (“AT” indicator)
-
Ambient humidity (“%RH” indicator)
-
Press the button ºC/ºF (6) to switch between the temperature units Celsius and Fahrenheit.
•
NOTES ON THE mEASURING pROCEDURE
Operating principle
a)
IR thermometers measure the surface temperature of an object. The sensor on the device
•
records the heat radiation emitted, reflected and transmitted from the object, and converts
this information into a temperature value.
The emission level is a value used to describe the energy radiation characteristics of a
•
material. The higher the value, the more capable the material is of emitting radiation. Many
organic materials and surfaces have an emission level of approx. 0.95. Metallic surfaces
or shiny materials have a lower emission level and therefore return inaccurate measured
values.
The ambient sensor measures the ambient temperature and humidity. From this, the
•
dew point is calculated. The infrared sensor measures the surface temperature and then
compares it with the calculated dew point temperature. The closer the value of the surface
temperature is to the dew point temperature value, the higher the risk of mould formation on
the measured surface.
Measurement distance / measurement surface area ratio (D/S)
b)
To achieve accurate measurements, the target must be larger than the thermometer’s
•
measuring area. The measured temperature is the average temperature of the area
measured.
The smaller the target, the smaller the measurement distance between thermometer and
•
target object has to be.
The distance to target / size of IR focal spot ratio is 12:1. With a distance of 12 cm to the
•
target, the size of the IR focal spot is thus 1 cm.
mAkING mEASUREmENTS
Turn the product on and activate the target laser (2), if required.
1.
The measuring surface is in the middle between the two laser points. The closer you are
to the surface, the more accurately you can aim on the desired measuring surface.
The maximum distance from the measuring surface should not be greater than 2 m.
Now start scanning the surface slowly. Point the IR sensor (1) as vertically to the measuring
2.
surface as possible.
In the lower display (5) area, the surface temperature of the measuring surface will be shown.
3.
In the upper display area, the ambient sensor (8) reading will be shown.
The right-hand side of the display shows the bargraph display. The higher the bar indicator
4.
is, the greater the risk of mould formation.
The 3-colour warning LED (4) is located above the display. When the LED lights up
5.
green, there is no risk of mould formation.
-
yellow, there is an increased risk of mould formation.
-
red, there is an acute risk of mould formation, or the measuring surface has already been
-
affected by mould.
If the yellow LED lights up, in addition a beep tone will sound. If the red LED lights up, in
6.
addition a continuous beep tone will sound.
mAINTENANCE AND CLEANING
The device requires no servicing on your part apart from occasional cleaning. Only use a soft,
•
anti-static and lint-free cloth for cleaning.
Do not use abrasive or chemical cleaners.
•
Legal notice
These operating instructions are a publication by Voltcraft®, Lindenweg 15, D-92242 Hirschau/Germany, Phone +49 180/586 582 7
(www.voltcraft.de).
All rights including translation reserved. Reproduction by any method, e.g. photocopy, microfilming, or the capture in electronic data processing
systems require the prior written approval by the editor. Reprinting, also in part, is prohibited.
These operating instructions represent the technical status at the time of printing. Changes in technology and equipment reserved.
© Copyright 2011 by Voltcraft®
DISpOSAL
product
a)
Electronic devices are recyclable waste and must not be disposed of in the household
waste!
At the end of its service life, dispose of the product according to the relevant statutory
regulations.
(Rechargeable) batteries
b)
You as the end user are required by law (Battery Ordinance) to return all used batteries/
rechargeable batteries. Disposing of them in the household waste is prohibited!
Batteries/rechargeable batteries that include hazardous substances are labelled with
these icons to indicate that disposal in domestic waste is forbidden. The descriptions
for the respective heavy metal are: Cd=cadmium, Hg=mercury, Pb=lead (the
designation is written on the rechargeable battery e.g. under the rubbish can symbols
depicted at the left).
You can return used batteries/rechargeable batteries free of charge at the official
collection points of your community, in our stores, or wherever batteries/ rechargeable
batteries are sold!
You thus fulfil your statutory obligations and contribute to the protection of the environment.
TECHNICAL DATA
Operating voltage:
9 V block battery
Optics:
12:1
Emission level:
0.95 (fixed)
IR wavelength:
8 – 14 µm
Laser class:
2
Laser wavelength:
630 – 670 nm
Max. laser output power:
<1 mW
Operating temperature:
0 to +50 ºC / +32 to +122 ºF
Operating humidity:
<80 % RH
Storage temperature:
-20 to +60 ºC / -4 to +140 ºF
Storage humidity:
10 – 90 % RH
Dimensions (W x H x D):
58 x 168 x 82 mm
Weight:
163 g
Measuring range
Accuracy
Resolution
Temperature
-50 to +20 ºC
-58 to +68 ºF
±3.5 ºC
±6.3 ºF
0.1
+20 to +350 ºC
+68 to +662 ºF
±1 % +1.5 ºC
±1 % +2.7 ºF
Humidity
0 – 100 %
±3.5 %
Dew point temperature
-30 to +100 ºC
-22 to +212 ºF
---


