background image

14

Descriptions and Features

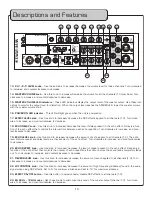
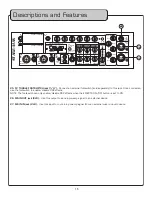
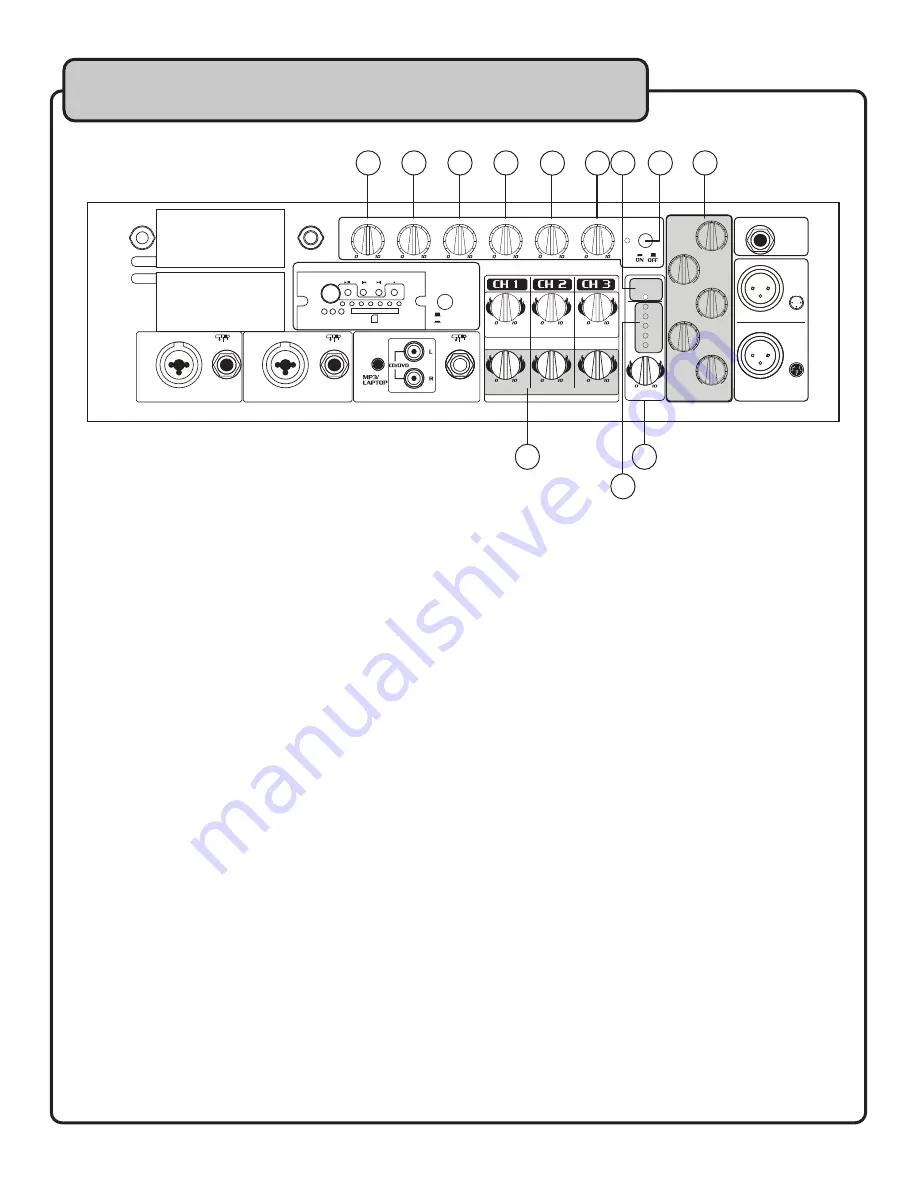
13. CH 1/2/3 LEVEL knobs

 – Use these knobs to increase/decrease the volume level for these channels. Turn clockwise 

to increase, and counterclockwise to decrease.

14. MASTER VOLUME knob

 – Use this knob to increase/decrease the volume for all the channels (1-3) combined. Turn 

clockwise to increase, and counterclockwise to decrease.

15. MASTER VOLUME LED indicators

 – These LED indicators display the output level of the master output. Use these indi

-

cators to monitor the output level for distortion. When the output level reaches the AMBER LED, lower the master volume 

with the master volume knob. 

16. POWER ON LED indicator

 – This LED will light green when the unit is powered on.

17. EFFECT LEVEL knob

 – Use this knob to increase/decrease the DSP effects applied to all channels (1-3). Turn clock

-

wise to increase, and counterclockwise to decrease.

18. ECHO DELAY knob

 – Use this knob to increase/decrease the level of delay present in the echo effect. Delay is a func

-

tion of the echo effect that controls the interval time between each echo repetition. Turn clockwise to increase, and coun

-

terclockwise to decrease.

19. ECHO LEVEL knob

 – Use this knob to increase/decrease the amount of echo applied to all channels (1-3). The echo 

level controls repeat and delay levels, as they are part of the echo effect. Turn clockwise to increase, and counterclockwise 

to decrease .

20. ECHO REPEAT knob

 – Use this knob to increase/decrease the level of repeat present in the echo effect. Repeat is a 

function of the echo effect that controls the number of echo repetitions that occur before the sound fades completely fades 

out. Turn clockwise to increase, and counterclockwise to decrease.

21. REVERB LEVEL knob

 – Use this knob to increase/decrease the amount of reverb applied to all channels (1-3). Turn 

clockwise to increase, and counterclockwise to decrease.

22. LCF CONTROL knob

 – Use this knob to increase/decrease the amount of high frequency (sibilance) found in the audio 

signal when using DSP effects. Set to ‘0’ for minimum sibilance and set to ‘10’ for maximum sibilance. 

23. EFFECT ON/OFF button

 – Use this button to quickly enable/disable DSP effects to all channels (1-3). 

24. EQ 63Hz – 12kHz knobs

 – Use these knobs to customize the sound of the master output (channel 1-3). Turn clock

-

wise to increase, and counterclockwise to decrease.  

+63Hz

250Hz

1kHz

3.5kHz

-10

-5

0

+3

+6

12kHz

MAIN

OUT

MAIN

IN

MASTER

VOLUME

POWER

ON

N

A

M-

E

G

AT

S

FX

TOGGLE

FOOT

SWITCH

EQUALIZER

EFFECT

EFFECT

EFFECT

LEVEL

LEVEL

LEVEL

Effect Level

Echo Delay

Echo Level

Echo Repeat

Reverb Level

LCF Control

MIC/
(XLR/ 1/4 )

LOOP

LOOP

SD

PLAYBACK

ROUTE

TO MAIN EQ
TO CH 3

CH 2

ANT

DIGITAL SD RECORDER

CH 1

ANT

LOOP

MIC/
(XLR/ 1/4 )

EFFECTS

SLEEVE

SEND

RETURN

SLEEVE

SEND

RETURN

SLEEVE

SEND

RETURN

CH

1

CH

2

CH

3

1 2

3

CH 1

CH 2

+12

-12

0

+12

-12

0

+12

-12

0

+12

-12

0

+12

-12

0

OPTIONAL ACCESSORY

OPTIONAL ACCESSORY

REC PLAY POWER

REC

VOL

VOL

PLAY/STOP

REC

PLAY/STOP

SDR-3

DIGITAL SD RECORDER

SDR-3

DIGITAL SD RECORDER

PREV

NEXT

PREV

NEXT

REC

SD

SD

PLAY POWER

13

14

15

16

17

18

19

20

21

22

23

24

Содержание STAGE-MAN

Страница 1: ...o w n e r s m a n u a l STAGE MAN 200W 3 Channel Active Vocal Monitor with DSP Effects...

Страница 2: ......

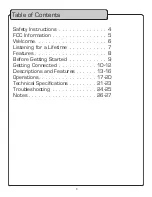
Страница 3: ...tion 5 Welcome 6 Listening for a Lifetime 7 Features 8 Before Getting Started 9 Getting Connected 10 12 Descriptions and Features 13 16 Operations 17 20 Technical Specifications 21 23 Troubleshooting...

Страница 4: ...cluding amplifiers that produce heat 10 Power Sources The appliance should be connected to a power supply only of the type described in the operating instructions or as marked on the appliance 11 Grou...

Страница 5: ...e place for future reference 2 Install your unit in a cool dry clean place away from windows heat sources and too much vibration dust moisture or cold Avoid sources of hum transformers motors To preve...

Страница 6: ...urtiss Court La Verne CA 91750 Toll Free 800 678 5348 TEL 909 593 8893 FAX 909 593 8890 VocoPro Company Email Directory Customer Service General Information info vocopro com Tech Support techsupport v...

Страница 7: ...ay attention to the different levels in various recordings Taking a minute to do this now will help to prevent hearing damage or loss in the future After all we want you listening for a lifetime Used...

Страница 8: ...DSP effects with ON OFF switch designed especially for vocals and spoken word Three channels with connections for 2 microphones MP3 player laptop and stereo audio device Individual loop jacks on each...

Страница 9: ...packing the STAGE MAN This STAGE MAN has been inspected and tested prior to being shipped During unpacking carefully check that you have received all the required components This is also the time to c...

Страница 10: ...IONAL ACCESSORY REC PLAY POWER REC VOL VOL PLAY STOP REC PLAY STOP SDR 3 DIGITAL SD RECORDER SDR 3 DIGITAL SD RECORDER PREV NEXT PREV NEXT REC SD SD PLAY POWER 1 4 Mono Audio Cable 1 4 Mono Audio Cabl...

Страница 11: ...OWER ON N A M E G A T S FX TOGGLE FOOT SWITCH EQUALIZER EFFECT EFFECT EFFECT LEVEL LEVEL LEVEL Effect Level Echo Delay Echo Level Echo Repeat Reverb Level LCF Control MIC XLR 1 4 LOOP LOOP SD PLAYBACK...

Страница 12: ...TS SLEEVE SEND RETURN SLEEVE SEND RETURN SLEEVE SEND RETURN CH 1 CH 2 CH 3 1 2 3 CH 1 CH 2 12 12 0 12 12 0 12 12 0 12 12 0 12 12 0 OPTIONAL ACCESSORY OPTIONAL ACCESSORY REC PLAY POWER REC VOL VOL PLAY...

Страница 13: ...1 8 input Connect audio from an MP3 player or laptop this jack 10 CH 3 CD DVD RCA input Connect audio from an CD DVD player this jack 11 CH 3 LOOP jack Connect an external effects device to be used wi...

Страница 14: ...ease decrease the level of repeat present in the echo effect Repeat is a function of the echo effect that controls the number of echo repetitions that occur before the sound fades completely fades out...

Страница 15: ...z 250Hz 1kHz 3 5kHz 10 5 0 3 6 12kHz MAIN OUT MAIN IN MASTER VOLUME POWER ON N A M E G A T S FX TOGGLE FOOT SWITCH EQUALIZER EFFECT EFFECT EFFECT LEVEL LEVEL LEVEL Effect Level Echo Delay Echo Level E...

Страница 16: ...witch Use this switch to turn the unit OFF ON 3 HEADPHONE jack 1 4 Connect a set of headphones with a plug to this jack NOTE Connecting headphones mutes the main amplifier output Bottom Side Panel 1 S...

Страница 17: ...ing a recording press the PLAY STOP button to stop the recording and conclude the track 3 PREV BUTTON This button will skip back through previously recorded tracks When the fi rst track recorded is re...

Страница 18: ...he maximum size SD card that can be used by the SDR 3 is 2GB The SDR 3 does not support SDHC cards Recording to the SDR 3 Prior to recording to the SDR 3 you want to ensure that the signal being recor...

Страница 19: ...e channel when the associated transmitter is turned off To adjust squelch turn clockwise to increase and counterclockwise to decrease NOTE Typically as a channel s squelch setting increases its operat...

Страница 20: ...n the tab and slide the lid down towards the bottom of the microphone 2 Insert 2 fresh 1 5 volt AA alkaline batteries Make sure the batteries are inserted in the right direction according to polarity...

Страница 21: ...NNECT 24dBu 28dB 1 8Kohm Mixer Output Specification OUTPUT CONNECTION LEVEL IMPEDANCE MAIN MIX OUTPUT XLR BAL 4dBu 240ohm HEAD PHONE OUTPUT 1 4 PHONE TIP LEFT RING RIGHT 1 0V 33ohm Power Output MAIN M...

Страница 22: ...Output 4dBu BAL Less than 0 05 CH3 to Main Mix Out 4dBu BAL Less than 0 02 EFFECT Loop Send 6dBu UNBAL Less than 0 02 Hum Noise S N OUTPUT LEVEL CONDITION AMP OUTPUT 85dB RATED POWER 1KHz MAIN MIX IN...

Страница 23: ...cho Delay 40mS 242mS Echo Repeat 30 80 Echo Volume 0 100 Reverb Volume 0 100 LPF Control 3KHz 8KHz Effect Master 0 100 EFX DSP Control Foot Switch 1 4 TS On Off Switch with LED Indicator EFX DSP Buss...

Страница 24: ...teries to ensure that they are providing sufficient power Replace battery if necessary Make sure antennas are firmly connected and extended to an optimal position If necessary reduce the distance betw...

Страница 25: ...25 Recordings are distorted Lower the recording level on the SDR 3 If routing SDR 3 playback to EQ check the EQ settings and readjust in necessary Troubleshooting...

Страница 26: ...26 Notes...

Страница 27: ...27 Notes...

Страница 28: ...STAGE MAN Owner s Manual VocoPro 2012 v1 1023 www vocopro com...

Отзывы: