


Quick User Guide
page 15
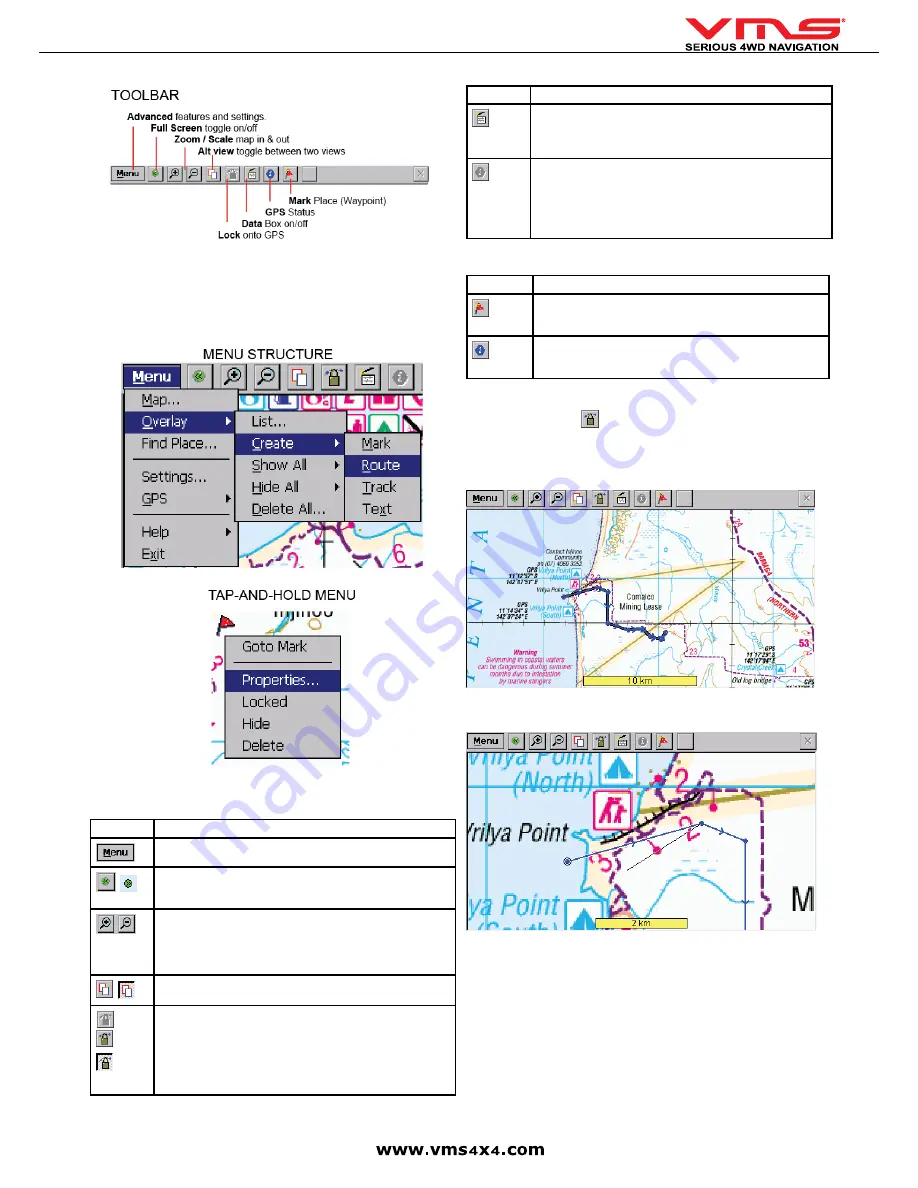
The Toolbar provides access to most of the functions in Memory Map. Another less
obvious control is the TAP-AND-HOLD technique. Tap-and-Hold is equivalent to
a right mouse click on a PC. Simply Tap on an object like a map, mark or position
symbol, hold for a moment without moving, then release. A menu will appear that is
related to the where you tapped.
TOOLBAR BUTTONS
Icon
Description
Menu Options
Toggle Full Screen on/off. Whilst in Full Screen mode, large trans-
parent touch buttons remain on the right hand side of the screen
for Zooming in and out.
Zoom in or out with automatic map scaling. When you have
reached the maximum or minimum zoom level for a particular
map the next tap will take you to the next available map scale.
Tap-and-hold on the map to manually choose from the list of maps
available at that location.
Toggles between two views (Zoom / Scale levels of choice) of the
same map
When you have a GPS fix the “Padlock” button will appear. Tap
the Lock button to automatically display your current position. Your
position is shown as a flashing red cursor with an arrow indicating
your direction and speed of travel. The map will automatically
scroll as you move. To scroll around the map, you will need to
toggle off the lock button. Toggling it back on brings the map view
back to your position.
Icon
Description
Select the data box and tap on the map to see grid coordinates
and route/track information. Use the Menu > Overlay > Settings...
command to set your preferred units of measurement, magnetic
variation and the size of the velocity vector.
INFORMATION - The blue Information button will appear whilst
your GPS position is being calculated. Tapping the Blue informa-
tion button will simply bring up a dialogue box that states you have
No GPS Signal. Once a signal is acquired the Blue information
button will become grey and unavailable. For detailed status tap
Menu > GPS > Satellites.
WAYPOINTS / MARKS
Icon
Description
To plot a waypoint. Tap this button & tap anywhere on the map. A
flag will appear to show that a waypoint has been placed. To plot
another waypoint, repeat the above procedure
To create a waypoint at the current position, select “MENU” >
“GPS” > “MARK POSITION”. A waypoint marker will be placed at
the current location.
BROWSING THE MAP
When the GPS lock is off (
), pan the map by dragging across the touchscreen.
PLANNING A ROUTE
Scroll and zoom the map to show the entire region your route will cover.
Tap on Menu > Overlay > Create Route.
Tap on the screen to place each waypoint. Waypoints do not need to be precisely
positioned, this can be edited later. Double Tap on the last waypoint to finish the
route.
TIP:
For long route, zoom out to a smaller scale map. First create a rough outline
of your route and then zoom in to a more detailed map to re-position or add/
remove waypoints as required.
Содержание TOURING 7000 SERIES
Страница 1: ...TOURING 7000 SERIES QUICK USER GUIDE...
Страница 2: ...Quick User Guide page 2...
Страница 22: ...Quick User Guide page 22...
Страница 23: ...Quick User Guide page 23...


