


Version 1/19/2009
13
www.VIZIO.com
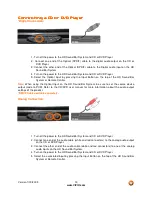
Connecting
Connecting
Connecting
Connecting a
a
a
a CD or DVD Player
CD or DVD Player
CD or DVD Player
CD or DVD Player
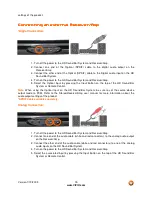
*Digital Connection:
1. Turn off the power to the HD Sound Bar System and CD or DVD Player.
2. Connect one end of the Optical (SPDIF) cable to the digital audio output on the CD or
DVD Player
3. Connect the other end of the Optical (SPDIF) cable to the Digital audio input on the HD
Sound Bar System.
4. Turn on the power to the HD Sound Bar System and CD or DVD Player.
5. Select the Optical input by pressing the Input Button on the top of the HD Sound Bar
System or Remote Control.
Note:
When using the Optical Input on the HD Sound Bar System, be sure to set the source device
output mode to PCM. Refer to the CD/DVD user manual for more information about the audio output
settings of the product.
*SPDIF Cable available separately.
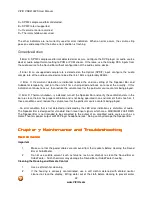
Analog Connection:
1. Turn off the power to the HD Sound Bar System and CD or DVD Player.
2. Connect one end of the audio cable (white and red connectors) to the analog audio output
on the CD or DVD Player.
3. Connect the other end of the audio cable (white and red connectors) to one of the analog
audio inputs on the HD Sound Bar System.
4. Turn on the power to the HD Sound Bar System and CD or DVD Player.
5. Select the associated input by pressing the Input Button on the top of the HD Sound Bar
System or Remote Control.


