


Version 1/19/2009
23
www.VIZIO.com
from penetrating into the housing. Wipe the housing with a dry cloth after cleaning.
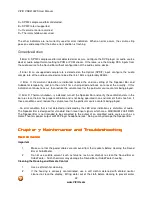
Troubleshooting Guide
Troubleshooting Guide
Troubleshooting Guide
Troubleshooting Guide
If the HD Sound Bar System fails to operate, or the performance changes dramatically, check the
operation in accordance with the following instructions. Remember to check the peripherals to pinpoint
the source of the problem. If the HD Sound Bar System still fails to perform as expected, contact the
VIZIO for assistance by calling 1-877-MYVIZIO (1-877-698-4946) or e-mail us at
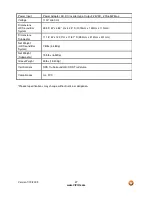
Problem
Solution
No power.
Make sure AC power cords are securely connected to the AC sockets and
to the AC receptacles on the AC/DC Adapters.
Make sure the power LED’s on the AC/DC adapters are glowing green.
Plug another electrical device (like a radio) to the power outlet to verify that
the outlet is supplying power.
Press the Power button on the remote control or the top of the HD Sound
Bar System.
No sound.
Press the Volume + (Up) button on the remote control or the top of the
Sound Bar.
Press MUTE on the remote. If the source device has a mute function, check
to make sure it is not engaged.
Press the INPUT button on the remote control or the top of the HD Sound
Bar System to cycle through the inputs.
No sound on Optical In
The source device may be set to AC3 (Dolby Digital) output. SRS TS-HD
requires PCM audio (Lt/Rt encoded for movies). Change the device output
to PCM.
Buzzing or humming
Make sure that both ends of the audio cables are connected securely.
Test on an alternate device or replace the audio cable.
Test the device and cable on an alternate input on the HD Sound Bar
System.
Settings are lost
When the Speaker Bar is powered off, settings are retained except when
the AC power is removed. To keep settings, Leave AC/DC power adapters
connected to AC. Otherwise, they will return to initial values.
Telephone & Technical Support
Telephone & Technical Support
Telephone & Technical Support
Telephone & Technical Support
Products are often returned due to a technical problem rather than a defective product that may result in
unnecessary shipping charges billed to you. Our trained support personnel can often resolve the problem
over the phone. For more information on warranty service or repair, after the warranty period, please
contact our Support Department at the number below.
Customer support and quality service are integral parts of VIZIO’s commitment to service excellence.
For technical assistance contact our VIZIO Technical Support Department via email or phone.
:
Tel: (877) 698-4946 Fax: (949) 585-9563
Hours of operation: Monday - Friday: 6 am to 9 pm
Saturday – Sunday: 8 am to 4 pm