


VIZIO VSB210WS User Manual
8
www.VIZIO.com
Top
Top
Top
Top Panel
Panel
Panel
Panel Buttons
Buttons
Buttons
Buttons
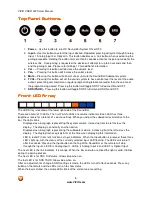
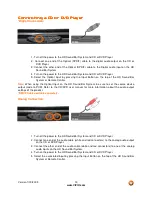
1.
Power –
Use this button to turn HD Sound Bar System ON or OFF.
2.
Input –
Use this button to select the input desired. Repeated pressing will cycle through Analog
Input 1, Analog Input 2 or Optical In. This button doubles as a Link button when used during the
pairing procedure. Holding the button for more than 3 seconds activates the pairing mode for the
wireless link. Once pairing is requested, the device will attempt for up to 30 seconds and then
end the pairing mode. Please refer to Page 17 for additional information.
3.
Vol - –
Pressing this button will decrease the volume level.
4.
Vol+
–
Pressing this button will increase the volume level.
5.
Mute –
Pressing this button will either mute or un-mute the Sound Bar/Subwoofer system.
6.
TVOL–
Pressing this button will set the sound system to have control over the level of the audio
output, preventing commercials on regular programming to become louder than the volume of
the program being viewed. Pressing this button will toggle SRS TruVolume ON and OFF
7.
SRS (TSHD) –
Pressing this button will toggle SRS TruSurround HD ON and OFF.
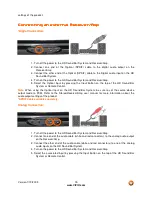
Front LED Array
Front LED Array
Front LED Array
Front LED Array
The LED Array is located at the lower right side of the Sound Bar.
There are a total of 10 LEDs. The first 7 white LEDs are volume indicators. Each LED has three
brightness levels for a total of 21 volume settings. When you adjust the subwoofer level relative to the
bar, the LEDs blink.
Displayed as a bar graph representing the system volume, increasing from the left across the
display. The display is constantly on when active.
Displayed as a bar graph representing the subwoofer volume, increasing from the left across the
display. The display flashes quickly 50% of the time when displaying this information.
LED 5, 6 and 7 (from left) function as Input indicators. When the Input button is pressed, these three
LED’s light up, with the status of the currently selected input LED flashing. The LED’s will turn off
after 5 seconds. Pressing the Input button on the top of the Sound Bar or the remote will step
through the inputs. LED 5 is Analog Input 1, LED 6 is Analog Input 2 and LED 7 is Optical Input.
The next LED is the link indicator. It is orange. When the bar and sub are linked the light is solid. It blinks
during the pairing process.
The next LED is for SRS TruVolume. Glows blue when on.
The last LED is for SRS TSHD. Glows blue when on.
After an adjustment or change in SRS settings is made, the LED’s turn off after 5 seconds. Press any
button on the remote and the LEDs turn on to show status.
When the bar is muted, the volume LEDs blink at the current volume setting.