background image

If not, then in order to open the application you need to double click on the Photags Express icon on the 

desktop. 


7. 

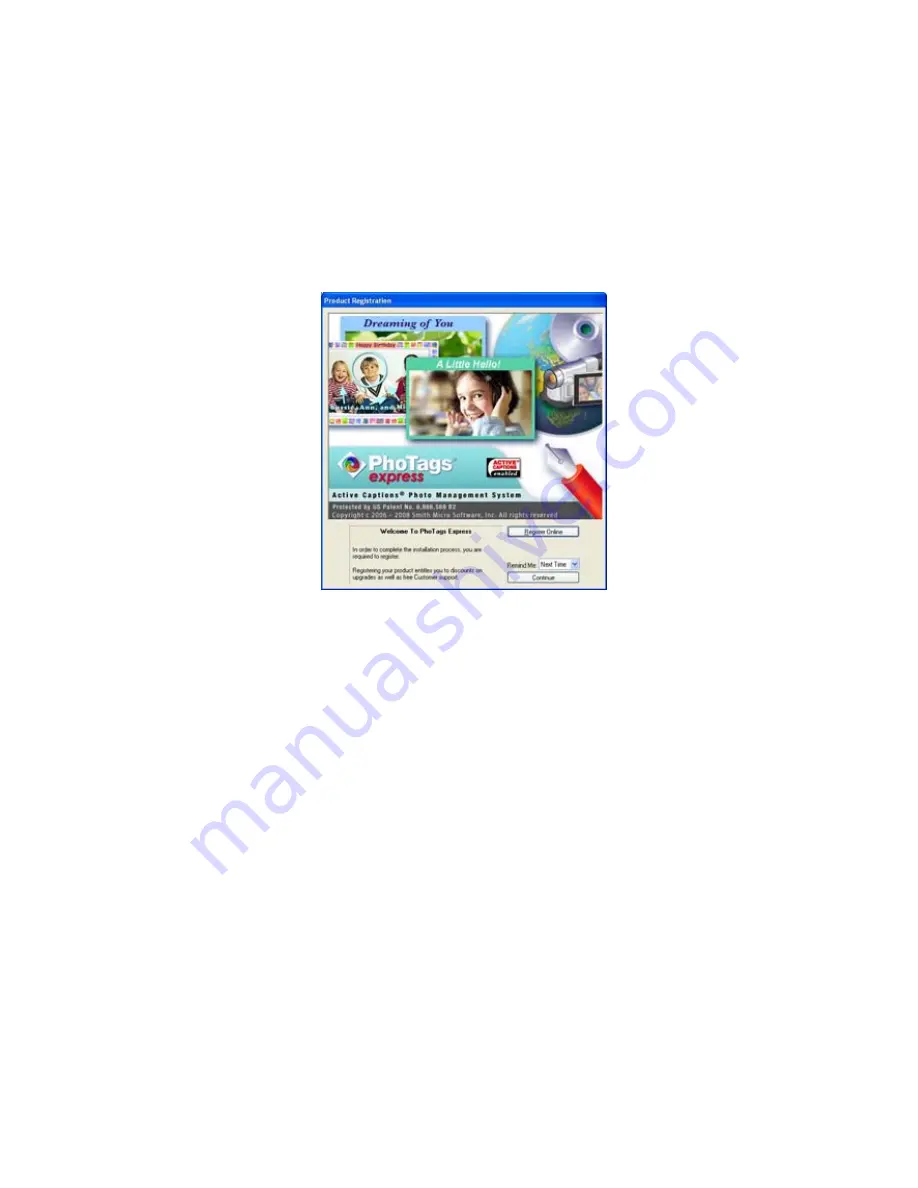
The Welcome to Photags Express Product Registration screen will open. This screen will appear 

each time you open the application until you register. To register your product please click the 

“Register Online” button and fill out the online registration form (This requires an internet 

connection). 

Note

: In order to complete the installation process you are required to register. Registering your 

product entitles you to discounts on upgrades as well as Free Customer Support. 

If you choose to register at a later time click the “Continue” button to open the Photags Express application. 


38

Содержание VIVICAM 8025

Страница 1: ...l Camera Owner Manual 2009 Sakar International Inc All rights reserved Windows and the Windows logo are registered trademarks of Microsoft Corporation All other trademarks are the property of their re...

Страница 2: ...D Memory Card 7 Starting Your Digital Camera 9 This is the default mode when you power on your camera 11 Taking Photos 11 Installing PhoTags Express Software 34 Everything you need to get the most fro...

Страница 3: ...y Digital Video resolutions 640x480 Pixels VGA 320x240 Pixels QVGA y 8 1 mega pixels camera with choice of 6 digital camera resolutions 3264x2448 pixels 8M 3648x2048 pixels 7M 2592x1944 pixels 5M 2048...

Страница 4: ...space y Available USB interface y CD ROM Drive y 1024 x 768 Recommended screen resolution y 16 bit color or higher display adaptor Computer System Requirements for Windows Vista To be able to download...

Страница 5: ...6 or later y 128 MB or more available system RAM 256 MB recommended 150 MB free disk space y 800 x 600 or higher resolution monitor displaying millions of colors Note This hardware is plug and play co...

Страница 6: ...A Quick Look at Your Camera 5...

Страница 7: ...e battery door 2 Insert the battery correctly with the correct polarity facing up 3 Close the battery door Note 1 A Low battery message will appear on the LCD when the battery power is insufficient Sh...

Страница 8: ...ied charger Your camera is supplied a compatible charger for you you are only required to put the battery into charger and charge the lithium battery directly from electrical outlet Installing SD Memo...

Страница 9: ...est images The image will be deleted when camera power is turned off Please download the images before power off SD memory card is required for normal use 2 An external memory card is required for nor...

Страница 10: ...LCD will light up this indicates your camera is turned on and ready for use Power off Press the Power button once to turn off your camera When there is insufficient battery power and icon will appear...

Страница 11: ...es while in Video mode In Playback mode you can preview photos and videos as well as being able to delete rotate protect crop and print your photos You can set Exposure ISO White Balance Quality Auto...

Страница 12: ...the Setup menu Note If you are in the Playback or Video mode pressing the Home button will exit these modes and open the Still Image mode Still Image mode This is the default mode when you power on y...

Страница 13: ...in the section Download photos and videos to your PC or insert another SD card to continue taking more photos Digital Zoom function You can magnify your subject using the digital zoom by touching the...

Страница 14: ...backlight conditions To set the flash 1 Touch the icon function area until the icon appears on the left side of the LCD screen This will activate the automatic flash 2 Touch the icon function area aga...

Страница 15: ...ature to delay the time between you pressing the shutter button and when the photo is actually taken It is recommended that you use a tripod or place the camera on a flat and sturdy surface when using...

Страница 16: ...the photo Scene Your camera supplies many scenes for you to take photos in almost any environment Scene included with your camera are Auto Night Portrait Night Scenery Portrait Scenery Sport Party Bea...

Страница 17: ...photo The higher the photo quality the more memory it will take The image size and quality will also affect the maximum size you can effectively print your photo To set the Image size 1 Press the Menu...

Страница 18: ...e photo You are not required to use a tripod in order to take good quality photos 1 Press the Menu OK button 2 Touch the icon function area repeatedly until you see the Anti Shake option 3 Touch the i...

Страница 19: ...area to enter the Face Detection menu 4 Touch the icon function area to select the Face Detection On Off 5 Press the Menu OK button to confirm and exit to the camera standby mode Note The Face Detecti...

Страница 20: ...ng allows you to control the brightness of your images 1 Touch the first icon function area to enter the Exposure option 2 Touch the icon function area to select an exposure value from 3 to 3 3 Press...

Страница 21: ...ue 4 Press the Menu OK button to confirm save and exit to the camera standby mode White Balance This setting allows the camera to adjust the color of your photos according to the color of your light s...

Страница 22: ...H setting means you can take fewer photos but they will be of better quality The default value is STANDARD 1 Touch the icon function area until you see the Quality option 2 Touch the icon function are...

Страница 23: ...one 4 Press the Menu button to confirm save and exit to the camera standby mode Date This allows you to set the system time which will be displayed on the photos 1 Touch the icon function area until y...

Страница 24: ...the images stored in the memory will be erase This process is irreversible Please download all images to the PC before formatting the card 1 Touch the icon function area until you see the Format opti...

Страница 25: ...unction area to enter the Default menu 3 Touch the icon function area to select OK or Cancel 4 Press the Menu OK button to confirm 5 A Default Setting message will appear on the LCD 6 Touch the icon o...

Страница 26: ...he icon will flash on the LCD screen 3 Press the Shutter button again to stop and save this file in AVI format Note You can play this AVI file in playback mode or on your computer using Quick Time and...

Страница 27: ...button 2 Touch the MP function area to enter Image Size menu 3 Touch the icon function area to select VGA or QVGA 4 Press the Menu OK button to confirm save and exit to the video standby mode Playbac...

Страница 28: ...Image mode and begin to take photos Full screen to Thumbnail display When the camera is in the Playback Mode and an image appears on the LCD screen 1 Touch the icon function area 2 This will open up t...

Страница 29: ...o displayed on the LCD screen 2 Touch the or icon function area to select Yes or No from the Delete message that appears 3 Press the Menu OK button to confirm The selected image is deleted Operation f...

Страница 30: ...rotated Note 1 You cannot rotate a protected file when This File is Write Protected appears on the screen 2 No card inserted will appear on the screen if no SD card is insert Please insert an SD memo...

Страница 31: ...rder to free up memory You can delete one image or video clip at a time or delete all except the protected photos and videos that are currently recorded on the memory card 1 Press the Menu OK button 2...

Страница 32: ...zoom in on an image and then save that part of the image as a new photo 1 Press the Menu OK button 2 Touch the icon function area until you see the Crop option 3 Touch the icon function area to enter...

Страница 33: ...ter button 10 Press the Shutter button again to confirm and save it as a new photo or you can press the Menu OK button to exit without saving Note you can select Cancel in step 4 and press the Menu OK...

Страница 34: ...to device will appear on the LCD screen 8 Connect your camera with the USB cord to the compatible printer for printing Note 1 you can select Cancel in step 6 and press the Menu OK button to exit 2 In...

Страница 35: ...install the Software and drivers to download and edit the photos and videos captured using this camera you need to install the CD installation disk Insert the installation CD into your CD ROM drive Th...

Страница 36: ...2 On the PhoTags Express screen click the Next button 3 Please review the license terms and click the I Agree button to continue 35...

Страница 37: ...4 Let the PhoTags Express installer create the folder where the program will be installed to and then click Install 5 Please wait while the application is being installed on your computer 36...

Страница 38: ...n your computer click the Finish button to let the PhoTags Express installer finish the installation program If you selected the option for the application to start after pressing the Finish button th...

Страница 39: ...il you register To register your product please click the Register Online button and fill out the online registration form This requires an internet connection Note In order to complete the installati...

Страница 40: ...SB port on your computer 3 Wait for your computer to recognize that new hardware has been installed and the ready to use message pops up on the task bar 4 If the Camera is off it will automatically be...

Страница 41: ...ds and more that can be viewed or hidden any time Locate and Organize your photos and collections Search by Captions Category Keyword or Date directly from the operating system of your computer Share...

Страница 42: ...to your slideshow Download photos and videos to your PC Transfer Photos and video images from your camera to your PC using PhoTags Express Select the Get Photos button from the top of the PhoTags Expr...

Страница 43: ...t and then select either the Custom or Express copy radial button in the Copy methods box CUSTOM COPY METHOD Select the Custom copy radial button Click the Next button Add Active Captions to your pict...

Страница 44: ...where to place your photos and videos The default is to place all photos and videos into a folder under the C My Documents My Pictures folder with the date when the photos were taken as the folder na...

Страница 45: ...Click the Finish button to start the download process A photos download progress bar appears showing the number of media videos included downloading to your computer 44...

Страница 46: ...elect the Express copy radial button if you want to have all the images transferred to the PC without the option to select which photos you want to transfer In this mode you will not see a preview of...

Страница 47: ...paring your camera to take more photos and videos Transferring photos and videos to your PC manually Turn on your camera Change your Still Image mode to Playback and connect your camera to the compute...

Страница 48: ...TORAGE DEVICE to view the images The images are stored in the subfolder called DCM100 5 You can now copy and paste the images to any directory you choose Transferring photos and videos to your MAC man...

Страница 49: ...er than normal use including but limited to repair by unauthorized parties tampering modification or accident What To Do When Service Is Required When returning your defective product postage pre paid...

Страница 50: ...ens f 7 23mm F2 8 Zoom 8X Digital Zoom Exposure 3 0EV 3 0EV White Balance Auto Daylight Cloudy Incandescent Fluorescent ISO Auto 100 200 400 Scene Auto Night Portrait Night Scenery Portrait Scenery Sp...

Страница 51: ...s specifications can be found in the General Computer Information section If you have determined that your computer meets the minimum system requirements and that you do have pictures in your camera f...

Страница 52: ...portant pictures In order to use your camera properly you will need to insert a SD card of up to 8GB All your images will be stored on this card It is recommended to download the images from the card...

Отзывы: