background image

English

25

5. Select the audio track you want to transfer, and then drag the files in the Mutlimedia

Camera Manager folder to the folder you specity in your hard disk.

6. Once the copy process has been completed, the audio then have successfully down-

loaded from the camera to you PC.

Note

You do not need to use batteries or the power adapter when you have connected a USB cable
between the camera and your PC. The camera consumes power from the PC through the USB
port.

Erasing Contents from the
MULTIMEDIA CAMERA

When both the camera’s internal memory and the inserted Compact Flash Card are
already full, it is time for you to erase some or all of their contents to free up storage
space. But before you erase anything, make sure that you transfer the contents first to
your PC if you still want to use them.

Erasing a Single Picture, MP3 Song or Recorded Audio

To erase a single picture, MP3 song or recorded
audio:
1. Set the camera to the proper operation mode:

     ● 

To erase a picture, set to TV mode         .

     ● 

To erase an MP3 song, set to MP3 mode

                  .

     ● 

To erase a recorded audio, set to AUDIO

      mode               .
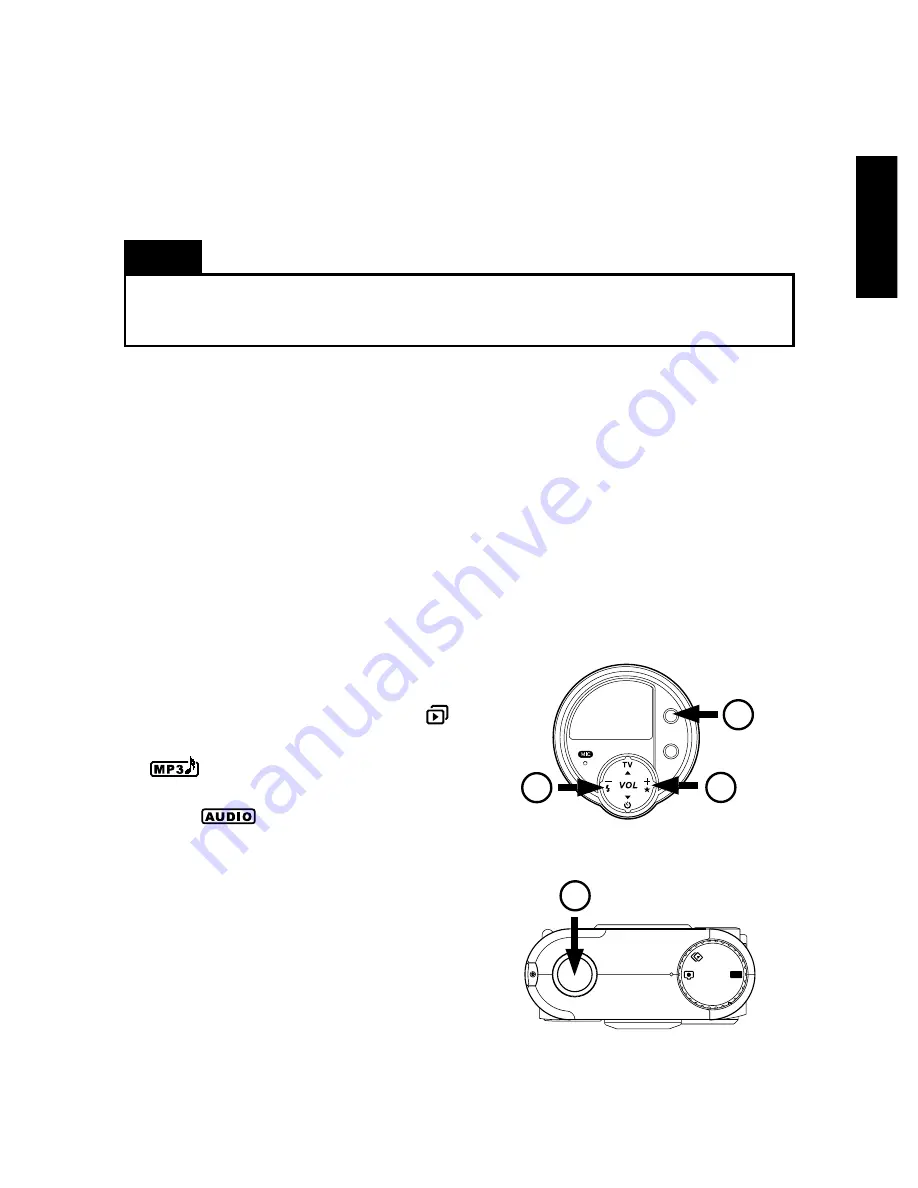
2. To enter Erase mode by pressing the Erase/

Stop button located in front of the camera.

3. Use the 4-Way Toggle Control in front of the

camera to select the picture, MP3 song, or
audio track number you want to erase. Press
Right (+) repeatedly to skip forward, or press
Left (-) repeatedly to go backwards, until the
number that you want appears on the LCD
panel.

4. Press the Shutter Release button to erase

the selected number.

5. Press the Erase/Stop button to quit from

Erase mode.

ERASE
/STOP

AUDIO
REC/
PLAY

2

3

3

4

MP3

PC

A

UDIO

Downloaded from 

www.Manualslib.com


manuals search engine


Содержание Vivicam 2795

Страница 1: ...Instruction Manual Vivicam 2795 Multi Function Digital Camera MP3 Player www vivitar com...

Страница 2: ...easonable protection against harmful interference in commercial installation This equip ment generates uses and can radiate radio frequency energy and if not installed and used in accordance with the...

Страница 3: ...ways use the camera and its accessories in well ventilated locations While it is switched on do not move the camera after transferring images to PC if you are using the AC power adapter unplug the ada...

Страница 4: ...local authorized service facility for information on the cost of cleaning your camera Do not use batteries other than those specified for use with your camera The use of unsuitable batteries may resul...

Страница 5: ...ra case has been damaged switch the camera off and then disconnect the power source batteries or AC power adapter If you are using the AC power adapter unplug the adapter from the AC power outlet afte...

Страница 6: ...or inflammable foreign objects into the camera through access points such as the Compact Flash card slot This may cause a fire or electric shock Do not attempt to modify this camera This may cause a f...

Страница 7: ...short circuit the positive and negative poles of the battery This may cause the battery to split or leak resulting in fire or injury Do not heat or attempt to disassemble a battery and do not place a...

Страница 8: ...ictures 16 Downloading Pictures into your PC 18 Using Multimedia Camera as a MP3 Player 20 Where to get MP3 music files 20 T ransferring MP3 files into multimedia camera 20 MP3 Playback Controls 21 Pl...

Страница 9: ...ou use it as a PC camera you can videoconference over the Internet Look and talk to people on the internet face to face What s Included in the Package Multimedia camera unit USB cable Video cable Earp...

Страница 10: ...Shutter Release C Ready LED D Mode Dial E Lens F Viewfinder Window G Flash H Compact Flash Card slot I Self Timer LED J Stop Erase Button K Audio Record Play Mode Selection Button L Microphone M 4 Way...

Страница 11: ...o not need to use batteries when you connect a USB cable between the camera and your PC The camera consumes power from the PC through the USB port Warning Note If you won t be using the camera for an...

Страница 12: ...r Using a damaged cord may cause fire or electrical shock Switch off and disconnect the AC adapter from the camera before unplugging it from the wall socket Attaching the Strap If you intend to take p...

Страница 13: ...d To insert a Compact Flash memory card To insert a Compact Flash memory card To insert a Compact Flash memory card To insert a Compact Flash memory card 1 Open the card slot located at the side of th...

Страница 14: ...con is situated at the middle uppermost side of the Mode Dial Refer to the succeeding pages for more infor mation on each of these operation modes Function Controls The front panel buttons provide dif...

Страница 15: ...t in memory For information on inserting memory card see page 12 To take a picture To take a picture To take a picture To take a picture To take a picture 1 Turn the camera on by pressing the Power Bu...

Страница 16: ...ine low compression The lower the compression the higher the image quality will be but lesser number of pictures can be taken Higher compression allows more pictures to be taken and the image quality...

Страница 17: ...backward when viewing pictures and to erase pictures For details on erasing pictures see page 25 Viewing Pictures on your TV Set the camera to TV Mode when you want to use a TV to view the pictures y...

Страница 18: ...stem you are using 4 Also use the 4 Way Toggle Control to se lect which picture to display on the TV screen Press Right to display the next picture or press Left to display the previ ous picture As yo...

Страница 19: ...camera Note You do not need to use batteries or the power adapter when you have connected a USB cable be tween the camera and your PC The camera con sumes power from the PC through the USB port Camera...

Страница 20: ...Application Suite shortcut icon has now been created on the desktop Note The system requirements and the operation of each bundled software applications may vary For more information please refer to...

Страница 21: ...your personal CD collection Record from your personal CD collection Record from your personal CD collection Record from your personal CD collection Record from your personal CD collection Another way...

Страница 22: ...yback Press to go forward and select the next MP3 song Press to decrease the volume level 2 Set it to PC mode PC mode PC mode PC mode PC mode 3 Double click the DSC Application Suite shortcut icon on...

Страница 23: ...d in the front panel Press to increase the volume level Press to go forward and select the next recorded audio Press to decrease the volume level Press to go backward and select the previous recorded...

Страница 24: ...press the Shutter Release button again 7 To stop recording press the Erase Stop but ton located in front of the camera 2 3 4 7 If you keep on pressing the Shutter Release button in between recordings...

Страница 25: ...rack Number 7 3 LCD Panel in Audio Playback Mode LCD Panel in Audio Playback Mode LCD Panel in Audio Playback Mode LCD Panel in Audio Playback Mode LCD Panel in Audio Playback Mode T ransferring Recor...

Страница 26: ...e you erase anything make sure that you transfer the contents first to your PC if you still want to use them Erasing a Single Picture MP3 Song or Recorded Audio To erase a single picture MP3 song or r...

Страница 27: ...l recorded audio tracks set to AUDIO mode 2 Switch to Erase mode by pressing the Erase Stop button located in front of the camera 3 Keep pressing the Right or Left of the 4 Way Toggle Control until th...

Страница 28: ...ted with PC by USB cable For details see Connect ing to the computer on page 18 3 Set the camera to PC mode PC mode PC mode PC mode PC mode 4 Launch your own video conference software such as Microsof...

Страница 29: ...or text display LED Indicator Self timer red in front Ready green in top Lens Fixed lens Power supply 2 AA size Alkaline Battery AC Adapter 5V DC 2 4 A DC5V from USB port MP3 Playback MP3 File Voice R...

Отзывы: