background image

VT-EH Series DVRs________________________________________________________________________________ 


13 

L

L

I

I

V

V

E

E


D

D

I

I

S

S

P

P

L

L

A

A

Y

Y


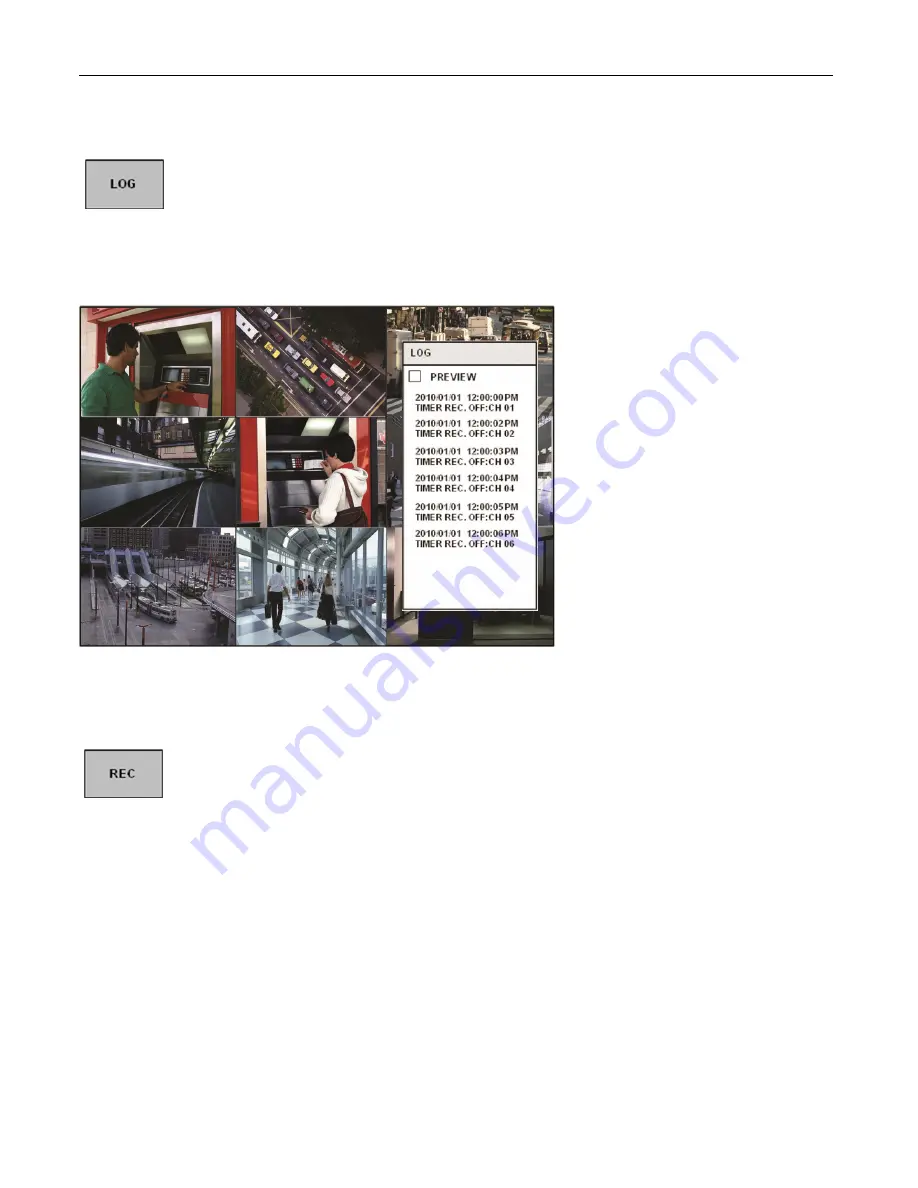
User can see the current log immediately.   

Click once after selecting log, recorded data will be played. This 

will appear if you select the ―PREVIEW‖ option. 


Panic Recording 


This menu is used to start and stop the Panic recording. 

If panic recording is started, the record icon will change to a red square with a 

―P‖. 

Select once more to return to previous. 

  - Panic recording setup will be assigned from Record menu.     


Содержание VT-EH Series

Страница 1: ...Safari Firefox Opera and Chrome Free Applications for iPhone iPad iTouch and Droid Devices 500GB to 4TB Internal Storage Options up to 4TB 2x2TB Quick Search Function for automatic review Email Event Notification with Snapshot CMS Central Management Software Included MAC Client Software Included Automatic sending of Health and Event notifications via email 4 Audio Inputs 1 Output Control locally v...

Страница 2: ...ularly at plugs convenience receptacles and the point where they exit from the apparatus 11 Only use the attachments accessories specified by the manufacturer 12 Use only with a cart stand tripod bracket or table specified by the manufacturer or sold with the apparatus When a cart is used use caution when moving the cart apparatus combination to avoid injury from tip over 13 Unplug this apparatus ...

Страница 3: ...tion must be provided taking particular care not to block any of the air vents on the DVR Adequate protection against lightning and power surges must be installed to prevent damage to the DVR Any safety warnings on the DVR and in these instructions must be adhered to If cleaning is necessary shutdown the DVR and disconnect power first Use only a soft dry cloth and never use any abrasive cleaners D...

Страница 4: ...onnection Playback software is embedded with the backup files The backup also contains the system event log and backup log for full traceability REMOTE CONNECTION Depending on the user level full DVR control is available over the internet as well as the ability to remotely configure the DVR Alarm outputs on the DVR can be remotely triggered over the internet COMPREHENSIVE RECORDING SETUP Recording...

Страница 5: ...he DVR has 2 main monitor outputs Composite and DVI One spot monitor output can be programmed in the DVR setup LIVE DISPLAY The DVR displays single or multi screen images and also has several sequence modes standard and user definable CONFIGURATION BACKUP All configuration settings on the DVR can be saved to USB memory stick or a PC file remotely The saved data can then be uploaded to other DVR un...

Страница 6: ...VT EH Series DVRs________________________________________________________________________________ 6 S SY YS ST TE EM M O OR RG GA AN NI IZ ZA AT TI IO ON N ...

Страница 7: ...e display and playback SCR MODE Change display mode Split mode SEARCH Displays the search menu MENU Displays the setup menus Control Keys CURSOR KEYS Navigates the menu system ENTER Apply settings or Select an item RETURN Cancel or go to Previous menu Playback Controls Increases reverse playback speed Selects reverse playback ΙΙ Pauses resumes playback Selects forward playback and also accesses th...

Страница 8: ...ted 4 PAL NTSC SWITCH 5 ALARM INPUTS RELAY OUTPUT Up to 4 alarm inputs can be connected and configured as high or low inputs with common ground One Relay output can be connected and configured as high or low with common ground Connection to external telemetry 6 RS 485 devices for PTZ or Keyboard controller 7 LAN LAN connection to a router or internal network 8 DVI DVI main monitor connection to a ...

Страница 9: ...troller sync the remote to each DVR then all DVRs can be controlled with one remote controller How to sync a remote controller to a DVR s ID Press the ID button on the remote Notice REMOTE ID statement on the screen On the remote controller enter the System ID number press ENTER then press RETURN default System ID is 0 Navigation Buttons Used for Playback Control Menu Navigation and PTZ Focus Cont...

Страница 10: ...ve s After startup diagnostics are complete the operator must logon to the system The default user name is ADMIN Using the CHANNEL SELECTION buttons key in the default password of 1234 and press the ENTER button The DVR begins normal operation and shows the default display of all 4 8 or16 channels depending on system model The status bar Include menu control at the bottom of the screen shows menu ...

Страница 11: ...Y Y DIVISION SCREEN Select the DISPLAY button for the screen division menu to appear Select the screen type 1 4 6 8 9 16 and rotation sequence Sequence mode User can select the type from display menu Press the SEQ button Each channel is shown in full screen for a set period of time before switching to the next channel To stop the sequence on a particular channel press the SEQ button again More com...

Страница 12: ...n control each item with or button 4 Parameter Press this button and another window will appear User can view each item from PTZ parameter menu Parameter values can be set in CAMERA PTZ SETUP Digital Zoom Select the ZOOM button When viewing a channel in full screen the operator can zoom in to a particular area by up to 8 times To use the digital zoom select the required channel and press the ZOOM ...

Страница 13: ...mediately Click once after selecting log recorded data will be played This will appear if you select the PREVIEW option Panic Recording This menu is used to start and stop the Panic recording If panic recording is started the record icon will change to a red square with a P Select once more to return to previous Panic recording setup will be assigned from Record menu ...

Страница 14: ...l that the user wants Even though other channels show live display this particular channel display is stopped Click once more to return to previous 2 PTZ Please refer to PTZ menu on Page 12 3 Zoom Please refer to ZOOM menu on Page 12 4 Playback User can playback immediately with selected time 10 20 30 seconds or 1 minute ago In case of selecting go to menu this menu will appear After selecting the...

Страница 15: ...the SYSTEM SETUP menu To navigate around any items in the setup menu use the CURSOR KEYS and the ENTER and RETURN buttons In general the ENTER button is used to select and change a particular item and the RETURN button is used to cancel a change or exit from a particular setup screen To setup all main system functions highlight SYSTEM SETUP and press ENTER ...

Страница 16: ... setup the various camera options highlight CAMERA and press ENTER TITLE Input the camera title COVERT When it is set to ON the camera image is not displayed in live display but continues to record AUDIO Determines the audio recording channel CAMERA COLOR SETUP Brightness contrast tint and color can be adjusted for each individual channel Highlight each channel to modify and press ENTER ...

Страница 17: ... a different channel highlight CAMERA and choose the desired channel Press RETURN when all changes are complete CAMERA PTZ SETUP Click the PTZ SETUP menu and click each value on the ADDRESS PROTOCOL and BAUD RATE menu Change each value with button ADDRESS The unique ID of the PTZ device PROTOCOL The protocol of the PTZ device BAUD RATE The baud rate of the PTZ device DETAIL Detail setting for PTZ ...

Страница 18: ...gs such as AUTO FOCUS may not be compatible with particular PTZ equipment If this is the case changing the value will have no effect on PTZ control Click the TOUR button and set the MODE to AUTO to use TOUR function First please set PRESET number on the live PTZ mode Then set the PRESET number from 1 to 16 and DWELL Time DWELL TIME is the time spent in one position until you move to the next prese...

Страница 19: ... SENSITIVITY Between 1 Lowest and 10 Highest and determines the degree of motion required before recording is activated Click the AREA SETUP button AREA SETUP Choosing this option allows the operator to define which areas of the image are monitored for motion detection To quick select or deselect the entire grid click the right mouse button and click the SELECT ALL or DESELECT ALL menu Blank clear...

Страница 20: ...d RECORDING MODE ICON Determines whether the DVR recording status is shown at the top right of each channel display window BORDER Determines whether there is a border around each channel in multi screen display mode BORDER COLOR If the border is ON the operator can choose the color MOTION SENSOR DISPLAY If false motion recording is occurring the operator can use this feature to determine and recti...

Страница 21: ... D1 resolution 704 x 576 this should be set to ON to prevent shudder during playback ALARM POP UP MODE When set to ON an alarm input will cause the associated channel to display in full screen ALARM POP UP DWELL Determines how long the full screen popup is displayed after an alarm input If the alarm condition continues the popup screen is displayed constantly MOTION POP UP MODE When set to ON moti...

Страница 22: ...equence will cycle through all channels one by one Sequence setup allows the operator to define a custom sequence using mixed multi screen views and any desired channels Click the ADD menu To add a new sequence highlight ADD and press ENTER Sequence title is highlighted press ENTER to bring up the virtual keyboard and key in a name or reference number for the new sequence Select the SAVE Then the ...

Страница 23: ...Sequence Setup menu appears Determine the VIEW TYPE and assign CONFIGURE Then click CONFIRM To add an additional mode click ADD After finishing the setup press CLOSE To modify the current one double click that mode Then Sequence Setup window will appear again The new sequence is now saved and can be started by pressing the SEQ button when in live view ...

Страница 24: ...OR OUTPUT User can assign the SPOT OUT display for each channel Double click the spot out channel that needs to be assigned SPOT TITLE input the title ACTIVATION Determines ON OFF Press MODIFY Below is default setup To modify the current display double click the display Then Spot Sequence Setup window will appear How to setup is the same as Sequence setup User can assign Single and Quad display on...

Страница 25: ... it is set to ON the selected audio channel can be monitored on the AUDIO OUTPUT AUDIO MONITORING CHANNEL Specify which one of the 4 AUDIO INPUTS is routed to the AUDIO OUTPUT NETWORK AUDIO TX When set to ON live and playback audio is transmitted to a remote PC connection NETWORK AUDIO RX When set to ON allows a remote PC connection to send audio back to the DVR SOUND BUZZER Click the BUZZER menu ...

Страница 26: ...ime DATE FORMAT Determines how the date is displayed TIME FORMAT Determines how the time is displayed NETWORK TIME SERVER SETUP If the DVR is connected to the Internet the time and date can be accurately set by selecting SYNC and pressing ENTER User can modify default time server by double clicking Network Time Server TIME ZONE It should be set according to the region the DVR is used in D S T Dayl...

Страница 27: ... the channel 1 input signal at power on DISK CAPACITY Shows the total hard drive capacity installed IP ADDRESS Shows either the manual IP address entered in NETWORK setup or the IP address assigned by a DHCP server if enabled MAC ADDRESS Shows the MAC Media Access Control address of the DVR It is unique no other network device has this MAC address DDNS DOMAIN NAME If DDNS is enabled the host DDNS ...

Страница 28: ...ill set the unit back to factory settings SYSTEM DATA System settings can be saved to a USB memory stick The settings can be reloaded in case of accidental factory reset or can be transferred to another DVR if multiple units need to be installed with the same settings PASSWORD Determines the PASSWORD ON OFF to enter specific menu SYSTEM CONTROL DEVICE This will allow up to 254 DVRs to be controlle...

Страница 29: ...user details can be modified To modify user details highlight the user with the green cursor and press ENTER The maximum number of users that can be created is 8 For editing double click on the each tab After changing click OK USER ID Edit the user ID using the virtual keyboard Max 10 characters PASSWORD Change the password using the virtual keyboard Max 4 Characters GROUP Users can be assigned to...

Страница 30: ...ups ADMIN MANAGER or USER E MAIL Enter the user s email address if email notification is required E MAIL NOTIFICATION Enable or disable email notifications for the specified user USER USER AUTHORITY User can give the authority to the MANAGER and USER To select authority click the APPLY button after selecting each item Please note Any user can be deleted except the default ADMIN user USER LOG OUT A...

Страница 31: ...server can be manually set 2ND DNS SERVER If DHCP is not being used the second DNS server can be manually set RTSP SERVICE PORT If the connected Router supports UP P Universal plug and play function clicking AUTO PORT will automatically complete the port forwarding Clicking DELETE PORT will delete the port and PORT TEST will test the ports WEB SERVER PORT If the connected Router supports UPNP Univ...

Страница 32: ...o your DVR s main menu System Setup Network 2 IP SETUP should be selected by default To the right DHCP is listed If it is checked uncheck it then select Apply at the bottom of the screen You should get a pop up indicating the network is rebooting If DHCP was unchecked see below 3 Once the network reboots go back and check DHCP and select Apply Again the network will reboot 4 Make note of your DVR ...

Страница 33: ...forwarding a Default WEB SERVER PORT 8080 b Default RTSP SERVICE PORT 554 Default DDNS HOST NAME is set to the MAC Media Access Control address Creating your DDNS Host Name The EH series allows you to actually name your DVR and access it by that name Steps 1 Access the DVR s main menu by using the remote control or by the buttons on the front of the unit 2 The Setup box will appear Select System S...

Страница 34: ...g up a browser ex Internet Explorer and type http your ddns hostname dvrlink net 8080 in the address bar For example If your DDNS Host Name was Johndoesdvr you would type http johndoesdvr dvrlink net 8080 NOTE If you changed the webport you will need to use that number NOT 8080 DYNDNS ORG CONFIGURATION Before configuring the DVR to use the dyndns org server you must first setup an account Go to ww...

Страница 35: ...r by using the buttons on the front of the unit 2 The Setup box will appear Select System Setup 3 Select System 4 Select System Management 5 Select System Information 6 The MAC address will be displayed here 7 Bring up a browser ex Internet Explorer and type http the mac address of your dvr dvrlink net 8080 in the address bar For example if your MAC address was 001155555555 you would type http 001...

Страница 36: ...sing the buttons on the front of the unit 2 The Setup box will appear Select System Setup 3 Select Network 4 Select DDNS 5 Make sure DDNS is turned ON 6 DDNS Host Name this is your host name To create a new host name please see pages 33 34 7 Bring up a browser ex Internet Explorer and type http your ddns hostname dvrlink net 8080 in the address bar For example if your DDNS Host Name was Johndoesdv...

Страница 37: ... If you are on the same network as the DVR you will need to use the DVR s IP address to access it Steps 1 Access the DVR s main menu by using the remote control or by using the buttons on the front of the unit 2 The Setup box will appear Select System Setup 3 Select Network 4 IP SETUP should be selected by default To the right you should see the DVR s IP address 5 Bring up a browser ex Internet Ex...

Страница 38: ...mail port number SECURITY Set to OFF if the SERVER does not require a username and password to connect USER Enter your email account PASSWORD If SECURITY is set to ON enter the password here FROM Input the E mail address or any text It is only used for E mail test E mail sender TEST E MAIL User can test after inputting E mail address to receiving test E mail Please contact your ISP Email Provider ...

Страница 39: ...ENT Click the HDD EVENT menu The DVR can monitor the hard drives and detect problems that may be developing S M A R T HDD ALARM Enables SMART disk monitoring CHECK INTERVAL Can be adjusted as desired DISK FULL EVENT Determines ON OFF EVENT SENSOR ALARM INPUT Click the ALARM INPUT menu and click the OPERATION and TYPE values OPERATION Alarm inputs can be enabled or disabled TYPE Alarm inputs can be...

Страница 40: ...present or LATCHED the output is active for a set period of time after a trigger DURATION In LATCHED mode the time that the alarm output remains active after it has been triggered TYPE Can be set to high 0V to 5V when activated or low 5V to 0V when activated HDD EVENT Determines whether a hard drive event triggers the alarm output Action settings ALARM Determines whether alarm inputs will trigger ...

Страница 41: ...the buzzer MODE Can be either TRANSPARENT the buzzer sounds only when the trigger criteria is present or LATCHED the buzzer sounds for a set period of time after the trigger DURATION In LATCHED mode the time that the buzzer sounds after it has been triggered Action settings ALARM Determines whether alarm inputs will sound the buzzer VIDEO LOSS Determines whether video loss on any of the selected c...

Страница 42: ...nds an email HDD EVENT Determines whether a hard drive event sends an email BOOTING EVENT Determines whether a booting event sends an email SNAPSHOT NOTIFICATION Determines whether an image JPEG of selected channel sends an email Action settings ALARM Determines whether alarm inputs will send an email VIDEO LOSS Determines whether video loss on any of the selected channels will send an email MOTIO...

Страница 43: ...2 days 3 days 1 week or one month Once the DVR has this amount of footage stored it will start to overwrite the earliest recorded footage OVERWRITE When set to ON the DVR will start overwriting the earliest recorded footage once the hard drive becomes full In this case the percentage of hard drive used shown in live display will always be 99 When it is set to OFF the DVR will stop recording when t...

Страница 44: ...er DAILY one schedule will apply to every day of the week or WEEKLY each day of the week has its own schedule PRE EVENT RECORDING TIME When the DVR is not in continuous recording mode this setting determines the amount of time that is always recorded before an event occurs Motion detection alarm input etc POST EVENT RECORDING TIME When the DVR is not in continuous recording mode this setting deter...

Страница 45: ...efined across a 24 hour period in blocks for example between 09 00 and 18 00 or for each individual hour Note that when SCHEDULE MODE is set to WEEKLY each day of the week can also be selected ACTIVATION This section determines at what times the DVR will record and whether it is in continuous recording or motion detection SIZE FPS QUALITY Click the SIZE FPS QUALITY menu To change the SIZE FPS QUAL...

Страница 46: ...rsor shown represents one hour The table below the time bar shows the recording settings for this time period Drag the time that user wants to have the values changed Example To change the recording settings between 09 00 and 18 00 Use the CURSOR KEYS to move the green cursor to the 09 00 position and press ENTER The cursor changes to orange to show the start position Use the CURSOR KEYS to stretc...

Страница 47: ...m recording This field will be available when you select DUAL STRREAM QUALTY CONTROL as MAUAL During playback when a particular channel is selected in full screen the assigned audio channel will be played back at the same time Adjust values as desired and select OK to finish and return to the parameter menu Other time periods can be configured in the same manner Remember that if SCHEDULE MODE is s...

Страница 48: ... highlight ACTIVATION and press ENTER The schedule box is highlighted in green Drag the Time and Channel with left mouse click After selecting the area determines the recording type The schedule screen has 4 symbols to show the different recording modes NO COLOR blocks No scheduled or motion recording SKY BLUE blocks The DVR will record continuously BLUE block The DVR will only record while motion...

Страница 49: ...ample between 09 00 and 18 00 or for each individual hour Note that when SCHEDULE MODE is set to WEEKLY each day of the week can also be selected ACTIVATION This section determines at what times the DVR will monitor the alarm inputs and activate recording Please refer to Continuous Motion setup for setting up SIZE FPS QUALITY and ACTIVATION Alarm activated recording can be used in conjunction with...

Страница 50: ...___________ 50 R RE EC CO OR RD D M ME EN NU U RECORD PANIC SETUP Click the PANIC RECORDING menu Select the Size Frame Quality and Audio During panic recording mode the DVR will override all other recording settings and record continuously on all channels at the settings configured here ...

Страница 51: ...he default password of 1234 and press ENTER SEARCH TIME SEARCH Click the date that user wants to have the values changed The DVR uses a calendar and timeline search method for quick access to recorded footage The calendar displayed on the left shows the current month Days highlighted in yellow have recorded footage The timeline on the right shows a 24 hour status of all channels for the selected d...

Страница 52: ... day As different days are selected the timeline display also changes to show recorded footage on that day Press ENTER to choose the day and move to the timeline Click the PANO Thumbnail mode PLAY Multi View buttons Use the CURSOR KEYS to move the timeline cursor left or right to select the time segment required The currently selected time is displayed under the calendar Press PLAY to begin playba...

Страница 53: ...lt playback mode is of a 16 screen display By pressing DISPLAY or using the CHANNEL SELECTION buttons it is possible to display a single screen or other multi screen formats in a similar way to the live display mode During playback user can reserve the recorded data that needs to be archived Press button at the time the archive is to be started Then playback is stopped and the menu below will appe...

Страница 54: ...ure to press this button to reserve current data first Then user can select RESERVE START Press this to start the reserve CLOSE Finish archiving Reserved data will be reserved on HDD User can see the reserved data from RESERVED DATA MANAGEMENT on ARCHIVING menu To exit playback mode and return to the search screen to choose another time and date press RETURN To exit the search screen and go back t...

Страница 55: ...ideo loss etc To search for an event and playback the recorded footage press the SEARCH button and log in as ADMIN with the default password of 1234 Click the SEARCH BY EVENT menu and select each desired channel and condition Then click the time with button to change Click the SEARCH button Playback footage for a particular event select the event from the list using the CURSOR KEYS and press ENTER...

Страница 56: ...CHIVING To archive recorded footage to a USB memory stick press the ARCHIVE button To protect unauthorized viewing and distribution of footage only the ADMIN user level can archive footage To login as ADMIN enter the default password of 1234 and press ENTER Click each desired channel Then click the times with button to change Click the QUERY menu Make sure to press QUERY first before selecting BUR...

Страница 57: ..._______ 57 RESERVED DATA MANAGEMENT AVI ARCHIVING LIST User can see the AVI archiving data that was reserved from new archiving menu or archiving of search INFORMATION The detailed information of Reserved AVI data DELETE User can delete the reserved AVI data BURN Backup the selected AVI data ...

Страница 58: ...ur FTP site FTP TEST Tests connectivity to the FTP server W WE EB B C CO ON NN NE EC CT TI IO ON N S SE ET TU UP P PRELIMINARY BEFORE CONNECT For connecting over the web also known as Remote Viewing ports 554 and 8080 need to be port forwarded in the router Refer the manual of Router for port forwarding setting WEB RA MINIMUM PC REQUIREMENT CPU P4 3 0 or Higher RAM 512MB or Higher VGA Geforce MS 4...

Страница 59: ...t the IP Address or URL of the DVR in the Internet Explorer Address Bar See pages 35 37 for more details Default ID and password are ADMIN 1234 User needs to install Active X click Run Add on In case user is unable to install active X User needs to check the option of activeX on IE security menu Windows Internet Explorer ...

Страница 60: ... DVRs________________________________________________________________________________ 60 Select Enable for all ActiveX related options Ex Download signed ActiveX control Download unsigned ActiveX control LIVE MODE ...

Страница 61: ...the live image Print the current screen Snapshot the current screen Setup Render and Save Folder Status Show active status of DVR 1 Alarm Indicator will be marked when system detects Alarm input 2 Motion Indicator will be marked when system detects Motion 3 Video Loss Indicator will be marked when system detects Video Loss 4 Recording Display current recording mode Continuous Motion Panic Alarm St...

Страница 62: ..._______________________________ 62 Log Display all system logs with real time PTZ User is able to control connected PTZ camera 1 Pattern move a camera among several preset positions 2 Preset set a position of camera view 3 Swing move a camera between two preset points ...

Страница 63: ...__________________ 63 SEARCH By time line 1 Select a time line on time table or set an exact time 2 Then press Play button 1 Refresh Refresh the recording table of data 2 Play Start to display the recorded data from system 3 Backup User can back up the recorded data on remote site ...

Страница 64: ... Select the desired channel s 3 Click Start By default the video will be saved to the C SaveFolder SEARCH By Event 1 Event Select events for querying 2 Period Set duration for querying recording data 3 Search Start to query and list up all events on the list 4 Select an event on the list then the DVR will start to playback the related camera s image ...

Страница 65: ...______________ 65 SETUP MODE 1 CAMERA User can configure camera s attribute such as title live color PTZ setup or motion Motion setup for detecting motion events 1 Select Motion menu tab 2 Select a channel and sensitivity 3 Drag a mouse on the image to select detecting area 4 Press OK ...

Страница 66: ...VRs________________________________________________________________________________ 66 2 Display 1 OSD Choose text to display over the image 2 Monitor User can set dwell time for sequence or spot and pop up function ...

Страница 67: ..._____________________________________ 67 3 Sound 1 Audio Setting Select a live audio channel and activation 2 Buzzer setting Activate buzzer out for event notification 4 System User can configure the DATE of the system Check system information and set controller ...

Страница 68: ..._________________________________________________________________ 68 5 Recording User can configure the recording parameter Setting detail is same as system 6 User To add a User select Add then assign Authority level and Log Out time ...

Страница 69: ...___________________ 69 7 Network User can check the system s network information and selectable speed level IP settings are not allowed to be changed on remote site Network IP can only be changed from DVR For email notification user can input the SMTP server detail as shown below ...

Страница 70: ...________ 70 8 Sensor Management can set all device option of Alarm in out Buzzer out for event notification HDD EVENT Alarm Input Alarm output Buzzer out E mail notification option All detail setup follow DVR system setup INFORMATION Display Model name of DVR and WEB Remote Software version ...

Страница 71: ...When archiving from the web browser to a PC the BackupPlayer is NOT included To obtain the BackupPlayer user must physically archive from the DVR to a USB flash drive Click to choose which archive file to playback Playback of the archive file begins The controls under the display can be used to adjust playback direction and speed W WA AT TE ER RM MA AR RK K P PR RO OC CE ES SS S 1 Run BackupPlayer...

Страница 72: ...______________________________________________________ 72 2 Click the Open file button and open the backup file 3 After opening file select Yes to check the watermark 4 If the backuped AVI file is modified Verification failed message will appear ...

Страница 73: ...__________________________ 73 S SM MA AR RT TP PH HO ON NE E C CO ON NN NE EC CT TI IO ON N iPHONE 1 Select the Safari browser 2 Enter the IP address or URL to connect And Click the GO button 3 Enter the User name and Password then use can see the Image Default ADMIN 1234 ...

Страница 74: ..._______________________________________________________ 74 BlackBerry 1 Select the Web browser 2 Enter the IP address or URL to connect And press the Enter button 3 Enter the User name and Password then use can see the Image Default ADMIN 1234 ...

Страница 75: ...stall Vitek DVR Viewer in Apple APPstore 2 Run DVR Viewer Application 3 ADD Connection List 4 Server Name This is just a way to differentiate between multiple DVR s in the list Please name your DVR anything you like then Save 5 Insert IP and ports then save 6 Insert ID Password and login type select Default Auto Login then save 7 Select DVR in list 8 View CAMERA live video DVR1 ADMIN ...

Страница 76: ...Install Connect Android 1 Search and Install Vitek EH DVR Viewer in Android market 2 Run Vitek EH DVR Viewer Application 3 ADD Connection List Select menu button 4 Insert name URL ports ID Password and select ID Password save type then select Save button 5 Long press DVR in list then select Connect button ...

Страница 77: ...______________ 77 2 PTZ Snapshot PRO version 1 Touch the PTZ button 2 Set PTZ by pressing button 3 Set Image Capture By using camera Button 3 Log View PRO version 1 Touch the log view button 2 Select start end time and Filter Option select after touch search button 3 View the log list ...

Страница 78: ...__________________ 78 4 Search PRO version 1 Touch the Search button 2 Select date time and touch play button 3 User can do the playback rewind fast forward and Split Screen Search 5 Setup PRO version 1 Touch the Setup button 2 WebRA setup menu and the same settings are available ...

Страница 79: ......

Страница 80: ... for its intended purpose and not been subjected to damage by misuse willful or accidental damage caused by excessive voltage or lightning The product must not have been tampered with in any way or the guarantee will be considered null and void This guarantee does not affect your statutory rights Contact your local VITEK Reseller should servicing become necessary VITEK makes no warranty or guarant...

Страница 81: ...28492 CONSTELLATION ROAD VALENCIA CA 91355 WWW VITEKCCTV COM 888 VITEK 70 ...

Отзывы: