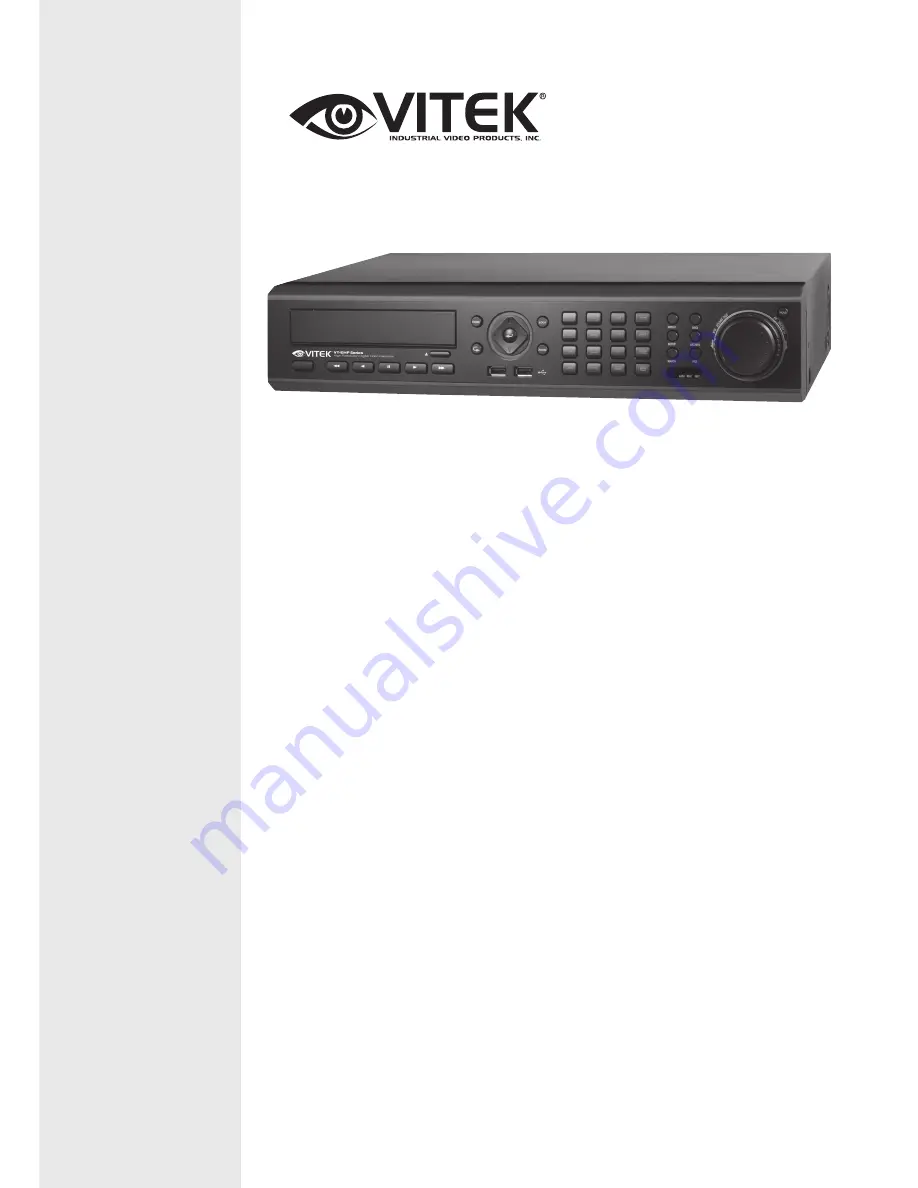
background image

VITEK

VT-EHP Series 

8 & 16 Channel H.264 Digital 

Video Recorders

• 8 or 16 Video Inputs with Main, Spot, and 1080P HDMI outputs

• H.264 Compression

• 4 Alarm Inputs / 1 Relay Out 

• Up to 480fps Live Display & 480fps Recording (VT-EHP16) / 240/240 (VT-EHP8)

• Built-in Point-of-Sales support

• Built-in Data Redundancy

• Remote Viewing over a LAN or Internet

• Free Applications for iPhone, iPad, iTouch and Droid Devices

• 500GB to 8TB Internal Storage Options (up to 8TB @ 4x2TB)

• Email Event Notification with Snapshot

• CMS Central Management Software (Included)

• MAC Client Software (Included)

• Control locally via Front Panel, USB Mouse or with the Included IR Remote control 

• PTZ Control over RS-485

Summary of Contents for VT-EHP Series

Page 1: ...VT EHP8 Built in Point of Sales support Built in Data Redundancy Remote Viewing over a LAN or Internet Free Applications for iPhone iPad iTouch and Droid Devices 500GB to 8TB Internal Storage Options up to 8TB 4x2TB Email Event Notification with Snapshot CMS Central Management Software Included MAC Client Software Included Control locally via Front Panel USB Mouse or with the Included IR Remote co...

Page 2: ...ide blade or the third prong is provided for your safety If the provided plug does not fit into your outlet consult an electrician for replacement of the obsolete outlet 10 Protect the power cord from being walked on or pinched particularly at plugs convenience receptacles and the point where they exit from the apparatus 11 Only use attachments accessories specified by the manufacturer 12 Use only...

Page 3: ...urely and firmly A falling camera may cause personal injury 6 Do not place conductive objects e g screwdrivers coins metal parts etc or containers filled with water on top of the device Doing so may cause personal injury due to fire electric shock or falling objects 7 Do not install the unit in humid dusty or sooty locations Doing so may cause fire or electric shock 8 If any unusual smells or smok...

Page 4: ... fire 6 Install it in a place with good ventilation 7 Avoid aiming the camera directly towards extremely bright objects such as sun as this may damage the CCD image sensor 8 Apparatus shall not be exposed to dripping or splashing and no objects filled with liquids such as vases shall be placed on the apparatus 9 The Mains plug is used as a disconnect device and shall stay readily operable at any t...

Page 5: ...any of the air vents on the DVR Adequate protection against lightning strikes and power surges must be installed to prevent damage to the DVR Any safety warnings on the DVR and in these instructions must be adhered to If cleaning is necessary shutdown the DVR and disconnect power first Use a soft dry cloth only never use any abrasive cleaners Do not attempt to service or repair the DVR as opening ...

Page 6: ...nd backup log for full traceability REMOTE CONNECTION Web connection is allowed up to 8 users at the same time Depending on the user level full DVR control is available over the internet as well as the ability to remotely configure the DVR Alarm outputs on the DVR can be remotely triggered over the internet COMPREHENSIVE RECORDING SETUP Recording can be scheduled alarm or motion activated For each...

Page 7: ...d HD MONITOR output Four spot monitor outputs can be programmed in the DVR setup LIVE DISPLAY The DVR displays single or multi screen images and also has several sequence modes standard and user definable CONFIGURATION BACKUP All configuration settings on the DVR can be saved to USB memory stick or a PC file remotely The saved data can then be uploaded to other DVR units allowing rapid deployment ...

Page 8: ...VT EHP 7 SYSTEM ORGANIZATION ...

Page 9: ... DIVISION SCREEN 16 PTZ 17 DIGITAL ZOOM 17 PANIC RECORDING 18 QUICK MENU 19 SYSTEM SETUP MENU 20 CAMERA 21 CAMERA CAMERA SETUP 21 CAMERA COLOR SETUP 21 CAMERA PTZ SETUP 22 CAMERA MOTION SENSOR 24 DISPLAY 25 DISPLAY OSD 25 DISPLAY MONITOR 26 DISPLAY SEQUENCE 27 DISPLAY SPOT OUT 29 SOUND 30 SOUND AUDIO 30 SOUND BUZZER 30 SYSTEM 31 DATE TIME 31 SYSTEM SYSTEM MANAGEMENT 32 SYSTEM CONTROL DEVICE 33 ...

Page 10: ...VENT SENSOR HDD EVENT 45 EVENT SENSOR ALARM INPUT 45 EVENT SENSOR ALARM OUTPUT 46 EVENT SENSOR BUZZER OUT 47 EVENT SENSOR EMAIL NOTIFICATION 48 EVENT SENSOR PTZ Pan Tilt Zoom PRESETS 49 DISK MANAGE 50 51 RECORD MENU RECORD MENU 51 RECORD RECORDING OPERATIONS 51 RECORD CONTINUOUS MOTION 52 SIZE FPS QUALITY 52 ACTIVATION 55 RECORD ALARM SETUP 56 RECORD PANIC SETUP 57 RECORD NETWORK STREAMING SETUP 5...

Page 11: ... TO CONNECT 68 LIVE MODE 70 SEARCH by Timeline 72 SEARCH by event 74 SETUP MODE 75 INFORMATION 82 83 BACKUP PLAYER 83 WATERMARK PROCESS 85 SMARTPHONE CONNECTION CONNECTING WITH THE DEFAULT BROWSER OF THE PHONE 85 iPHONE 85 ANDROID 86 BLACKBERRY 87 DVR VIEWER GUIDE iPhone iPad Android 88 SMART PHONE APP INSTALL AND CONNECT iPhone iPad 88 INSTALL AND CONNECT ANDROID 90 96 EH CMS 102 EH CONNECT MAC C...

Page 12: ...display and playback Also used to enter numeric passwords for the various login screens G CURSOR KEYS Allow to Navigate on the menu H ENTER Apply or Select an item I RETURN Cancel or go to Previous menu Playback Control J JOG When playback is paused used to move footage forwards or backwards frame by frame K HOLD Locks the current function of the SHUTTLE WHEEL so it can be released L Increases rev...

Page 13: ...common ground E ALARM OUTPUTS Up to 16 alarm outputs can be connected and configured as high or low outputs with common ground F RELAY OUTPUTS Up to 4 Relay outputs can be connected and configured as high or low outputs with common ground G RS485 Can connect PTZ camera and controller by two RS485 connectors Left side for PTZ Right side for keyboard controller H E SATA Can connect External Storage ...

Page 14: ... or more the video may not be properly displayed 1 If you select HD output 2 If you select VGA output 3 If you select SD output K USB PORT Can connect USB mouse or USB device for backup L HD MONITOR OUPUT Can connect HD monitor output M VGA Can connect VGA monitor output N RS232 Serial port O LAN Can connect to a router or internal network P POWER Can connect Power cable ...

Page 15: ... ID on the remote controller Press the ID button on the remote Notice REMOCON ID statement on the screen On the remote controller enter the System ID number press ENTER then press RETURN default System ID is 0 Navigation Buttons Used for Playback Control Menu Navigation and PTZ Focus Control ID ID Button Select DVR ID ENTER Apply Select Go to Next Screen AUDIO Not Supported DISP Change display scr...

Page 16: ... as the CD RW DVD RW drive After startup diagnostics are complete the operator must log on to the system The default user name is ADMIN Using the CHANNEL SELECTION buttons key in the default password of 1234 and press the ENTER button The DVR begins normal operation and shows the default display of all 8 or 16 channels depending on system model The status bar Including menu control is shown at the...

Page 17: ...ar Select the screen type 1 4 6 8 9 16 and rotation sequence Sequence mode Press the SEQ button Each channel is shown in full screen for a set period of time before switching to the next channel To stop the sequence on a particular channel press the SEQ button again More complex sequences can be programmed through the setup menu 2010 07 07 13 23 12 MEN U ARCH SEA RCH DISP PTZ ZOO M LOG REC DISP ...

Page 18: ...ect the preset you wish the camera to move to then select GO TO 4 Zoom Focus IRIS User can control each item with or button 5 Parameter Press this button and another window will appear User can select each item from PTZ parameter menu DIGITAL ZOOM Select the ZOOM button When viewing a channel in full screen the operator can zoom in to a particular area up to 14 times To use the digital zoom select...

Page 19: ...ed user can t use Live LOG function PANIC RECORDING This menu is used to start and stop the Panic recording If the panic recording is started record icon will change to red square with P Select once more to return to previous record schedule Note Panic recording setup will be assigned from Record menu ...

Page 20: ... can stop the live display of channel that user wants Even though other channels show live display this particular channel display is stopped Click once more to return to previous 2 PTZ Please refer to PTZ menu of Page 15 3 Zoom Please refer to ZOOM menu of Page 15 4 Panic Rec Start Stop Please refer to Panic record menu of Page 16 ...

Page 21: ...items in the setup menu use the CURSOR KEYS and the ENTER and RETURN buttons In general the ENTER button is used to select and change a particular item and the RETURN button is used to cancel a change or exit from a particular setup screen To setup all main system functions highlight SYSTEM SETUP and press ENTER ...

Page 22: ... press ENTER TITLE Input the camera title COVERT When set to ON the camera image is not displayed in live display but continues to record AUDIO Determines the audio recording channel CAMERA COLOR SETUP BRIGHTNESS CONTRAST TINT and COLOR can be adjusted for each individual channel Highlight each channel to modify and press ENTER ...

Page 23: ... desired channel Press RETURN when all changes are complete CAMERA PTZ SETUP Click the PTZ SETUP menu and click each value on the ADDRESS PROTOCOL and BAUD RATE menu Change each value with button ADDRESS The unique ID of the PTZ device PROTOCOL The protocol of the PTZ device BAUD RATE The baud rate of the PTZ device DETAIL Detail setting for PTZ device Refer to the next page TOUR Allows for PTZ TO...

Page 24: ...s is the case changing the value will have no effect on PTZ control Click the TOUR button and set the MODE to AUTO to use the TOUR function NOTE Before programming a TOUR presets must be set from the live PTZ mode Each Step represents a stopping point in a TOUR Assign a preset to each step then set the DWELL TIME DWELL TIME defines the time the PTZ remains on each preset during the TOUR ...

Page 25: ...t and determines the degree of motion required before recording is activated Click the button AREA SETUP Choosing this option allows the operator to define which areas of the image are monitored for motion detection To quickly select or deselect the entire grid Click the right mouse button and click the SELECT ALL or DESELECT ALL menu Yellow Boxes Selected area No Boxes Non selected area ...

Page 26: ...s shown at the top right of each channel display window BORDER Determines whether there is a border around each channel in multi screen display mode BORDER COLOR If the border is ON the operator can choose the color MOTION SENSOR DISPLAY If false motion recording is occurring the operator can use this feature to determine and rectify the cause in real time OFF normal display mode ON areas where mo...

Page 27: ...udder during playback ALARM POP UP MODE When set to ON an alarm input will cause the associated channel to display in full screen ALARM POP UP DWELL Determines how long the full screen popup is displayed after an alarm input If the alarm condition continues the popup screen is displayed constantly MOTION POP UP MODE When set to ON motion detection will cause the associated channel to display full ...

Page 28: ...ws the operator to define a custom sequence using mixed multi screen views and any desired channels Click the ADD menu To add a new sequence highlight ADD and press ENTER Sequence title is highlighted press ENTER to bring up the virtual keyboard and key in a name or reference number for the new sequence Click on the ACTIVATION tab and click button for select ON OFF Select SAVE Then the below menu ...

Page 29: ...n CONFIGURE Then click CONFIRM To add an additional mode click ADD continuously After finishing the setup press CLOSE To modify the current one double click that mode Then Sequence Setup window will appear again The new sequence is now saved and can be started by pressing the SEQ button when in live view ...

Page 30: ...assign the SPOT OUT display for each channel Double click the desired spot out channel SPOT TITLE Input the title ACTIVATION Determines ON OFF Press MODIFY Below is default setup To modify the current display double click the display Then Spot Sequence Setup window will appear The Setup process is the same as Sequence setup User can assign 1 and 4 split display To add the additional displays selec...

Page 31: ...nitored on the AUDIO OUTPUT AUDIO MONITORING CHANNEL Specify which one of the 4 AUDIO INPUTS is routed to the AUDIO OUTPUT NETWORK AUDIO TX When set to ON live and playback audio is transmitted to a remote PC connection NETWORK AUDIO RX When set to ON allows a remote PC connection to send audio back to the DVR SOUND BUZZER Select the BUZZER menu and select the ON OFF menu Then click the button for...

Page 32: ...RMAT Determines how the date is displayed TIME FORMAT Determines how the time is displayed NETWORK TIME SERVER SETUP If the DVR is connected to the Internet the time and date can be accurately set by selecting SYNC and selecting ENTER TIME ZONE SETUP It should be set according to the region the DVR is used in D S T When it is set to ON the DVR will automatically adjust the time by one hour on the ...

Page 33: ...DRESS Shows either the manual IP address entered in NETWORK setup or the IP address assigned by a DHCP server if enabled MAC ADDRESS Shows the MAC Media Access Control address of the DVR It is unique no other network device has this MAC address DDNS DOMAIN NAME If DDNS is enabled the host DDNS server is specified here RTSP SERVICE PORT The port number that the DVR uses to support remote connection...

Page 34: ...FACTORY DEFAULT Select this to load the factory default settings SYSTEM DATA System settings can be saved to a USB memory stick The settings can be reloaded in case of accidental factory reset or can be transferred to another DVR if multiple units need to be installed with the same settings All information is saved apart from network settings and system name PASSWORD Determines the PASSWORD ON OFF...

Page 35: ...OS function BAUDRATE Must be set to match the baud rate of the POS device PROTOCOL Must be set in accordance with POS device ADDRESS This determines POS device address of each channel Caution When POS function is activated Live LOG function and Control device is deactivated and cannot be used ...

Page 36: ...t the user with the green cursor and press ENTER The maximum number of users that can be created is 8 For editing double click on the desired field tab After changing click OK USER ID Edit the user ID using the virtual keyboard Max 10 characters PASSWORD Change the password using the virtual keyboard Max 4 Characters GROUP Users can be assigned to one of three groups ADMIN MANAGER or USER E MAIL E...

Page 37: ...one of three groups ADMIN MANAGER or USER E MAIL Enter the user s email address if email notification is required E MAIL NOTIFICATION Enable or disable email notifications for the specified user USER USER AUTHORITY User can give authority to the MANAGER and USER groups To give authority to a user group check the appropriate box then select the APPLY button Note Any user can be deleted except the d...

Page 38: ...e of selecting AUTO LOGOUT ON determines the duration prior to logout CAMERA AUTHORITY CAMERA AUTHORITY Camera authority can be given to specific users To give camera authority select the desired user in the USER ID field then check each box to give user access to corresponding camera ...

Page 39: ...y set RTSP SERVICE PORT If the connected Router supports UPnP Universal plug and play function when you click the AUTO PORT the port forwarding is automatically setup Clicking DELETE PORT will delete the port and PORT TEST will test the ports WEB SERVER PORT If the connected Router supports UPNP Universal plug and play clicking AUTO PORT will automatically complete the port forwarding Clicking DEL...

Page 40: ...etwork 2 IP SETUP should be selected by default To the right DHCP is listed If it is checked uncheck it then select Apply at the bottom of the screen You should get a pop up indicating the network is rebooting If DHCP was unchecked see below 3 Once the network reboots go back and check DHCP and select Apply Again the network will reboot 4 Make note of your DVR s IP address you will need this for p...

Page 41: ... 5 Make sure DDNS is turned ON DVRLINK NET CONFIGURATION 1 Make sure DDNS is turned ON 2 Highlight HOST NAME and press enter The virtual keyboard will appear Change the Host Name to your desired name by removing the previous entry you can do this by repeatedly selecting the ß key When choosing your host name please don t include any spaces or special characters Once you have entered your desired h...

Page 42: ...elect System Management 5 Select System Information 6 The MAC address will be displayed here 7 Bring up a browser ex Internet Explorer and type http the mac address of your dvr dvrlink net 8080 in the address bar For example if your MAC address was 001155555555 you would type http 001155555555 dvrlink net 8080 NOTE If you changed the webport you will need to use that number NOT 8080 IMPORTANT In o...

Page 43: ...l appear Select System Setup 3 Select Network 4 Select DDNS 5 Make sure DDNS is turned ON 6 DDNS Host Name this is your host name To create a new host name please see page 38 7 Bring up a browser ex Internet Explorer and type http your ddns hostname dvrlink net 8080 in the address bar For example if your DDNS Host Name was Johndoesdvr you would type http johndoesdvr dvrlink net 8080 NOTE If you ch...

Page 44: ... to use the DVR s IP address to access it Steps 1 Access the DVR s main menu by using the remote control or by using the buttons on the front of the unit 2 The Setup box will appear Select System Setup 3 Select Network 4 IP SETUP should be selected by default To the right you should see the DVR s IP address 5 Bring up a browser ex Internet Explorer and type http your DVR s ip address 8080 in the a...

Page 45: ...e and password to connect USER Enter a username to identify the DVR in email messages PASSWORD If SECURITY is set to ON enter the password here FROM Input the E mail address or any text It is only used for E mail test E mail sender TEST E MAIL User can test after inputting E mail address to receiving test E mail Please contact your ISP Email Provider and or Network Administrator if help is needed ...

Page 46: ...g Analysis and Reporting Technology is a monitoring system to detect and report on various indicators of hard drive reliability in the hope of anticipating failures CHECK INTERVAL Can be adjusted as desired DISK FULL EVENT Determines ON OFF EVENT SENSOR ALARM INPUT Select the ALARM INPUT menu and select the OPERATION and TYPE value Determine the behavior of each of the 16 alarm inputs OPERATION Al...

Page 47: ...time after a trigger DURATION In LATCHED mode the time that the alarm output remains active after it has been triggered TYPE Can be set to high 0V to 5V when activated or low 5V to 0V when activated HDD EVENT Determines whether a hard drive event triggers the alarm output Action Settings ALARM EVENT Determines whether alarm inputs will trigger the alarm output VIDEO LOSS Determines whether video l...

Page 48: ... only when the trigger criteria is present or LATCHED the buzzer sounds for a set period of time after the trigger DURATION In LATCHED mode the time that the buzzer sounds after it has been triggered Action Settings ALARM EVENT Determines whether alarm inputs will sound the buzzer VIDEO LOSS Determines whether video loss on any of the selected channels will sound the buzzer MOTION Determines wheth...

Page 49: ... NOTIFICATION Determines whether a image JPEG from the selected channel sends an email To enable this feature click the button select the desired camera To disable this feature set the field to OFF Note A snapshot notification can only be sent from ONE camera Action Settings ALARM EVENT Determines whether alarm inputs will send an email VIDEO LOSS Determines whether video loss on any of the select...

Page 50: ...es whether alarm inputs will trigger PTZ preset VIDEO LOSS Determines whether video loss on any of the selected channels will trigger PTZ preset MOTION Determines whether motion detection on any of the selected channels will trigger PTZ preset PRESET Determine which PTZ preset to associate with alarm trigger NOTE PTZ presets must be completed prior to configuring EVENT SENSOR PTZ PRESETS See PTZ c...

Page 51: ...eek 2 week 3 week or one month Once the DVR has this amount of footage stored it will start to overwrite the earliest recorded footage OVERWRITE When set to ON the DVR will start overwriting the earliest recorded footage once the hard drive becomes full In this case the percentage of hard drive used shown in live display will always be 99 When it is set to OFF the DVR will stop recording when the ...

Page 52: ...le PRE EVENT RECORDING TIME When the DVR is not in continuous recording mode this setting determines the amount of time that is always recorded before an event occurs motion detection alarm input etc POST EVENT RECORDING TIME When the DVR is not in continuous recording mode this setting determines the amount of time that is always recorded after an event occurs motion detection alarm input etc NET...

Page 53: ...rding settings for each channel can be defined across a 24 hour period in blocks for example between 09 00 and 18 00 or for each individual hour Note that when SCHEDULE MODE is set to WEEKLY each day of the week can also be selected ACTIVATION This section determines at what times the DVR will record and whether it is in continuous recording or motion detection recording SIZE FPS QUALITY Select th...

Page 54: ...NTER Move the green cursor to the desired end and press ENTER EXAMPLE 1 To change the recording settings between 09 00 and 18 00 Use the CURSOR KEYS to move the green cursor to the 09 00 position and press ENTER Use the CURSOR KEYS to stretch the green cursor across to the 18 00 position then press ENTER EXAMPLE 2 To change the recording settings for the entire day 24hrs Use the CURSOR KEYS to mov...

Page 55: ...h channel AUDIO If audio devices are connected to the DVR user can select the audio recording on off Any audio channel can be assigned to any of the video channels Please refer to camera setup menu During playback when a particular channel is selected in full screen the assigned audio channel will be played back at the same time Adjust values as desired and select OK to finish and return to the pa...

Page 56: ...ain to use the green cursor to select multiple grid boxes in the schedule USING A MOUSE Drag the Time and Channel with left mouse click After selecting the area the EVENT window will pop up allowing to change record mode The schedule screen has 4 symbols to show the different recording modes RED blocks No scheduled or motion recording SKY BLUE blocks The DVR will record continuously BLUE block The...

Page 57: ... hour Note that when SCHEDULE MODE is set to WEEKLY each day of the week can also be selected ACTIVATION This section determines at what times the DVR will monitor the alarm inputs and activate recording Please refer to Continuous Motion setup on setting up SIZE FPS QUALITY and ACTIVATION Alarm activated recording can be used in conjunction with Continuous motion recording For example the DVR coul...

Page 58: ... and record continuously on all channels at the settings configured here RECORD NETWORK STREAMING SETUP Select the NETWORK STREAMING menu Select the Frame and Quality See pg 50 for more details on how to change the SIZE FPS QUALITY When Network Streaming mode is set to MANUAL see page 48 the uploaded video stream and overall quality can be customized for desired network performance NOTE Maximum ne...

Page 59: ...R SEARCH TIME SEARCH Click the desired date on the calendar The DVR uses a calendar and timeline search method for quick access to recorded footage The calendar displayed on the left shows the current month Days highlighted in yellow have recorded footage The timeline on the right shows a 24 hour status of all channels for the selected day The recorded time will be displayed with different color o...

Page 60: ...equired day As different days are selected the timeline display also changes to show recorded footage on that day Press ENTER to choose the day and move to the timeline Click the PLAY Multi View buttons Use the CURSOR KEYS to move the timeline cursor left or right to select the time segment required The currently selected time is displayed under the calendar Press PLAY to begin playback from the s...

Page 61: ...ng the CHANNEL SELECTION buttons it is possible to display single screen or other multi screen formats in a similar way to the live display mode When playback is paused the can be used to accurately move the footage forward or backwards frame by frame Playback speed and direction can also be controlled using the five playback buttons ...

Page 62: ...yback Press button again to end archiving Then the menu below will appear again RESERVE Press this to reserve current data CONTINUE Press this to reserve more data Then display will return to playback STOP Make sure to press this button to reserve current data first Then user can select RESERVE START Press this to start the reserve CLOSE Finish archiving Reserved data will be reserved on HDD User ...

Page 63: ... SEARCH The DVR event log stores events such as motion and alarm activated recording video loss etc To search for an event and playback the recorded footage press the SEARCH button and log in as ADMIN with the default password of 1234 Click the SEARCH BY EVENT menu and select each desired channel and condition Then select the desired times and use the button to change the values Click the SEARCH b...

Page 64: ...t using the CURSOR KEYS and press ENTER Playback resumes from the moment when the selected event occurred and continues until stopped by the operator During event search playback the playback buttons can be used as normal To stop playback and return to live view mode repeatedly press RETURN ...

Page 65: ...m keyword date etc On SEARCH BY POS EVENT menu it can search log price quantity item keyword date etc and playback recorded video Click the SEARCH BY POS EVENT menu and select each desired channel and condition Then select the desired times and use the button to change the values Click the SEARCH button ...

Page 66: ...ing the CURSOR KEYS and press ENTER Playback resumes from the moment when the selected event occurred and continues until stopped by the operator During event search playback the playback buttons can be used as normal To stop playback and return to live view mode repeatedly press RETURN ...

Page 67: ...ick each desired channel Then click the times with button to change Click the QUERY menu TAG Make sure to assign a TAG name before attempting to QUERY BURN or RESERVE Make sure to press QUERY first before selecting BURN or RESERVE Press RELEASE to reset after QUERY RESERVE Press this after inputting the TAG name OR BURN Press this after inputting the TAG name Then press START after menu below appe...

Page 68: ... AVI data BURN Backup the selected AVI data FTP SETUP The VT EHP allows for Archiving to an FTP site User must set up the Host Name Port number User Name and Password with the FTP server FTP Archiving is possible on New Archiving or Reserved Data Management For assistance with FTP setup please contact your FTP site administrator DIRECTORY Archived data will be saved to this user defined folder on ...

Page 69: ...assistance please reference your router s manual or contact your Network Administrator IT Professional WEB RA MINIMUM PC REQUIREMENT CPU P4 3 0 or Higher RAM 512MB or Higher VGA GeForce MS 400 Radeon 7500 or higher Gefocre 8 series or higher VGA MEMORY 64MB MONITOR 1280X1024 BROWSER InternetExplorer Firefox Crome Opera Safari IE VERSION IE6 0 or higher NETWORK 100Mbps DIRECT X V7 0 or higher HOW T...

Page 70: ... Active X click Run Add on In case the user is unable to install Active X check the ActiveX option in IE security menu Select Enable for all ActiveX related options ex Download signed ActiveX control Download unsigned ActiveX control ...

Page 71: ...division screen 1 4 8 9 16 split mode Sequence mode Move to next camera Full screen Select live channel select a channel manually Activate Mic to send a sound to DVR On Off Sound from DVR Save the live image Print the current screen Snapshot the current screen Setup Render and Save Folder ...

Page 72: ...stem detects Motion 3 Video Loss Indicator will be marked when system detects Video Loss 4 Recording Display current recording mode Continuous Motion Panic Alarm Stand By 5 Alarm Out Indicator will be marked when system detect Alarm output 6 Refresh Time set interval of refresh or Reload for manual refresh Log Display all system logs with real time ...

Page 73: ...ted PTZ camera 1 Preset Set a position of camera view 2 Position Step Determines how many steps the PTZ moves when a directional arrow is clicked SEARCH by Timeline 1 Select a timeline on time table or set an exact time 2 Then press Play button ...

Page 74: ...ta Play Start to display the recorded data from system Backup User can backup the recorded data on remote site Backup 1 Select the desired Start and End Time 2 Select the desired channel s 3 Click Start By default the video will be saved to C SaveFolder ...

Page 75: ... by event 1 Event Select the desired event s for searching 2 Period Set the start and end time 3 Search Click SEARCH to query and list up all events 4 Select an event on the list the DVR will immediately begin playback ...

Page 76: ...n configure camera s attribute such as title live color PTZ setup or motion Motion setup for detecting motion events 1 Select Motion menu tab 2 Select a channel and sensitivity 3 Drag a mouse on image to select area of detection 4 Press OK ...

Page 77: ...rn the live audio on or off Default Audio Channel Select the default audio channel Network Audio Tx When set to ON live and playback audio is transmitted to a remote PC connection Network Audio Rx When set to ON allows a remote PC connection to send audio back to the DVR 1 Buzzer setting When it is set to ON each front panel button that is pressed is confirmed by a beep ...

Page 78: ...er can configure system date check system information and setup control device 5 Recording Allows the operator to remotely configure the DVR for recording Please see pages 48 54 for more details Setting the SIZE FPS Quality ...

Page 79: ...VT EHP 78 Activation This section determines at what times the DVR will record and whether it is in Continuous Motion or Continuous Motion recording 6 User User Management Add edit user information ...

Page 80: ...ority User can give the authority to the MANAGER and USER To give authority check each desired box then select OK Log Out Auto Logout Determines if Auto Logout is ON OFF Duration Determines the duration before Auto Logout ...

Page 81: ...t the desired user in the USER ID field then check each box to give user access to corresponding camera 7 Network Network User can check the system s network information and select the transmission speed IP settings may not be changed from the remote site Network IP settings can only be changed at the DVR ...

Page 82: ...Please contact your ISP Email Provider and or Network Administrator if help is needed obtaining your email information 8 Sensor User can setup the various event handling options HDD EVENT Alarm Input Alarm output Buzzer Out E mail notification option and PTZ Presets for events Please see pages 43 47 for more details ...

Page 83: ...VT EHP 82 INFORMATION Display Model name of DVR and WEB Remote Software version ...

Page 84: ...C the BackupPlayer is NOT included To obtain the BackupPlayer user must physically archive from the DVR to a USB flash drive Click to choose which archive file to playback Playback of the archive file begins The controls under the display can be used to adjust playback direction and speed WATERMARK PROCESS 1 Run BackupPlayer then select the desired archived media ...

Page 85: ...VT EHP 84 2 Click the Open file button and open the backup file 3 After opening file select Yes to check the watermark 4 If the backed up AVI file is modified Verification failed message will appear ...

Page 86: ...NECTING WITH THE DEFAULT BROWSER OF THE PHONE iPHONE 1 Select the Safari browser 2 Enter the IP address or URL to connect And Click the GO button 3 Enter the User name and Password then you will see the following image Default ADMIN 1234 ...

Page 87: ...VT EHP 86 ANDROID 1 Select the Web browser 2 Enter the IP address or URL to connect 3 Enter the User name and Password then you will see the following image Default ADMIN 1234 ...

Page 88: ...VT EHP 87 BLACKBERRY 1 Select the Web browser 2 Enter the IP address or URL to connect Press the Enter button 3 Enter the User name and Password then you will see the following image Default ADMIN 1234 ...

Page 89: ...L AND CONNECT iPhone iPad 1 Search and Install Vitek DVR Viewer in Apple APPstore 2 Run DVR Viewer Application 3 ADD Connection List 4 Server Name This is just a way to differentiate between multiple DVR s in the list Please name your DVR anything you like then Save DVR1 ...

Page 90: ... ports then save 6 Insert ID Password and login type select Default Auto Login then save 7 Select DVR in list 8 View CAMERA live video For further assistance please visit our website http vitekcctv com VideoTutorials asp ADMIN ...

Page 91: ...VT EHP 90 INSTALL AND CONNECT ANDROID 1 Search and Install Vitek EH DVR Viewer in Android market 2 Run Vitek EH DVR Viewer Application 3 ADD Connection List Select menu button ...

Page 92: ...name URL ports ID Password and select ID Password save type then select Save button 5 Long press DVR in list then select Connect button For further assistance please visit our website http vitekcctv com VideoTutorials asp ...

Page 93: ...e PRO version of the app includes the following additional features PTZ CONTROLS SNAPSHOTS LOG VIEW SEARCH SETUP PTZ CONTROLS 1 Touch the PTZ button 2 Control PTZ by pressing button SNAPSHOT 1 Capture image by using camera Button ...

Page 94: ...VT EHP 93 LOG VIEW 1 Touch the log view button 2 Select start end time and Filter Option select after touch search button 3 View the log list ...

Page 95: ...VT EHP 94 Search 1 Touch the Search button 2 Select date time and touch play button 3 User can do the playback rewind Fast forward and Split Screen Search ...

Page 96: ...VT EHP 95 SETUP 1 Touch the Setup button 2 The Setup menu includes the same settings as the DVR ...

Page 97: ...ws each able to display up to 64 cameras from the VT E VT EHL VT EH and VT EHP DVRs 4 8 16ch models 1 Download and install the EH CMS software http vitekcctv com Downloads asp 2 Launch the software The Default username is ADMIN with a password of 1234 ...

Page 98: ...VT EHP 97 3 Click the Setup tab 1 Click Shared 2 then click the green plus sign 3 to add a new group Give the new group a name 4 1 2 3 4 ...

Page 99: ...P 98 4 Click the green plus sign to create a view 1 NOTE Make sure the group is highlighted first 2 Once the Create View button is clicked the display options are displayed Select the desired display 3 1 2 3 ...

Page 100: ...VT EHP 99 5 Click Resource 1 then click Add 2 6 Input the DVR information then select OK NOTE Port is the webport of the DVR ID Password is the username and password of the DVR 1 2 ...

Page 101: ...VT EHP 100 7 After adding the DVR to the Device List click Apply 1 The DVR will appear in the left column under System Overview 2 2 1 ...

Page 102: ...Live tab 9 Click on the DVR in System Overview 1 Either drag and drop individual cameras or drag and drop the DVR to the viewing area 2 For further assistance please visit our website http vitekcctv com VideoTutorials asp 1 2 ...

Page 103: ...VT EHP 102 EH CONNECT MAC COMPATIBLITY Users can connect to the DVR with a Mac computer Steps 1 Click the Add icon 2 Click on Devices then click to add a device Once you have added your device click OK ...

Page 104: ...VT EHP 103 3 Click the Add icon again 4 Click Group a Click the to add a new Group b Give the new group a name next to Group Name c Select OK ...

Page 105: ...Group a Click on a device in the Devices section b Click the button to move the device from the Devices list to the Members of the Group on the left See Fig A c Your device should now be located under Members See Fig B Now click OK Fig A Fig B ...

Page 106: ...VT EHP 105 7 Click the Connect button 8 Your DVR should now be connected ...

Page 107: ...ps 704x480 480 fps 704x480 PTZ 2 RS 485 Supports most of PTZ protocols with up to 255 Presets Point of Sale POS YES Motion Area Setting Adjustable Grid 16 x 16 Recording Resolution Setting By each camera for different resoultion setting CIF 2CIF D1 Recording Quality Control 4 Levels Low Standard High Highest Recording Schedule By hour by day by recording mode By alarm By Ch Panic Record Overrides ...

Page 108: ...n Screen Display for programming Their IP68 NEMA rating means that these Weather proof cameras will never leak or condensate and cannot be permeated by dust or pests Image Device Resolution Minimum illumination Infrared LEDs IR Distance Day Night Built In Lens Light Compensation Noise Reduction E WDR Motion Detection Privacy Mask Water Resistance Mounting Power Source Power Consumption 12VDC Power...

Page 109: ...wolf Wide Dynamic Range DSP and the Sony Effio Day Night DSP The Highest resolution Analog camera line up to date offers 700 TV Lines of Resolution up the coax OSD Control and low light capability up to 0 00008 lux Created to meet and solve the challenges brought on by varying lighting conditions and display clear crisp images more accurately than ever before A long list of mounting and configurat...

Page 110: ...o repairing the defective product including all necessary parts and related labor costs At its sole discretion VITEK may choose to either exchange a defec tive product or issue a merchandise credit towards future product purchases Any replacement parts furnished in connection with this warranty shall be warranted for a period not to exceed the remaining balance of the original equipment warranty A...

Page 111: ...28492 Constellation Road Valencia ca 91355 WWW VITEKCCTV COM 888 VITEK 70 ...

Reviews: