MADE IN TAIWAN
DV-18 / DV-19 / DV-20
Copyright © 2014 OKINA USA. All rights reserved.
R201405-V09
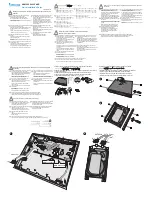
PACKAGE CONTENTS
A.
B.
C.
4 / 8 CH.
16 CH.
D.
E.
F.
x 2 (4 / 8 CH.)
x 4 (16 CH.)
G.
H. Inside the DVR
I.
x 2
x 10
x 2 (16 CH.)
J.
K.
L.
x 32 (16 CH.)
x 1 (16 CH.)
x 1 (16 CH.)
M.
N.
*Notes:
Any Return Must Include All Components.
Additional charges apply for any missing
components. A UPS Battery Backup
System is highly recommended to avoid
power failure restoration damage to Hard
Drive & Motherboard.
Please read this Quick Setup Guide before installation.
**Quick Setup Guide & User’s Manual are subject to change without notice.
A. One (1)
HDRR-04 / HDRS-08 / HDRR-16 DVR
I.
Two (2)
Rack Mount Ear w/ Screws –
HDRR-16
B. One (1)
Remote Controller
J. Thirty-two (32) Hard Drive Screws –
HDRR-16
C. Two (2)
AAA Battery for Remote Controller
K. One (1)
DB15 to 16-CH Audio Cable –
HDRR-16
D. One (1)
USB Mouse
E. One (1)
Power Cord
L. One (1)
DVDRW Stand w/ Screws –
HDRR-16
F. Two (2)
Four (4)
8-Screw on Terminal Connector –
HDRR-04 /
HDRR-08
8-Screw on Terminal Connector –
HDRR-16
M. One (1)
Quick Setup Guide
N. One (1)
CMS Software & Manual CD
G. Two (2)
External eSATA Cable
H. Ten (10)
SATA Cable Inside DVR
HDRR-04
HDRR-08
HDRR-16
HD SDI H.264 DVR – 4/8/16 CH.
Quick Setup Guide