Vitavia Hera 4500 Скачать руководство пользователя страница 5

5

014.02.0902

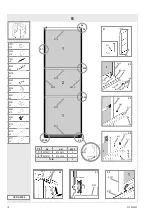
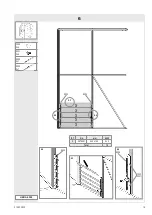
suring the diagonals.

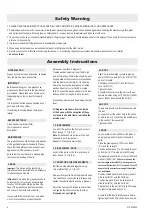
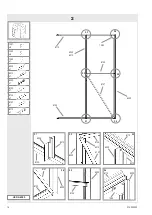
Loosely connect the door wheels (6049) and 

door jump clips (6039) to bottom bar (6117) 

using nut (1002), bolt (6046) and washers 

(6051) (5.2). 

Connect the plastic door guides (6057) onto 

top bar (6114) with screws (6062) (5.4). 

The door can now be positioned in the house. 

Insert the plastic door guides (6057) into the 

channel in eave bar (6110) (5.6) and then 

lower the wheels onto the door track on sill bar 

(6102) (5.7) (5.8). Hook the door jump clips 

(6039) under the lip on (6102) and tighten the 

door wheel bolts (6046) (5.7).
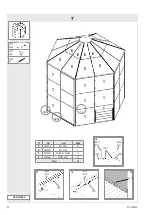
 6. VeNt 

Trim the rubber seal in louvre sides (9523) and 

(9524) to length.

The louvre can only be fitted into the bottom of 

any side in a section that does not already 

have a diagonal brace (6107) fitted.

Connect louvre sides (9523) and (9524) to 

corner bar (6022) and middle bar (6013) by 

inserting the cropped head bolts (2001) into 

the bolt channels in these bars (6.2) (6.4).
Open the vents and slide panes (3) into place 

(6.3). Bend the end of the pane guides against 

the panes to fix them securely in place.

 7. glazINg  


Please note the already mentioned safety 

precautions.

Press the glazing seals (1020) onto all alumini-

um profiles (7.2) and cut to length.

Using the step ladder begin glazing the roof 

by standing inside the building and working 

through the free roof spaces. 

Secure the panes using glazing spring clips 

(1011) (7.3) (7.4) and glass retaining clips 

(1012) (7.5). Ensure that the top edge of pane 

(5) is tucked under the bottom edge of pane 

(6) with (1012) between them (7.5), and that 

the lower edge of pane (5) sits in the recess in 

the eaves.

On the sides please begin from the bottom.

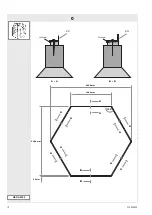
Now tighten the bolts connecting the house to 

the foundation.

 fINIShINg 


If desired, it is possible to seal the greenhouse 

at the edges using silicon. Silicon is not in cluded.
Place the warning label inside the house.

A full range of greenhouse accessories, to 

help you make the most of this product, is 

available from your stockist. Please inform 

yourself as to the possibilities.

 Safety NotIce 


In the event of high wind conditions, close the 

door and all vents. 
In the event of heavy snowfall, clear the roof of 

the building or take suitable measures to sup-

port the roof. Heat the building in winter.

 commeNtS 


For the complete protection of your new 

green house, we advise you to include it in 

your 

house insurance.

 Please take note of 

possible building rules relating to the positio-

ning of greenhouses.
Please stick the included greenhouse model 

label onto the door bar (6114) after success-

fully assembling this product. This information 

is important in the event that replacement 

parts are later required. 
Please keep these Assembly Instructions in a 

safe place, for future reference!
Our policy is one of continuous improvement 

and we reserve the right to change the specifi

-

cations without prior notice.

Содержание Hera 4500

Страница 1: ...014 02 0902 Hera 4500 Assembly instructions Montageanleitung Notice de Montage Montagevejledning Monteringsanvisning Montasjeveiledning Kokoonpano ohjeet D F DK S N SF...

Страница 2: ...1 6005 6 2 M6 x 10 1797 8 1 6013 6022 1 2 1 2 1797 1797 6 6 6023 6036 5 4 1772 380 2 1 6039 6046 5 5 27 M6 x 23 2 2 Item No Part Sect Ref Size mm Quantity 4500 6049 6051 5 5 32 6 23 2 4 6052 6054 4 4...

Страница 3: ...3 014 02 0902 Item No Part Sect Ref Size mm Quantity 4500 6111 6112 4 4 1374 1204 6 6 6114 6115 5 5 620 598 1 2 6117 6135 5 4 598 198 1 1 9523 9524 6 6 444 444 2 2...

Страница 4: ...wide should be posi tioned between the stone concrete foundation and the aluminium frame A A On the side where the door will be located use a treated wooden beam not more then 55 mm wide B B Connect...

Страница 5: ...es using glazing spring clips 1011 7 3 7 4 and glass retaining clips 1012 7 5 Ensure that the top edge of pane 5 is tucked under the bottom edge of pane 6 with 1012 between them 7 5 and that the lower...

Страница 6: ...tten 1092 3 1 bis 3 3 miteinander verschrau ben Nun das soweit verschraubte Gew chshaus auf das vorbereitete Fundament Rahmen set zen und lose verschrauben Bitte die Schrau ben erst festziehen nachdem...

Страница 7: ...ei ben biegen um sie an ihrem Platz zu fixieren 7 Verglasung Bitte beachten Sie die oben erw hnten Si cherheitsvorkehrungen Die Glasdichtungen 1020 auf die Aluminium profile 7 2 dr cken und auf L nge...

Страница 8: ...pos au vent Percer des trous dans les traverses de base et dans les fondations en acier et assemblezles l aide de boulons et d crous Si vous voulez cependant r aliser vousm me des fondations en pierre...

Страница 9: ...Ouvrir la jalousie et coulisser les verres 3 6 3 Exercer une pression sur les profil s afin que les verres soient bien maintenus 7 VITRAGE EN VERRE Veuillez suivre les consignes de s curit voqu es pr...

Страница 10: ...onerne som er vist i afsnit 0 Fastg r en trykimpr gneret tr liste mellem fundamentet og bundskinnen p drivhuset som vist og benyt 50mm skruer og rawlplugs ej medleveret Alle tegninger af drivhuset er...

Страница 11: ...den passer til begge sider og jalousivinduet 9523 og 9524 Jalousivinduet kan kun monteres i den ne derste del af en sektion hvori der ikke sidder en tv rstiver 6107 Fastg r jalousivinduets lodrette si...

Страница 12: ...12 DIANA 0 014 02 0902 hera 4500 30 x 20 mm 52 x 20 mm a a b b a a b b a a a a a a a a 2528 mm 2189 mm 22 mm 6101 6102 1264 mm 120...

Страница 13: ...1 5 1 1 1 6 6110 6013 6013 6107 6103 6013 6101 6107 6022 6101 6103 6022 1092 6110 6022 1001 5 x 8 1002 5 x 8 1092 5 x 1 6013 5 x 1 6022 5 x 1 6101 5 x 1 6103 5 x 1 6107 5 x 1 6110 5 x 1 1 3 1 2 1 6 1...

Страница 14: ...1002 x8 1092 x1 6005 x1 6013 x1 6022 x1 6102 x1 6104 x1 6107 x1 6110 x1 2 3 2 1 2 5 2 6 6005 6013 6005 6013 6110 6102 6104 6022 1092 6110 6022 2 2 2 4 6013 6005 6107 6104 2 3 2 6 2 2 2 5 2 1 2 4 6107...

Страница 15: ...DIANA 1 3 15 014 02 0902 hera 4500 1001 x29 1002 x29 1092 x6 3 1 3 2 3 3 6022 6101 6107 6103 6022 1092 6110 6022 3 3 3 2 3 1...

Страница 16: ...DIANA 1 4A 16 014 02 0902 Hera 4500 1001 x18 1002 x19 6036 x1 6052 x1 6054 x1 6061 x2 6111 x6 6112 x6 6135 x1 4 1 6135 6112 6111 6112 6111 6036 6112 6111 6052 4 2 6061 6036 6054 6061 1002...

Страница 17: ...DIANA 1 4B 17 014 02 0902 hera 4500 1001 x18 1002 x18 4 4 4 3 4 3 4 4 6111 6112 6110 6110 6110...

Страница 18: ...15 x2 6117 x1 5 5 No mm 4500 1 3679011 610 x 610 2 2 3679181 610 x 442 1 Total 3 5 1 1020 1020 1020 5 2 5 3b 5 4 5 1 5 6 5 7 5 8 6023 6039 1 6057 1 1 2 6110 6102 6102 1 1 2 1002 6046 6039 6060 6049 60...

Страница 19: ...DIANA 6 19 014 02 0902 hera 4500 1002 2x4 2001 2x4 9523 2x1 9524 2x1 6 1 No mm 4500 3 3679251 549 x 100 2 x 5 Total 10 9523 6 2 6 3 6 4 6 2 6 3 6 4 9524 9523 9524 1002 2001 1 3 3 3 3 3 3 3 3 3 3...

Страница 20: ...1 7 1 No mm 4500 1 3679011 610 x 610 31 4 3679921 610 x 150 2 5 3679391 610 326 x 610 20 12 6 3679381 332 38 x 610 12 Total 43 1020 6013 6112 6022 6111 1020 1020 7 3 7 4 7 5 1 1 1 1 1 1 1 1 5 5 5 5 6...

Страница 21: ......

Страница 22: ......

Страница 23: ......

Страница 24: ...A D 58089 Hagen Postfach 3320 D 58033 Hagen Tel 49 2331 37555 0 Fax 49 2331 37555 55 www eph schmidt de verkauf eph schmidt de OPJ A S Volderslevvej 36 A Postboks 480 DK 5260 Odense S Danmark Tel 45...

Отзывы: