VitalConnect VistaPoint 3.1 Скачать руководство пользователя страница 4

4

Before applying a new VitalPatch, use the following steps to 

remove a previously applied VitalPatch (if necessary).

1. Disconnect from VistaPoint

IMPORTANT: If the VitalPatch is still connected to VistaPoint, 

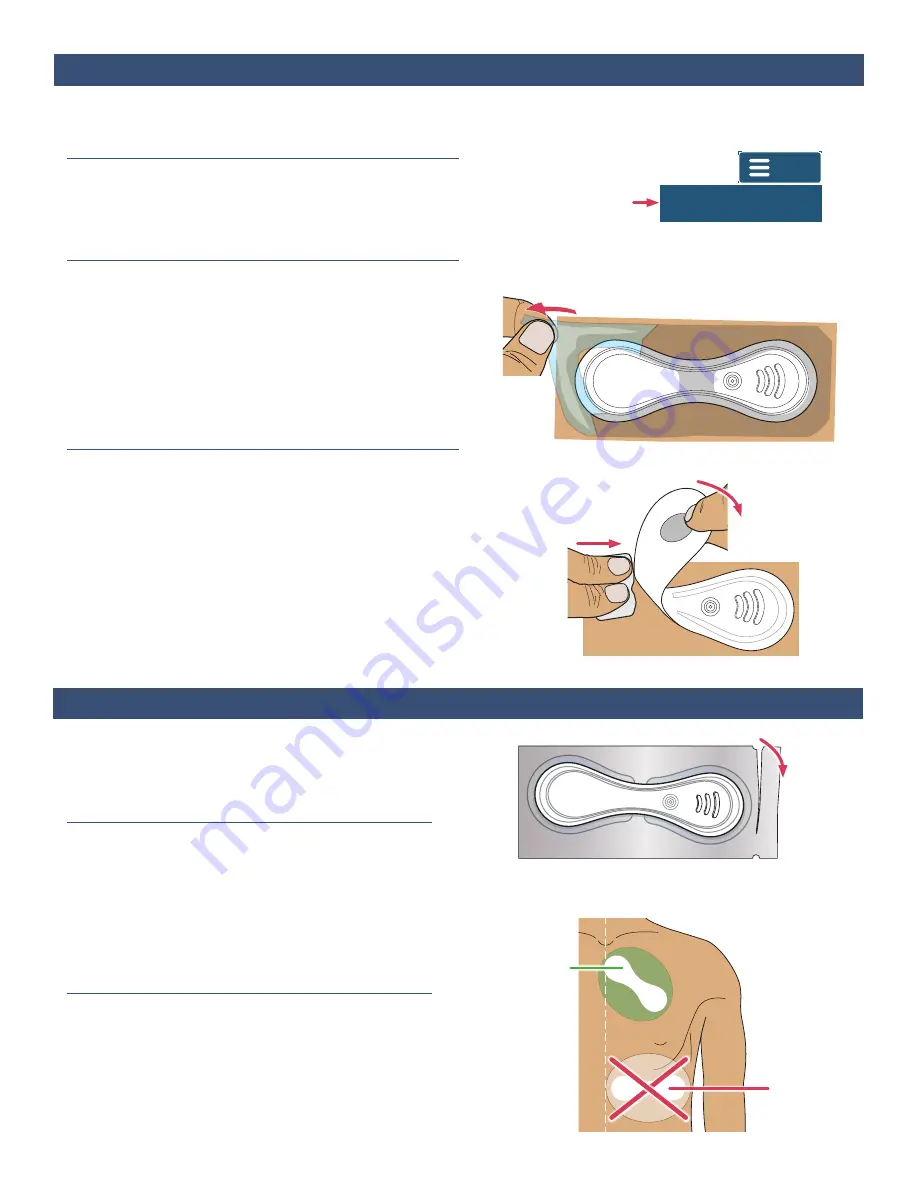
tap the Menu and then tap Disconnect Patch. See 

Section 

10 on page 11

 for more information.

2.  If Overlay Was Used, Peel off

If there is a clear adhesive overlay applied over the 

VitalPatch, it must be removed first. If no overlay is present, 

continue to 

Step 3 below

.

a.  Grasp a corner of the overlay and peel it off the skin.
b.  Continue pulling the overlay off. Stretch the overlay 

horizontally to help release it from the skin.

Note: The VitalPatch may begin pulling off with the overlay. 

3.  Peel off VitalPatch

a.  Wipe an adhesive removal pad along the edge of the 

VitalPatch. 

b.  Grasp a corner of the VitalPatch (or the middle where 

there is no adhesive) and peel it off the skin while 

continuing to sweep the adhesive removal pad 

underneath.

c.  Dispose the VitalPatch according to local laws for routine 

electronic waste.

d.  Clean skin with an alcohol pad and allow to dry.

Section 4:

 Removing Previous VitalPatch

Sweep Adhesive

Removal Pad

Tear open 

pouch

Grasp a corner of the overlay and 

stretch horizontally to remove

Peel Off 

VitalPatch

Tap “Disconnect 

Patch” from the Menu

VitalConnect

Section 5:

 Applying the VitalPatch

If using arrhythmia detection, VitalPatch must be placed 

on the 

PRIMARY

 location on the upper left chest. DO 

NOT use the SECONDARY location. 

See Step 3 on page 

5

 for more details on the location.

1. Remove VitalPatch from Pouch

Make sure your hands are clean and dry. Tear open the 

pouch at the notch and remove VitalPatch.
Note: Wait a minimum of 2 minutes before powering-on 

the VitalPatch. Chest prep (next step) may be performed 

while waiting.

2.  Prepare Chest

a.  If there is body hair on the site, shave the site before 

cleaning. Prepare an area larger than the VitalPatch. 

See figure to the right.

b.  Clean site with an alcohol wipe and allow to dry.

DO NOT use 

this location

PRIMARY

Location

Menu

Disconnect Patch

Vital

Connect

Содержание VistaPoint 3.1

Страница 1: ...cal instructions The VistaPoint application collects and uploads vital signs from the VitalPatch and approved third party devices to your care team VistaPoint runs on the portable VistaTablet or Vista...

Страница 2: ...and enter the PIN provided by your care team default PIN is 1234 Section 1 Setting Up VistaTablet or VistaPhone Status Bar Status Bar Home Key Menu Menu Device Name Device Name VistaTablet Charging P...

Страница 3: ...the device will sound a warning tone and then turn off If this occurs charge the device before turning it on again Checking VitalPatch Hours Each VitalPatch will last up to 5 days 120 hours or 7 days...

Страница 4: ...oval pad underneath c Dispose the VitalPatch according to local laws for routine electronic waste d Clean skin with an alcohol pad and allow to dry Section 4 Removing Previous VitalPatch Sweep Adhesiv...

Страница 5: ...ace two fingers below the jugular notch dip at the base of the neck b Position diagonally with the three lines angled downward away from the midline VitalConnect Midline LEFT Side Left Hand Section 6...

Страница 6: ...back This creates a tab that will help you remove the top liner later See figure to the right 3 Place the Adhesive Overlay Over VitalPatch a Position the adhesive overlay over the VitalPatch with the...

Страница 7: ...Patch ID and then enter the last 6 characters of the Bluetooth ID 3 Choose Pacemaker Status After connecting the pacemaker status screen may appear The screen will appear only once per patient will no...

Страница 8: ...model If the Elevated option is not available ensure the patient is in the Standing Sitting or Supine position when calibrating Instruct patient to remain still in their current body position and tap...

Страница 9: ...lPatch Report Symptom Device Name Organization VitalPatch ID 0087ea has 94 hours remaining 92 5 45 PM Take SPO2 Take BP Take Weight Streaming Mode 98 Berry BM1000 00 01 0C 82 BF 6E Oxygen Saturation H...

Страница 10: ...contents will vary based on device configuration See figures to the right Disconnect Patch Use when monitoring is complete or to pair a new VitalPatch This option maintains the pairing with third part...

Страница 11: ...nt Discharge patient from the monitoring system Cancel Section 10 When Monitoring is Complete Tap Disconnect Patch Choose a Disconnect Option Section 11 Reporting a Symptom Section 12 Making a Video C...

Страница 12: ...e figure below Tap Calibrate to begin the posture recalibration process See Step 5 and 6 beginning on Page 7 If you do not recalibrate VistaPoint will not provide you with respiration rate or posture...

Страница 13: ...itionally if the displayed posture does not match the actual posture you must recalibrate the posture To do this select Posture Settings from the VitalPatch menu and then tap Calibrate Message Fall De...

Страница 14: ...ion Note If you have a pacemaker VistaPoint will not display ECG heart rate or respiration rate Menu Calibrate Posture Calibrate Temperature Flash Patch LED Disconnect Patch Menu Calibrate Posture Cal...

Страница 15: ...tton on VistaPhone and then Take BP 3 Tap Manual Entry if not already selected 4 Tap the first entry field Use the on screen keyboard to enter the two measured values and then tap Enter If you make a...

Страница 16: ...until the display turns off d After confirming operation proceed to Step 2 on page 17 for pairing Setting Up the BM2000A Wrist Refer to the BM2000A Operator s Manual for complete instructions See fig...

Страница 17: ...Saturation tile or Take a Measurement on VistaPhone and then Take SpO2 c Tap Use Bluetooth and then tap Pair New d Tap Berry BM2000A BM1000 as the model e Scanning for Devices will display Tap the Bl...

Страница 18: ...displayed in the upper right of the display no additional action is necessary go to Step 2 below c If Bluetooth is not ON press and hold the Touchpad until the menu screen is displayed Press and hold...

Страница 19: ...n VistaPhone and then Take SpO2 c Tap Use Bluetooth and tap Pair New d Tap Masimo MightySat as the model e Scanning for Devices will display Tap the Bluetooth ID of the Masimo MightySat when it appear...

Страница 20: ...our care team 1 Find the Bluetooth ID Optional Note This step is optional and is only necessary when using the Model 3150 in an environment where multiple similar devices are being used such as a hosp...

Страница 21: ...ings will continue to be transmitted to the dashboard as long as the Nonin 3150 is operational and the sensor is applied to the finger If the dashboard displays Finger Removed check finger is inserted...

Страница 22: ...will be measured and you will be returned to the dashboard If you see a message asking you to confirm the device pairing tap Confirm d Pairing is now complete Remove Model 3230 from finger 3 Take a Re...

Страница 23: ...us step b Tap Take BP in the Blood Pressure tile or Take a Measurement on VistaPhone and then Take BP c Tap Use Bluetooth d Tap Pair New e Tap Model UA 651 as the model f Scanning for Devices will dis...

Страница 24: ...ted c Tap Take Reading or Take a Measurement on VistaPhone and then Take Weight d Step on the scale Step off the scale when it beeps and displays Step Off VistaPoint displays Please wait connecting wh...

Страница 25: ...on 1 Tap the Menu button and then tap Applications menu item Select the Wi Fi Center application this application will not be displayed if your tablet uses a cellular connection 2 If Wi Fi is OFF tap...

Страница 26: ...ap the Volume Down button on the side of the VistaPhone The device will restart normally Bluetooth Connection Issues If you have problems connecting to or disconnecting from the VitalPatch the followi...

Отзывы: