background image

5-2______________________________________________________________________Users  

5.2  Deleting a User 

1. From 

the 

Sites

 menu, select 

Users

, then 

Delete user

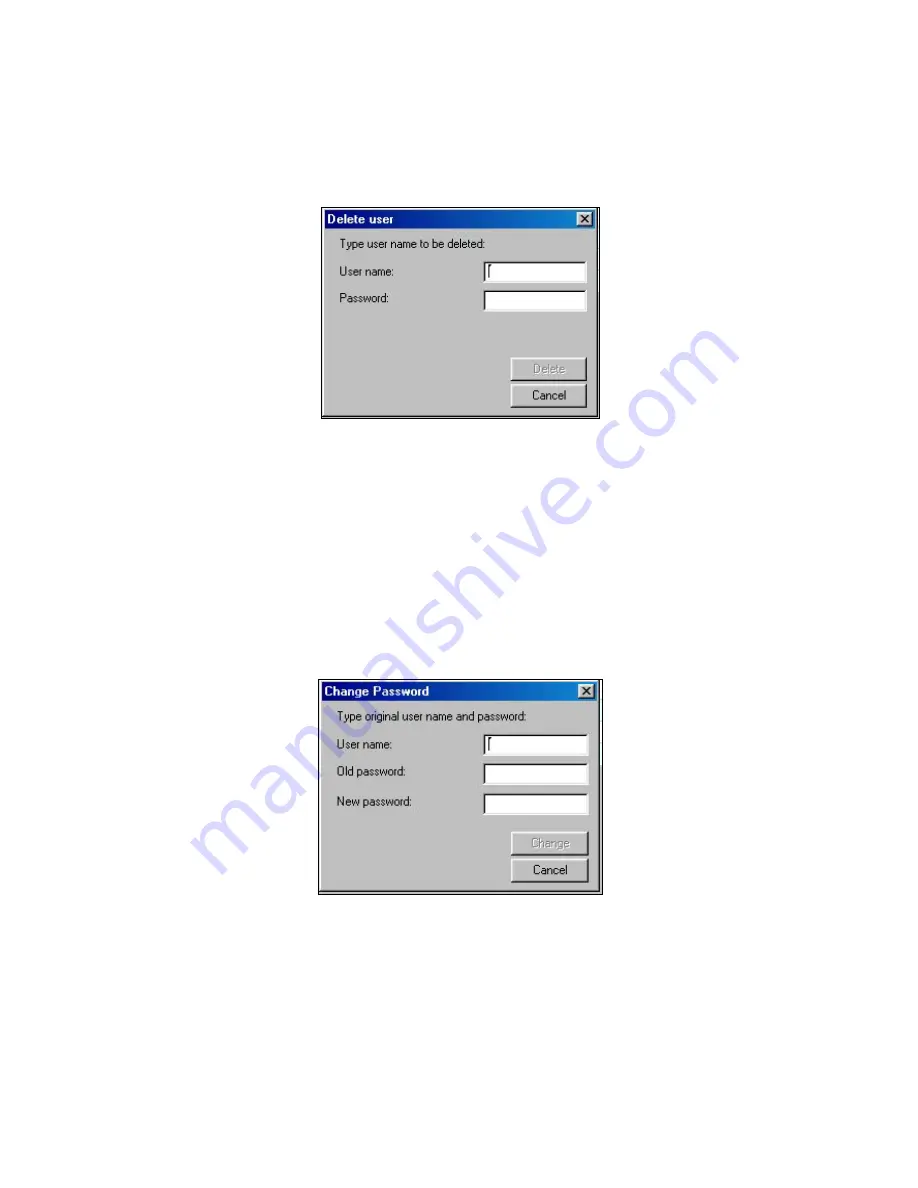
; the Delete user dialog box 

will appear. 


Figure 5-2: Deleting User Name Dialog Box 

2. In 

the 

User Name

 edit box, type the user's name.  

3. In 

the 

Password

 edit box, type the user's password. 

4. Click 

Delete

; a message box appears confirming the deletion of the user from 

the system. 

5.3  Changing User Passwords 

1. From 

the 

Sites

 menu, select 

Users

, then 

Change Password.

 The Change 

Password dialog box appears. 


Figure 5-3: Changing User Password Dialog Box 

2. In 

the 

User Name

 edit box, type the user's name. 

3. In 

the 

Old Password

 edit box, type the user's current password. 

4. In 

the 

New Password

 edit box, type the user's new password. 

5. Click 

Change

; a message box appears confirming the user password change. 

Содержание POWERMAX REMOTE - PROGRAMMER SOFTWARE

Страница 1: ...PowerMax Remote Programmer Software User Guide...

Страница 2: ...IBILITY OF SUCH DAMAGES WARRANTY Visonic Ltd and or its subsidiaries and its affiliates the Manufacturer warrants its products hereinafter referred to as the Product or Products to be in conformance w...

Страница 3: ...rly installed and maintained access control system may only reduce the risk of unauthorized entry without warning but it is not insurance or a guarantee that such will not occur or that there will be...

Страница 4: ...nt tables displayed in the software and provides a general overview of what is included in them Chapter 7 describes how to connect to the PowerMax This chapter details the different connection types a...

Страница 5: ...the documentation Note Additional information relevant to the presently discussed subject Warning Caution Information that is essential for your safety and to avoid damaging the hardware or software b...

Страница 6: ...Chapter 3 Menus 3 1 Sites Menu 3 1 3 2 Edit Menu 3 1 3 3 View Menu 3 1 3 4 Communications Menu 3 2 3 5 Advanced Menu 3 3 3 6 Help Menu 3 3 Chapter 4 Sites 4 1 Introduction to Sites 4 1 4 2 Creating a...

Страница 7: ...ns Definitions 6 6 6 11 GSM Definitions 6 7 6 12 PGM 6 7 6 13 Internal Siren Strobe 6 7 6 14 X 10 General Features 6 7 6 15 X 10 Device Settings 6 7 6 16 RF Diagnostics 6 8 6 17 Event Log 6 8 6 18 Scr...

Страница 8: ...10 1 10 2 Viewing a Report 10 2 10 3 Printing a Report 10 2 Chapter 11 Display Screen Appearance 11 1 Changing the Color 11 1 11 2 Column Alignment 11 2 11 3 User Interface Language 11 2 11 4 File Nam...

Страница 9: ...serial data cable as shown in figure 1 1 or remotely via telephone lines and a modem as shown in figures 1 2 and 1 3 Local Data Transfer enables the operator to prepare the parameters for the PowerMa...

Страница 10: ...are listed in the Modem field in the Communications tab of the Options window refer to 7 1 2 Remote Connection To Install PowerMax Remote Programmer 1 Start Windows Close all running applications if...

Страница 11: ...es are case sensitive use lowercase letters The main PowerMax Remote Programmer screen appears with the most uploaded recent PowerMax configuration This window enables you to open an existing site fil...

Страница 12: ...mize button The windows Close button Menu Bar Displays the menus that enable you to access PowerMax Remote Programmer features List of Tables This area displays a list of all the data tables containin...

Страница 13: ...site file displayed on the screen Sites Search Displays the Sites window without Site information View Sites Options Displays the Options dialog box View Print Displays the Print dialog box Sites Bac...

Страница 14: ...ttom of the PowerMax Remote Programmer screen It displays the following Menu name Caps lock Number lock Communication Status The communication status is displayed by the color of the two communication...

Страница 15: ...e cursor within a table edit box Display a drop down list Arrow keys The arrow keys enable you to move around the PowerMax Remote Programmer tables and highlight the edit boxes However they do not ena...

Страница 16: ...w name Print Prints a report Print Preview Displays the report on the screen before you print it Print Setup Enables you to determine the Print specifications User Enables you to manage users Exit Exi...

Страница 17: ...grammer to the control panel Upload Uploads data from the control panel to the PowerMax Remote Programmer In PowerMax this process uploads all parameters except for the Event Log To upload the Event L...

Страница 18: ...information on the status of the control panel and to set its state Enabled only when working online Settings Opens the Options dialog box on the Advanced tab 3 6 Help Menu The Help menu enables you...

Страница 19: ...List window opens with no data Figure 4 1 Site List Window This window displays a list of the site names whose files are located in the directory displayed in the Sites Location field The first time...

Страница 20: ...owse for Folder dialog box which enables you to locate a folder where the Site files are located Search Lists all the file names containing the text entered into the Search window If Look in sub direc...

Страница 21: ...ns with the Work Online tab open Note It is recommended to work online when creating a new site file so that the software will communicate with the control panel and will automatically select the suit...

Страница 22: ...omatically scan the computer ports to detect PowerMax presence Caution For local download the PowerMax must be set to the installer mode otherwise the software will not detect it not applicable to Pow...

Страница 23: ...ns Telephone Modem Communications Mode 2 Select Telephone modem in the Communications mode field 3 Click OK The New Site window will appear displaying the Work Online tab with the Phone Number field e...

Страница 24: ...ting Figure 4 7 Modem Dial Up Working Offline Work Offline only if you know the PowerMax model you want to connect to 1 Select the Work Offline tab The following screen will be displayed Figure 4 8 Ne...

Страница 25: ...the site file with a new name and in a different directory 1 From the Sites menu select Save As PowerMax Remote Programmer displays the Save As screen 2 Enter a suitable name for the new site and loca...

Страница 26: ...When a Site is no longer active and it is no longer necessary to store it in PowerMax Remote Programmer you can delete it 1 In the Sites List select the site to delete then click Delete a warning box...

Страница 27: ...ser without exiting PowerMax Remote Programmer 5 1 Adding New Users 1 From the Sites menu select Users then Add new user the Add new user dialog box will appear Figure 5 1 Add New User Dialog Box 2 In...

Страница 28: ...ser s password 4 Click Delete a message box appears confirming the deletion of the user from the system 5 3 Changing User Passwords 1 From the Sites menu select Users then Change Password The Change P...

Страница 29: ...From the Sites menu select Users then Login as a different user the PowerMax Remote Programmer Login screen appears 2 In the User Name edit box type the user s name and in the Password edit box type...

Страница 30: ...en the cells and focus on the different parameters then click the left mouse button or press ENTER to edit the cell and change the values PowerMax Remote Programmer includes the following tables Note...

Страница 31: ...phone number the control panel dials Primary Communication Mode The mode used to call a primary telephone number Secondary Phone No When the primary telephone number is engaged the PowerMax Remote Pro...

Страница 32: ...atically arm the system Squawk You can enable or disable the squawk short siren sound option upon arming and disarming Time Format You can adjust the control panel built in clock to show the time in E...

Страница 33: ...Panel In order to perform this procedure collect together A PowerMax control panel which will be used to pass the keyfob identifying information from the keyfob through to the PC and from there to th...

Страница 34: ...mbers This table displays the keypad ordinal number an indication whether the keypad has been enrolled the keypad ID the keypad sync counter and the keypad sync backup The PowerMax Remote Programmer e...

Страница 35: ...PowerMax Control Panel 6 6 2W Keypad Enrollment A 2W two way Keypad is a multi button wireless keypad unit The PowerMax Remote Programmer displays all enrolled 2W Keypads 6 7 Siren Enrollment A siren...

Страница 36: ...uler see 6 15 X 10 Device Settings for further details When the X 10 device settings table is uploaded the PowerMax Remote Programmer will also load the PGM table However this does not occur the other...

Страница 37: ...ed RF level and the RF level received in the last test performed The RF Level columns display the reception levels Strong Good Poor or Not OK When connecting to a particular PowerMax for the first tim...

Страница 38: ...display screen The message may contain up to four rows of text max of 16 characters on each row To activate the screen saver set the screen saver field at the panel definition table to an option othe...

Страница 39: ...direct cable used when the operator specifies the parameters on site Once connected it is possible to perform a number of operations for example uploading site parameters downloading site parameters...

Страница 40: ...s fields do not change Figure 7 2 Communications Mode Serial Port 2 Change the Comm port field as necessary 3 Auto Detection Option Check the Auto detect PowerMax when program starts checkbox so that...

Страница 41: ...by digital communication at a baud rate of 9600 using a Sony Ericsson Modem GM29 mandatory GSM digital callback Dials the GSM unit of the control panel at a baud rate of 9600 The control panel calls...

Страница 42: ...M unit calls back the Sony Ericsson Modem via digital communication at 9600 baud rate The Comm port field becomes disabled and the field value is the communications port where the modem is connected T...

Страница 43: ...aling process again The Try to connect field defines the number of times the dialing process should be initiated steps 1 4 The Wait for 2 4 rings during field defines the time allocated for the two to...

Страница 44: ...ialization commands to be sent by the system 7 Make sure that the string of characters in the Additional initialization commands is correct for the selected modem If not click Select from recommended...

Страница 45: ...pplicable to PowerMax The communication port is defined correctly You enter the correct download code To Login when creating a new site file 1 Select New Site from the Sites menu Or Click New in the S...

Страница 46: ...e Operations While connected to the PowerMax control panel it is possible to perform a number of different operations You can transfer information between the PowerMax Remote Programmer and the contro...

Страница 47: ...lect a table by clicking on a table name in the List of Tables area or by clicking a table tab at the bottom of the screen 2 From the Communications menu select Download Table or Upload Table Note Sel...

Страница 48: ...ect Customize Zone Sensor Names the Customize Zone Sensor Names dialog box appears Figure 7 11 Customize Zone Sensor Names Window 2 In the Current name list select the name you want to change 3 In the...

Страница 49: ...ss From the View menu select Options then click on the Data tab the Data dialog box appears Figure 8 1 Options Data Tab Note The contents of the Data dialog box differs for each PowerMax version 1 Che...

Страница 50: ...ure enables selecting only specific data to be uploaded downloaded in connection with the PowerMax control panel This saves significant time in uploading downloading data 1 Check the Enable customizin...

Страница 51: ...tware access levels are determined by the PowerMax control panel There are two Download code types as follows Master Download code Installer Download code When performing login using the download code...

Страница 52: ...and is assigned an Installer privilege Special cases A Master and Installer as the same Download Code The PowerMax control panel always confirms whether the download code is Master or Installer In the...

Страница 53: ...n by modifying all the Master download codes When the installer will try to perform login with the old master download code it will be rejected The installer will be obliged to use his Installer downl...

Страница 54: ...Remote Programmer account comprises of 12 tables You can generate a report including information about some or all of these details After you specify which details you require in the report PowerMax...

Страница 55: ...ifferent details of the report before you print it Note Every report automatically includes details from the Client Description screen The Print Preview toolbar enables you to do the following Print P...

Страница 56: ...e paper source 5 Specify the orientation of the paper 6 Click OK To Print a Report 1 From the Sites menu select Print PowerMax Remote Programmer displays the Print screen or click the Reports button o...

Страница 57: ...Changing the Color The colors of the Table Details are defined according to the following settings Table zebra color Defines the color of every other line in each table This makes it easier for the us...

Страница 58: ...cover the entire screen Last column stretched The last column in the table reaches the right side of the screen however wide the contents of the column Additional column An additional column is added...

Страница 59: ...File Naming This section provides you with the option for making compulsory the inclusion of the account number in the file name To Enable the Account Number in the File Name Feature 1 In the File Na...

Страница 60: ...conflict A2 Check whether you have the correct Com port and IRQ settings in your software and or in the Windows Control Panel Also verify that there are no conflicts with other devices B Failure to c...

Страница 61: ...nection of the RS 232 cable C2 The PowerMax is not set to the installer mode C2 Set the PowerMax to the installer mode C3 You may have a definition conflict in the OPTIONS menu Communications settings...

Страница 62: ...e failed to restart your computer when prompted to do so at the end of installation E1 Restart your computer and run the program again F After installing the software you see only the Installer code a...

Страница 63: ...ce some characters may not appear correctly in the chosen language This may require changing the language settings Changing Language Settings in Windows 2000 1 From Start Settings Control Panel double...

Страница 64: ...e computer Windows XP 1 From Start Settings Control Panel double click Regional and Language Options The Regional and Language Options dialog box appears Figure A 3 Regional and Language Options Windo...

Страница 65: ...load Code 4 4 4 5 E Edit Menu 3 1 Event Log Screen 6 8 Exiting PowerMax Remote Programmer 2 6 G GSM Communication 7 3 H Hardware Software requirements 2 1 Help Menu 3 3 I Installation general 2 1 mode...

Страница 66: ...e Information Screen 6 2 Sites copying 4 8 creating new 4 2 deleting 4 8 displaying editing 4 7 displaying list of 4 1 exiting window 4 8 menu 3 1 saving existing 4 7 saving new 4 7 window 4 1 Softwar...

Страница 67: ...dentification 12 1 serial port communication failure 12 2 U Upload all site parameters 7 8 table 7 9 User add 5 1 change password 5 2 codes screen 6 3 delete 5 1 login as different 5 2 settings screen...

Страница 68: ...ILTON KEYNES MK10 0BZ TEL 0870 7300800 FAX 0870 7300801 PRODUCT SUPPORT 0870 7300830 VISONIC GmbH D A CH KIRCHFELDSTR 118 D 40215 D SSELDORF TEL 49 0 211 600696 0 FAX 49 0 211 600696 19 PHONE 0870 730...

Отзывы: